| MIATA BUILD |
|
|
 | |
January 18, 2007 - A new beginning.
The original Targa Miata effort started about a year ago. We had a car to build, and it turned out to have been badly wrecked in the past. The replacement chassis had some minor damage but we got stalled with other projects. We have been collecting parts and making plans though.
It's now about 8 months until the start of the event and we're primed for some serious work. We have a clean chassis to use for the build, a nice work area and a pile of what looks like random parts to most people.
So buckle up, it's going to be a fun ride.
entry 1 |
| |
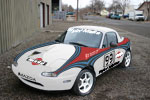 | January 18, 2007 - Here's an artistic rendering of the car.
Okay, it's a photoshop job. But it's what we're planning for a paint scheme. Both Eric and I are big fans of the classic Martini livery so we've decided to make a version of it for ourselves. There is no standard Martini paint job anyhow, they were always designed to suit the car.
Of course, we have a little way to go before we can actually do this, but it's our inspiration.
entry 2 - tags: Martini |
| |
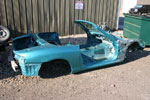
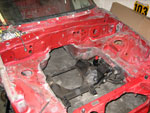
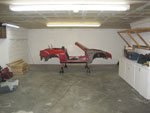 | January 18, 2007 - Here's our raw material.
The chassis is a 1994 R package car that had been destined for a rotary swap. For one reason or another, that never happened. But the owner of the car did strip the whole thing down as far as possible and power wash it. He even seam-welded the chassis. Even better, it's never been damaged. It's a perfect start for us.
entry 3 - tags: stiffening |
| |
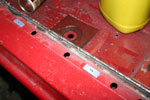 | January 18, 2007 - The seam welding makes the car noticeably stiffer.
If you stand inside the car and try to flex the windshield frame, it will move on a normal Miata. On this shell with the welding, that doesn't happen. Of course our roll cage will make the car even stiffer, but this is an easy upgrade at this point.
entry 4 - tags: stiffening |
| |
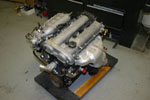 | March 19, 2006 - The engine has been obtained.
It will be torn apart for rebuilding with the new internals. It's from a 1999 Miata, equipped with a better cylinder head than the one originally used on our 1994.
entry 5 - tags: engine |
| |
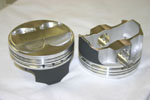 | March 15, 2006 - Sexy pistons.
Only 260 grams each, 11.5:1 compression and with a ridiculously small compression height. This engine is going to sing.
entry 6 - tags: engine |
| |
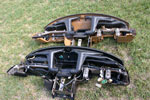 | July 5, 2006 - The 1991 dash (tan) is significantly lighter than the 1994 dash.
It's difficult to say why. The only big difference between the two appears to be the thickness of the plastic.
entry 7 - tags: weight loss, interchange |
| |
 | July 5, 2006 - A disassembled 1991 dash without wiring harness.
The black ducts are for the HVAC system. I'll retain what we need for defrosting and strip out the rest. Current weight is 20.8 lbs.
entry 8 - tags: weight loss |
| |
 | July 5, 2006 - The modified lightweight dash.
A bilge blower will probably be used for the defrosting. The metal bracing was trimmed back somewhat. Interestingly, the 1991 dash has a reinforced section where the steering column bolts in while the 1994 dash did not. The welding on some of these joints on the 1991 dash are done by hand and it looks as if there was some experimentation going on.
The current weight is 14.8 lbs, a 6 lb savings. I've been eying a few more spots where some weight can come out, but I need to make sure we have room to mount everything we need first.
entry 9 - tags: weight loss |
| |
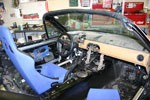 | July 6, 2006 - The trimmed dash in the car along with a seat and wheel.
The steel supports in the center will be used to mount intercoms and navigation gear. Or they'll be cut out completely. Sharp eyes will notice that the car has somehow become black. Well, yes. That was one of the previous chassis.
entry 10 - tags: weight loss |
| |
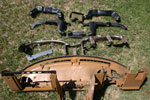
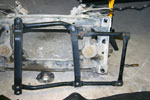 | July 18, 2006 - Many of the braces from the 2003 will be added to our car.
It will make things heavier, but we want the car to be as strong as possible - particularly since we expect to make more horsepower than even the turbocharged 2004 Mazdaspeed special edition. We're going to make the bracing do double duty as impact protection. This is a rear subframe brace.
entry 11 - tags: interchange, stiffening |
| |
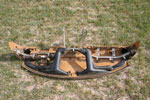
 | July 18, 2006 - A large number of our parts are coming from salvage vehicles.
Here's one of them. Seeing the chassis in this sort of condition makes it easy to spot the structural improvements made over the years.
entry 12 - tags: stiffening |
| |
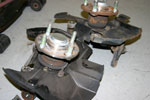 | July 19, 2006 - These two front uprights are the same except for one thing - the one in the foreground has an ABS sensor.
Our car won't have ABS, but we're going to use the upright with the sensor because it may come in handy for our rally computer. The front wheels don't spin so they should be more accurate in reading distance and speed.
entry 13 - tags: computer |
| |
August 8, 2006 - Eric found a pair of used Peltor rally helmets along with an intercom.
By a quirk of fate, they fit us perfectly. As an even bigger bonus, they have competed in the Targa before in a Miata. We're quite excited about this.
entry 14 - tags: safety, intercom |
| |
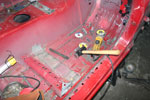
 | January 24, 2007 - There hasn't been any construction done on the car in the past few days, but I've still been busy.
I'm talking to a few suspension specialists about options. The JICs (the gold ones in the picture) are an excellent track option, but the spring rates and damping might be a little aggressive for the Targa. We have some new shocks coming in from some other companies with excellent reputations but are new to the Miata, and a Miata specialist is also going to be revalving some stock Bilsteins for us to evaluate. This will be interesting, I'm trying to come up with a good test procedure for them.
entry 15 - tags: suspension |
| |
 | January 25, 2007 - The car is being prepped for paintwork.
Every last nut and bolt is being stripped off. I'm also going to grind off some old unused brackets. The body is almost ready but the doors need significant work.
entry 16 - tags: paint |
| |
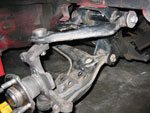 | January 25, 2007 - In order to move the car for paintwork, I installed a rudimentary suspension.
These control arms were used because they're already fitted with polyurethane bushings - but it looks like the right front lower arm is deformed. That's not good. We'll replace that. This is where our association with Flyin' Miata comes in very handy, as we have access to a wide variety of used parts.
entry 17 - tags: suspension |
| |
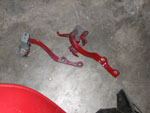 | January 25, 2007 - The car is on a major weight loss program.
These are the hinges for the trunklid. The lid will be cut down and then attached with pins. I'm going through the car front to back looking for little places to save weight. There's more to come out of the dashboard as well despite the previous work.
entry 18 - tags: weight loss |
| |
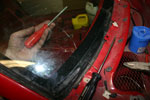 | January 28, 2007 - In order to make it easier to weld the cage in and paint the car, I removed the windshield.
This is always a little unnerving because it's easy to break the windshield and it's hard work. This one is a fairly good piece of glass (barring a bit of weld spatter from the previous owner). Mazda recommends piano wire on a couple of handles, so I used safety wire on a couple of screwdrivers. In conjunction with some razor blades, it did the job.
I then got in trouble for stashing the windshield in the spare bedroom. This is apparently a no-no. The single life made it easier to work on cars!
entry 19 |
| |
 | January 28, 2007 - It's chopping time on the car.
I cut out this folded steel bracket. It's the original seat mount. In order to maintain both a low seating position and some adjustability, I decided to remove it. I'll bolt the seat rails directly to the floor. For those concerned about the strength implications, the car will have reinforced floorboards and frame rails as well as the full cage. I might put a small cross bar in front of the seats but I don't anticipate there to be any need.
entry 20 - tags: weight loss, ergonomics |
| |

 THE DIARY