| MIATA BUILD |
|
|
 | | August 8, 2006 - Eric found a pair of used Peltor rally helmets along with an intercom.
By a quirk of fate, they fit us perfectly. As an even bigger bonus, they have competed in the Targa before in a Miata. We're quite excited about this.
entry 14 - tags: safety, intercom | | | 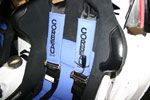 | May 12, 2007 - A little more ergonomic work.
I need to find a place to stash our intercom. The harness pads are a perfect place to run the wires.
Of course, I also spent some time in the driver's seat playing with the controls. The clutch pedal feels good with nice weighting, just like the twin to this unit that I've driven on the street. Given that it's a prototype unit that's no guarantee! My tall torso still puts my head awfully close to the roof of the car, but unless I build in some sort of Gurney GT-40-esque bump there's not much I can do about that. The Peltor helmets are pretty thick.
entry 171 - tags: ergonomics, intercom | | | 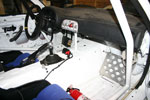 | February 21, 2008 - I spent a few minutes setting an approximate ride height for the car.
Nothing too precise or difficult, but it gets me into the range I want instead of being slammed down low. The driver's rear was down at around 12" (measured from the hub to the fender) so I lifted it up to 13.25". This is a ride height that works pretty well on a street-driven Miata and I think it'll be a good combination of ground clearance and CG location for the Targa car. I'm running 13" in the front. This will be fine-tuned later after the car's up to its final weight with a full load of tools, spare tire and other gear.
I did take a quick spin in the car last night to give the defogging system a test. It worked - if I turned off the fan the window would start to fog up a bit, but flipping it on cleared things up nicely. It wasn't a harsh test, but it was the best I could arrange in our climate.
So, time to install the intercom. First, I need to install the amplifier box itself. This needs to be accessible while driving so I can adjust the volume. It also needs to be accessible so we can easily change batteries - assuming I don't hard-wire it into the car. So I put it in front of the shifter, then spent a bit of time making sure the wires were properly corralled. Everything is on rivnuts so I can quickly pull the intercom (a Peltor FMT100, by the way) out of the car and install it into another. And because I haven't posted many shots of the cockpit, here's the big view!
entry 410 - tags: suspension, intercom, ergonomics | | | 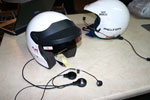 | February 21, 2008 - I tried to locate a Peltor helmet for Janel to match my own.
She wears a size small, and for some reason the small Peltors go for ridiculous sums on eBay when compared to the larger helmets. After trying to win various helmets all over the world, I gave up. She has a G-Force full-face helmet that she uses for track days and finds it very comfortable. We felt an open-face would be better for the race. A quick call to Discovery Parts and this new one was dispatched.
The intercom is a Peltor open-face kit. We stuck with Peltor instead of using something like Terratrip for this because we wanted the best fidelity possible and I felt that sticking with a single brand was best. Besides, this is one Peltor part that's relatively inexpensive.
And yes, Janel has personalised it already with a pink cat.
entry 411 - tags: safety, intercom | | | 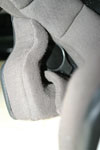 | February 21, 2008 - A happy discovery.
The G-Force helmet has a void to give room for the wearer's ears. The Peltor speakers are the perfect size to fit in this void. I thought I'd be cutting padding to fit these in, but no. They fit well enough that I was able to just stuff them in place so Janel and I could play with the intercom comfortably. While sitting on the couch. This is why we keep the blinds closed at our house.
Foolishness over, I used a bit of Velcro on the back of the speakers to stick them in place. There's even a deep seam between two sections of padding that makes a great wire channel.
entry 412 - tags: intercom | | | 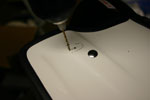 | February 21, 2008 - The microphone required a little more alteration.
A small bracket needed to be bolted to the side of the helmet. Some careful measuring and drilling ensued. Another lucky break, the holes ended up in that same void used by the speakers, right beside the metal bracket that holds the chin strap. It avoided any of the soft padding inside the helmet. It's all too good to be true!
The measurements were accurate, and the holes ended up in exactly the correct place. The supplied bolts (okay, they're machine screws) were just long enough, but not long enough to give me confidence in the threads should the microphone get yanked. So I hunted around and found two more 2.5mm screws out of some Miata application that were the perfect length. So now Janel's helmet has Miata parts. Naturally.
entry 413 - tags: intercom | | | 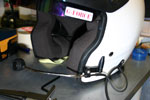 | February 21, 2008 - The final step in headset installation is cable management.
The speaker wire for the far side tucked nicely under the rubber finishing strip that runs around the edge of the fibreglass shell. I added an anchor for the microphone wire as well as the plug that goes to the amplifier. It's easy to forget you're plugged in when you go to get out of the car, and I wanted to avoid pulling half of the headset out of the helmet in this case!
Now that it's all done, I couldn't be happier with the result. Other than two tiny holes for the microphone boom and one slightly larger hole for the wire anchor, the helmet is unmodified. The speakers don't interfere with comfort at all and the sound quality is excellent. Everything went in so easily that you'd almost think this helmet was designed for the purpose at hand. Excellent.
The total cost was only $250, using all new parts. Compare that to $700 for a new Peltor helmet. Granted, the Peltor has better sound isolation but this shouldn't be a problem in our relatively quiet car.
entry 414 - tags: intercom | | |  | March 10, 2008 - What about in the car?
Once I'd roused Janel from the comfort of a warm tow vehicle, we discovered that our concerns about nausea were unfounded. With the rally computer to play with, she was distracted and forgot to get sick. Excellent!
The intercom worked well, allowing me to hear her clearly. She couldn't hear me quite as well - probably because the speakers were further from her ears - but that's a good setup. I did discover how hard it is to concentrate on driving quickly while also carrying on a conversation about how the trip computer works. Once the communication became more one-way, I was able to work better on dealing with the inputs.
For one session, she brought along a book and read it to me. Seems like an odd test, but we didn't have pace notes for the track, you see. Again, no problems with nausea as long as she kept her legs braced and didn't let them flop around. So the track day was a good test then. We learned a few things, that was the goal.
Eric asked for a picture of the whole interior in the mostly-final configuration. Here you go!
entry 432 - tags: testing, skills, computer, intercom | | | 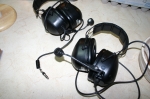 | June 20, 2009 - About 9 months late, we finally have some transit headsets for the car.
They were right near the top of our "things we need for next time list" last September. I think those long days in the car would have been a bit shorter if we'd been able to chat on the transits instead of simply putting in earplugs.
Part of the problem was our super Peltor intercom. Fantastic piece of kit, but the pieces are ridiculously expensive. Around $230 each for transit headsets. In fact, it would be cheaper to buy a separate Terratrip intercom and headsets than it would to buy a pair of Peltor-compatible heatsets from rallylights.com.
But I managed to find the part number of the headsets, and discovered that they're also used in the military. Sure, they have a 30 foot non-coiled cord and some weird military plug on the end, but you can buy new surplus ones for $200 a pair shipped. Some hunting around also unearthed the Nexus plug used by Peltor, and Aircraft Spruce provided a pair of those.
So, all I needed to do was figure out the wiring for the plug. Peltor was not interested in helping at all so I was on my own. The microphones on the helmets actually have a small connector on them, so it was a fairly easy job to use that to figure out that the two pins on the end of the Nexus connector were for the microphone and the next two were for the speakers. Chop the cable down, do a bit of careful wirestripping and soldering and voila! They work!
After a test drive, Janel announced that we really really really should have had these on the race. They work beautifully.
Now, for anyone who wants to duplicate the job, here's the parts list.
Peltor MT7H79A headsets (sourced from eBay)
Nexus TP-120 plugs (part 11-00699 from Aircraft Spruce
wiring:
pin 1 (tip): black
pin 2: yellow
pin 3: red
pin 4: white
Pins 1 and 2 can be interchanged, there's no polarity that matters. Same with 3 and 4.
So there you go. That's how you make a set of Peltor transit headsets for half the price of new ones.
entry 685 - tags: intercom | | | 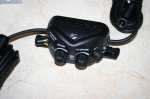 | July 6, 2011 - A new intercom for the Targa car.
This one, a Peltor FMT120, has a few features the old FMT100 didn't. Aux in (for a phone), separate volume controls, etc. Most importantly, it has an audio out. When combined with the new video camera that arrived last week, this means we'll be able to have Janel's instructions as audio for the in-car footage instead of just engine noise. That should make it a lot more interesting to watch.
The old intercom will go into Nancy, the sister car on the team.
Progress on the car should resume shortly. Lots of fine-tuning to do.
entry 868 - tags: intercom, video | | | 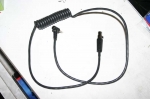 | July 30, 2011 - I've been waiting for this for a while.
It's a cable that will let me plug an iPod or iPhone into the Peltor FMT120 intercom. This cable isn't available in North America, despite the fact that all the resellers of the FMT120 use the same product description that includes this feature. This says something about the size of the Peltor rally intercom market in North America, I suspect. I had to bring this cable in from Demon Tweaks in the UK, which wasn't cheap.
Still, it'll let Janel and I make phone calls using the intercom as well as listen to music on long transits. If you look at the cable as a stereo system, it was a pretty good deal! Less than an iPod interface for our BMW, for example.
Since this thing can't be obtained at reasonable cost in North America, I'm going to reverse-engineer it so anyone can duplicate it - just as I did with the transit headsets a while back.
I've identified the plug that goes into the intercom as a 5-pin mini XLR, aka a Switchcraft TA5FL. Prices vary online, but Rugged Radios has them for under $6. The other end of the cable is the usual 1/8" 4-pole iPhone/iPod connector. The easy way to start would be with an iPhone cable for something else such as a $12 "microphone extension cable" and just replace the plug at the other end. You could also hook up another kind of phone if you know the wiring of the phone connection.
The Apple end works as such: the tip is the left audio out. The first ring is the right audio out, the second ring is the common/ground and the base ring is the microphone. On the Peltor end, the pins are numbered 1-5.
Pin 1: ground (second ring on Apple plug)
Pin 2: ground (second ring on Apple plug)
Pin 3: audio from phone (tip and first ring on Apple plug)
Pin 4: microphone (base on Apple plug)
Pin 5: microphone (base on Apple plug)
Happy soldering!
entry 892 - tags: peltor, intercom | | |
|

 THE DIARY