| MIATA BUILD |
|
|
 | |
 | January 28, 2007 - Time to lighten the doors.
I recently saw a picture of a Miata with every removable panel made out of carbon fibre. The owner claims the doors are 9 lbs each. We don't have that budget, but this door has been dropped from 32.45 to 24.35 lbs. Enough structure is being left in place to allow the retention of a manual window crank and windows.
It's not as extreme as I've gone in the past. For a previous race car I helped build at Flyin' Miata, was built a door that wouldn't support its own weight! That one was about 14 lbs. However, we are required to run the factory inner door panels for the Targa and we also want windows for the Newfoundland weather.
entry 21 - tags: weight loss |
| |
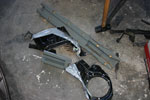 | January 28, 2007 - The bits and pieces that came out of the door.
The side impact beam is the heaviest piece. Switching from power to manual windows also saves over a pound.
entry 22 - tags: weight loss |
| |
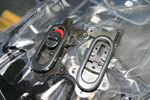 | January 28, 2007 - Extreme lightening.
In order to shave precious ounces, I removed the plastic locking levers from the door handles. Actually, I really did it to keep them from rattling. We won't have locks on the doors because 1) we won't need some of the inner door structure and 2) we don't actually have the keys to these locks.
entry 23 - tags: weight loss |
| |
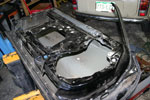
 | January 29, 2007 - A test fit of the dashboard substructure.
It's a little shocking how light all this is. I did remove one of the support braces in the middle of the beam, and this may not have been a great idea. I've spent a fair bit of time on track with a car with a similar dashboard and never noticed any steering column movement, but it is possible to flex the beam slightly by hand if you yank on it. Perhaps one vertical brace would be a good idea.
It would also be a good idea to clean up the footwell of the car!
entry 24 - tags: ergonomics, weight loss |
| |
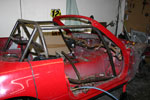 | January 29, 2007 - The cage is almost ready to go in.
This was provided by Hard Dog Fabrication and is a fantastic piece of work. It drops right in to place and has all the fishmouthed joints finished for us. We'll go a little further than the usual Spec Miata installation and tie it to the windshield frame as well.
entry 25 - tags: safety, sponsors |
| |
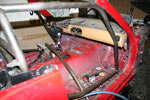 | January 29, 2007 - A hurdle to overcome.
The cage was designed to be installed on a car with the dashboard in place, it seems. I can install the structure underneath, but the plastic covering (which seems to weigh about a pound!) won't go in without more surgery. Since we want to paint the cage along with the body of the car, I do need to be able to pull and replace the dash somehow. There's a way, I just have to figure out the best way to do it.
entry 26 - tags: safety, weight loss |
| |
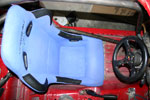 | January 30, 2007 - As part of checking the ergonomics, I test-fitted a seat with the cage.
It's a bit of a tight squeeze unless I reshape the transmission tunnel very slightly. We're still investigating various seats as well. Most Spec racers use aluminum seats, but they don't have the comfort we want for a week-long race.
entry 27 - tags: ergonomics, seats |
| |
 | January 31, 2007 - Just in case anyone thinks the Targa Miata is being built out of shiny new parts on an unlimited budget...
this gauge cover came out of a car that was wrecked in 1998 and sat outdoors for five years afterwards. That's not dust, that's crust. Most of the non-essential parts on the car are scavenged.
entry 28 |
| |
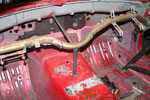
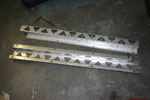 | January 31, 2007 - A bit of reinforcement for the chassis.
This frame rail reinforcement kit is from our sponsor Flyin' Miata. It slips over the frame rails and provides a surprising improvement in stiffness of the chassis. An added bonus for us - beyond the fact that our 200,000+ mile chassis could use all the help it can get - is that it also armors the underside of the car somewhat and allows us to use the entire length of the frame rail as a jacking point. It's an extra 14.5 lbs, but worthwhile. At least the weight is very low and centered between the wheels!
entry 29 - tags: sponsors, stiffening |
| |
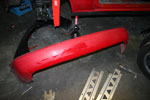 | January 31, 2007 - The rear bumper cover has been cut up fairly drastically.
Why? Because it will offer less aerodynamic drag. It will allow us to remove some substructure and weight. And also because the car that donated the rear bumper cover had a center exit exhaust, so it had a goofy cut right in the middle of it!
entry 30 - tags: weight loss |
| |
February 1, 2007 - Progress continues on preparing the body panels.
The rear bumper supports will be cut down shortly to knock a few pounds off the very back of the car. The passenger's door has been cut up to match the driver's as well. The cage will be welded up this weekend.
entry 31 |
| |
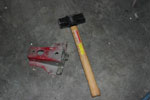 | February 4, 2007 - Now that the bumper cover has been cut down, I've removed the appropriate bits of the car as well.
This frame horn exists primarily to support the tie-down hooks used when the Miata is transported from Japan. There are two of them in the back and they're surprisingly hefty. Well, they were.
entry 32 - tags: weight loss |
| |
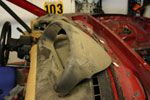
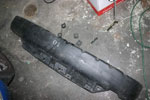 | February 4, 2007 - Behind the rear bumper skin is this large piece of black plastic.
It's pretty light considering, but all we really need are the four small squares of plastic seen sitting on the floor beside it.
entry 33 - tags: weight loss |
| |
 | February 4, 2007 - The dashboard substructure has been beefed up a touch.
I decided than an extra pound or so was worth it for an extremely solidly mounted steering column. There's also no way to remove the dash structure any more, but that's not bothering anyone. One thing that does become obvious when trying to lighten a Miata is just how light Mazda managed to make it in the first place. There aren't any easy places to remove large amounts of weight. The similarly-sized Honda S2000 can drop a significant amount of mass very easily.
entry 34 - tags: weight loss |
| |
 | February 4, 2007 - Time to weld in the cage.
Mark Wingerter from Flyin' Miata came by the garage to handle the welding.
entry 35 - tags: safety |
| |
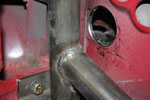 | February 4, 2007 - In order for Mark to get full access to some of the tubes, I cut some holes in the body of the car.
It worked quite nicely, allowing him to reach all the way around this awkward joint. The Hard Dog bar is available as a bolt-together design that avoids this kind of problem, but I prefer the weld-in solution better for strength and weight.
entry 36 - tags: safety |
| |
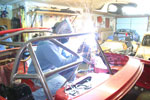
 | February 4, 2007 - About 3 minutes worth of work was required to bolt in the bar once all the welding was done.
It's a lot easier to install a cage in a completely stripped car than a street Miata, that's for sure! The quality of the welding by Hard Dog Fabrication had us all in awe.
entry 37 - tags: safety |
| |
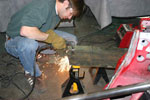 | February 4, 2007 - Brandon Fitch of Flyin' Miata was also on hand to help out with the cage construction.
He's cutting out some gussets to allow us to tie the cage to the windshield frame for maximum stiffness. Plasma cutters are fun!
entry 38 - tags: safety, stiffness |
| |
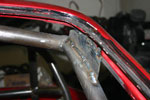 | February 4, 2007 - One of the gussets in place.
Before these were welded in, the windshield frame could be moved slightly independently of the cage. Now, there's no chance.
entry 39 - tags: safety, stiffness |
| |
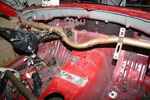
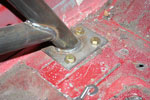
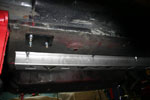 | February 4, 2007 - The frame rail reinforcements were bolted in.
You can also see the backing plate for the cage. Between the gusseted cage, the seam welding and these braces the Miata is solid as a rock. The chassis of the car is now ready for paint.
entry 40 - tags: stiffness |
| |

 THE DIARY