| MIATA BUILD |
|
|
 | | 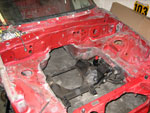 | January 25, 2007 - The car is being prepped for paintwork.
Every last nut and bolt is being stripped off. I'm also going to grind off some old unused brackets. The body is almost ready but the doors need significant work.
entry 16 - tags: paint | | | 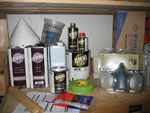 | February 6, 2007 - Mmmm, painting toys.
Now that the chassis is prepared (and most of the body panels are close), it's time to turn my attention to making the car look like the cool pictures. And this means it's time to learn how to paint.
Luckily, the panels already have decent factory paint with no bodywork so the preparation is easy - just some sanding to scuff the surface. And the fact that there's nothing to mask makes it even easier. That's good, I'll likely need all the help we can get.
In other news, we've found out that while we have to run inner door panels, we don't have to run factory panels. We might still do that as the factory parts are pretty light - but the ones from our donor cars are pretty badly damaged.
entry 41 - tags: paint | | | 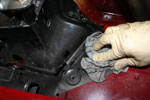 | February 10, 2007 - It's time to start working on the paint job.
First step, make sure the car is clean. It's amazing how many little crevices there are in a modern car. After all, it's essentially fabricated out of sheet steel that's been folded and welded together in a very complex shape. Just how complex becomes clear as you try to get every little corner clean...
entry 45 - tags: paint | | |  | February 10, 2007 - Now that the body is clean, it's time to go over it again with wax and grease remover.
Despite the careful cleaning, an extraordinary amount of grime comes off the car.
By the way, I'm learning as I go with this painting gig. If there are any experienced painters out there who see me doing something wrong, don't hesitate to offer advice!
entry 46 - tags: paint | | | 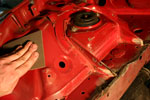 | February 10, 2007 - The new paint won't stick to nice shiny baked-on factory paint - which is what we have here - so it's time to scuff it up.
On the interior paint, we're using scotchbrite pads. For the exterior, it's 600 grit sandpaper.
entry 47 - tags: paint | | | 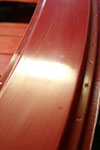 | February 10, 2007 - The paint's been scuffed.
Now all I have to do is the final cleaning (again!).
entry 48 - tags: paint | | | 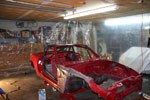 | February 16, 2007 - In the temporary paint booth.
Some inexpensive plastic sheeting is used to contain the overspray and the fumes. The floor has been swept, vacuumed and mopped and still the plastic picks up dust with static electricity. Oh well, maybe it will hold it instead of letting it into the air. The car's awaiting one final degrease and then it's ready to start shooting paint!
The goal is to have the chassis painted by the end of the weekend. The other body parts will be done later, as it's the chassis that's holding everything else up at this point.
entry 57 - tags: paint | | | 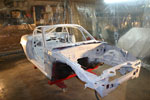 | February 17, 2007 - Tah-daaah!
A white Miata. Okay, it's just the primer coat and there's still a whole lot to learn before we can lay down a good paint job, but this is a major hurdle. Tomorrow the top coat goes on.
I'm using HVLP equipment to spray - the lack of overspray is dramatic. This is good.
entry 58 - tags: paint | | | 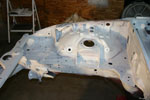 | February 17, 2007 - This is the first car I've painted.
At first, I figured that changing the color of a complete car was a tough way to start - but really, it's a pretty good one. I can easily see where I've missed a spot or where coverage is uneven. Also, since the car is totally stripped, there are very few exterior panels where the finish is important. Most of the work is figuring out how to get paint into all the nooks and crannies. The engine bay is a pain.
entry 59 - tags: paint | | | 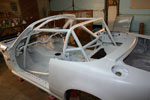 | February 17, 2007 - While the engine bay was a pain to paint, the roll cage was truly difficult.
First, I kept painting myself into a corner and making it difficult to access the next tricky spot. Then there's the problem of trying to get all sides of all tubes. It's not going to be fun shooting the final coat on this. Still, it looks just as cool as I'd hoped it would, as if the whole car was just dipped in a big vat of paint.
entry 60 - tags: paint | | |  | February 17, 2007 - The biggest problem is the paint on the rear fenders.
It's, umm, textured. Obviously more time learning the spray gun is required, and I've had some good advice on solving the problem. I'll sand this down before the top coat goes on. Oh well, if I didn't want to learn I would have paid someone else to do the work instead.
entry 61 - tags: paint | | | 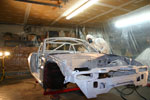 | February 18, 2007 - Hi Mom!
entry 62 - tags: paint | | | 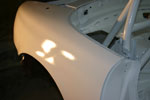 | February 18, 2007 - The finish coat is on now.
It's much glossier than the primer although of course it didn't cover up the orange peel. I didn't bother sanding it down.
That peel came from a total misunderstanding of how to set up the paint gun. I've got that sorted out now, only to discover that my grades in high school chemistry don't apply to the real world - I forgot to mix in the reducer! Doofus. This meant the paint went on fairly thick. Exactly what it means to the finish I'll find out.
It's not a big deal, however. There are only two exterior panels on the chassis, the two rear fenders. When it comes time to paint the other body panels, I'll take the lessons learned here and apply them. I'll also sand down these rear fenders and shoot them again. Of course, they'll be covered in stripes and sponsor stickers anyhow so it's not a big deal. In the sunlight, being white, the surface imperfections won't show up all that much.
And the most important thing is that I can now start bolting parts on to the chassis and building it all up. From here on I'm in familiar territory - I might not have built a rally Miata before, but I've built cars!
entry 63 - tags: paint | | |  | February 18, 2007 - The plastic I hung for the "paint booth" had a useful secondary purpose - the static charge on the plastic trapped all the overspray dust!
If I wanted to sound high-tech, I'd say that I painted the car in a custom-made booth with heat lamps (those halogens are hot!) and electrostatic dust traps.
A happy side note is that almost no fumes ended up in the house. This is good for domestic peace, as that windshield is still in the spare bedroom...
entry 64 - tags: paint | | | 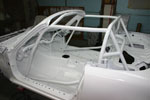 | February 19, 2007 - While looking at the pictures of the painting, I realized I hadn't put up any shots of the overall car with the final coat.
It's a very white car. I have a few factory "Crystal White" body parts to compare it with and this one is much brighter. Are the old (repainted) parts the wrong color, or did the paint shop give me something a little extra spicy? It's supposed to be the standard color.
There's one good way to tell - I have a factory white 1991 hardtop that's in as-new condition. I'll have to see how it matches the car.
entry 66 - tags: paint | | | 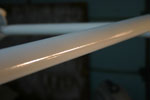 | February 19, 2007 - The best paint finish on the car is on the roll bar.
This is probably because I had my little detail gun set up better than the larger panel gun at first, so the tight areas got a better primer coat. Or it could be a reflection of how much time I spent on each section! Regardless of my talk earlier, the paint on the fenders isn't all that much worse than some other paint jobs that I've paid for.
For those who are wondering, the materials for the paint job came out to about $230. This includes a gallon of reducer (which is, umm, untouched), solvent for cleanup (lots left), the mask (read up on isocyanates to freak yourself out), lint-free towels, 2 quarts of paint (half gone) along with hardener and a quart of primer (all gone) with its hardener. I think that's about it. The guns were a couple of inexpensive Harbor Freight units that had received good reviews. The compressor was a 60 gallon 3.2hp Porter Cable that can move about 14 scfm at 40 psi and is completely unfazed by the amount of air used for the painting.
entry 67 - tags: paint | | |  | February 19, 2007 - If you paint with HVLP, this is the overspray you can expect.
That's from the engine bay and I think it's mostly primer from when I was trying to figure out how to lay the stuff down. I used the engine bay as my primary practice area.
entry 68 - tags: paint | | | 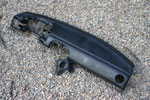 | May 12, 2007 - While waiting for the battery to charge, I busied myself with other things.
The tan and crusty dashboard had a date with the hose, then I sprayed it with flat black paint. It's only partially dry here, but even when dry it's hard to get a uniformly flat surface. There are pockets of gloss where there's a bit more paint buildup. I'll try a couple more coats and see if I can mist the paint on well enough.
entry 170 - tags: paint | | | 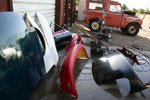 | May 28, 2007 - Bath time!
The body panels came outside for a date with the pressure washer. There are a lot of parts left to install to put the body together! They'll all go on quickly enough - that rear bumper will take about 3 minutes - but it's a bit daunting to see them all arrayed in the driveway like this.
The pressure washer (I love this thing) did a good job of removing all the various grime, oil and gunk from the used parts. Some are very used.
For those who are curious, we have Montego Blue Mica, Brilliant Black, Crystal White and Classic Red represented here. There's also a Silverstone Metallic trunklid in the garage but it's not going to be used.
entry 185 - tags: paint | | | 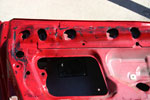 | May 28, 2007 - The worst part of the cleaning - the gunk on the inside of the doors.
Miata owners know what I'm talking about here. It turns out that WD-40 does a real number on this stuff, diluting it slightly and defeating its tenacity. This is the result of a bit of WD-40 and rag work. The pressure washer took care of much of the rest, and the pre-paint clean should finish the job.
Those with sharp eyes will note that the doors that were gutted before were black and this one is not. It was pointed out to me that the particular Spec Miata cage we're using does not have a substitute for the factory door bars. Since I'd cut the door bars out of the other, I'd left Eric and myself without much in the way of side impact protection. That's not a smart thing to do, so a new set of doors was substituted and left whole.
entry 186 - tags: paint, safety | | | June 4, 2007 - My house is conspiring against me.
My "Targa time" has been eaten up by a recalcitrant irrigation system (if you think of electronic sprinkler valves as fuel injectors it's all quite obvious, although I do prefer that fuel injectors aren't buried in the dirt) and some interior plumbing problems. Regardless, I've managed to make some progress. The remaining body panels are now scuffed up and clean, so they just need a final wipe down and then it's time to paint. I'm hoping to have the primer on them tonight.
entry 188 - tags: paint | | |  | June 5, 2007 - Primer time!
I don't have enough stands for all the parts, so I'm having to do this in stages. However, most of the body panels have primer on at least one side now. I'll finish the rest tonight.
Thanks to better gun setup, I'm seeing a far superior finish than on the car body. The larger smooth surfaces of the body panels - as opposed to engine bay crevices and roll cage - make it a lot easier to practice, and I've learned just how critical gun distance is. I've also learned it's really hard to tell where you've applied white primer to white panels!
entry 189 - tags: paint | | |  | June 6, 2007 - Okay, that's it for primer.
Tomorrow I'll break out the top coat and then it will be time to start assembling great big chunks of car!
I'm really enjoying the painting. Once you get the paint gun in hand, progress is very visible and very rapid. I wouldn't want to do it for a living, but it makes a great contrast to wiring!
entry 190 - tags: paint | | |  | June 8, 2007 - The painting is done.
Well, almost. I forgot to do the headlight covers and the gas cap cover. But those can wait.
The end result was pretty good. I did the top coats in two sessions. The parts in the second session (the big obvious surfaces such as the top, hood and trunk) didn't turn out that well. I think I laid down too thin a layer of paint and it didn't get glossy. You can see on the hardtop that the edges are quite nice, but the top is just dull. The edges got about twice as much paint as I hit them first to make sure they got full coverage, then they got covered in the sweeps for the body of the part.
It's not a big problem. This picture exaggerates it and it's under fluorescent lights, always the toughest test. In the sun and at speed, I think it will look just fine.
entry 191 - tags: paint | | |  | June 8, 2007 - The front fenders turned out very nicely.
You can tell they weren't factory fresh fenders to start with - they have a little character - but at least the paint's pretty smooth.
The white I used is supposed to be the white from 1990-93 Miatas. However, I have an original 1990 white hardtop in the garage and it's not as blinding as this stuff. Looking at the mix, my paint is almost pure base with just a touch of blue and a tiny bit of black. No wonder it's so bright!
entry 192 - tags: paint | | |  | June 8, 2007 - Naturally, as soon as the paint was dry enough I had to put some panels on the car.
They're not bolted in place yet, but it's a start!
You can see the 2005 Mazdaspeed MX-5 turbo exhaust protruding beyond the bumper. Those cars have a deeper rear bumper. I'll cut the pipe down a bit, it's goofy looking.
I never thought I'd get so excited about seeing a white Miata.
entry 193 - tags: paint, exhaust, interchange | | | 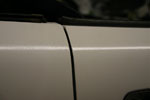 | June 10, 2007 - The door (right) and the rear fender.
In other words, my original paint and my new and improved job. It's good to see I'm learning something!
entry 196 - tags: paint | | |  | June 10, 2007 - The hood has been pinned as well.
Notice that oddly colored headlight cover? Not the missing one, the one on the driver's side. That's the original 1990 Miata white. I like mine a whole lot better.
The body of the car is complete, with the exception of the headlight covers, the gas cap lid and the hardtop. The latter only needs a window. Before I install the windshield again, I also need to install the dash. That means bundling up a bunch of wires, but I'm not 100% sure they all work. I'll have to do something before test driving! Or I could just go without a windshield...
entry 200 - tags: weight loss, paint | | | 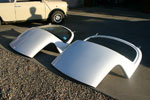 | June 16, 2007 - A comparison between my white paint (foreground) and Mazda's version.
There is a slight difference - but that's fine with me. I like mine better! My only concern is if I have to touch up the car. There's a fair bit of paint left, but not quite enough for major work.
Oh well.
entry 212 - tags: paint | | |  | July 5, 2007 - I stopped by the paint store (they love it when I drop in, it's good for their bottom line) and picked up some plastic tape and masking paper.
The plastic tape should let me do nice smooth curves with sharp edges, just what I need for laying out my stripes. I'm a bit worried about this, it would be easy to end up with a goofy looking setup if I let my line widths vary the wrong way.
entry 236 - tags: paint | | | 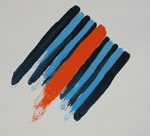 | July 7, 2007 - We have paint!
Okay, it's not on the car. But still, I do have the magic stuff to make my stripes happen.
I chose the Lamborghini "Arancio Diablo" because I wasn't having any luck finding Opel 512. But it's orange. Really orange as you can see in the picture. I expected an orange-red, but there's little or no red here.
This has me conflicted.
entry 238 - tags: paint, Martini | | | July 27, 2007 - I'm going backwards!
In order to paint the stripes, I need to strip off some parts of the car. A couple of pairs of hood pins, the door handles, mirrors, taillights, various trim pieces - I'm starting to pull it off now. Now I just have to finalise the shape of the stripes on the nose and I'm good to go.
entry 248 - tags: paint, Martini | | |  | July 29, 2007 - It's masking time.
This is an ambitious job for someone who's only just learned how to spray paint. But that's how you learn, right?
For masking the stripes, I'm using plastic "fine line" tape. It bends and curves much easier than masking tape and should leave a nice sharp edge. I sure hope so, I'd hate to have to do this again.
entry 249 - tags: paint, Martini | | | 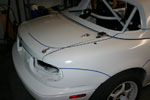 | July 29, 2007 - The fine line tape makes it very easy to lay down nice curves.
I've reworked almost every section of the car slightly, and pulled the tape up over and over to get a slightly better arc. I'm very happy with how the rear's turned out, but the front was still bugging me.
entry 250 - tags: paint, Martini | | | 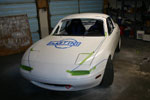 | July 29, 2007 - The lateral stripe across the nose had never worked to my satisfaction.
The original mockup had the stripes originating from the turn signal lens, so I tried going back to that. Think Lancia S4 instead of Porsche 911 for the source.
It took a whole lot of trial and error, but finally I stumbled across a look that I think is a big improvement. I was careful to have the stripe width constantly increasing, that was trickier than it sounds given the compound curves of the nose.
With both sides taped up like this, there was no question. I'd found the shape.
This picture shows the detail masking starting up. I spent a lot of time underhood and inside door jambs making sure I didn't get ugly overspray. I probably still will, but at least I tried.
entry 251 - tags: paint, Martini | | |  | July 29, 2007 - The big masking job begins.
It's tricky masking a convertible with a roll cage and no glass. The masking paper I bought from the paint store makes the job a lot easier than it could be. I thought about using plastic but I'm pretty sure this was the right decision.
One thing I did realize is that the hardtop complicates things. The top covers some of the rear fender when it's installed, so I have to paint the stripes on the topless car. But that's going to make it very difficult to align the stripes properly on the hardtop, and it's pretty obvious I can't pop it on and off when the car is masked. So I'll paint stripes on the car and the base color on the hardtop. Then I'll unmask the car, install the hardtop, mask off the remaining stripes (cyan and red) and spray it then. It means five painting sessions instead of three, but it'll also mean a much better look when I'm done.
I will mask off the wheels properly before spraying, and I might extend the "skirt" right to the floor. I sure hope this tape gives a clean edge. Not that I'm worried.
entry 252 - tags: paint, Martini | | | 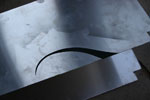 | July 30, 2007 - Eric suggested that I do a test panel with my tape since I'm so worried about it.
Duh. So I taped up a random piece of metal and shot it with spray paint. The metal was unsanded, slippery and slightly greasy aluminum. The end result? Very good. So that's all right then.
entry 253 - tags: paint | | | 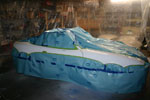 | July 30, 2007 - All bundled up and ready to go.
I sanded down the rear fenders a bit with some 600 and 1500 grit to smooth out the rough original paint - remember, that had a fair bit of bonus texture. The rest was scuffed up, then cleaned. I went over every bit of the tape to ensure it was well attached for a nice clean line.
One thing that isn't immediately obvious in this picture is that after doing the update last night, I noticed that the arc going into the front wheel was a touch more aggressive than it should be. So I eased it off a bit to match all the other arcs going into the wheel wells. Can you see the difference?
entry 254 - tags: paint, Martini | | | 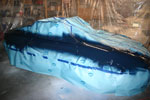 | July 30, 2007 - First, the dark blue.
This paint is "tape free" in 4 hours and deliverable in 24. I'm assuming "deliverable" means you can hand it over to the happy customer. I'll tape it up tomorrow night, then shoot the cyan.
The VW blue was fairly nice looking as I laid it down although I'm not sure I'd want a whole car this color. I did miss a couple of pinpoints of solvent (perhaps that last degrease was overkill) but I'll deal with that with touchup or by laying another stripe over top.
entry 255 - tags: paint, Martini | | | 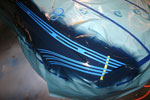 | July 31, 2007 - Time to start taping for the stripes.
This is taking up an inordinate amount of time and it's both fun and fairly new to me - so there are going to be a lot of pictures.
One of the most dynamic parts of the car, speaking from a stripe point of view, is the front corner. So that's where I started. The piece of green tape has the "ideal" proportions marked out - even size for the two blues, and the red is the size of three blue stripes. To make my life easier, I'm making the stripe width a combination of my tape widths. In this case, the stripes are 12mm wide, a good match to two widths of the 1/4" tape. You can see where I've used a couple of short pieces to ensure the gap is correct. The light blue tape is masking what will eventually be dark blue in the final scheme.
entry 256 - tags: paint, Martini | | |  | July 31, 2007 - So much for playing by the rules.
The stripes running along the hood didn't look right at 1/2" wide, so I narrowed them down to 1/4" plus 1/8". I also tapered them down slightly at the front. This small change altered the front from being a little stodgy to being very graceful. This is a game of millimeters.
entry 257 - tags: paint, Martini | | | 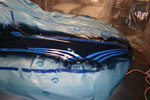 | July 31, 2007 - One fender done!
Okay, not quite done. The top stripe at the rear of the wheel opening has too much curve and doesn't quite work in the "graceful" stakes. I hadn't planned on having the dark blue stripes meeting in a point on the fender, but that's how it wants to go.
This is taking a while. I'm learning fast, though, and I think I'll be able to do the rest of the car pretty quickly. The door is almost done already, but it's easy because the stripes are a constant width. It's the flares at the wheelwells that take a while. Only three of those left, and I'm hoping the layout I'm doing now will help. I'm pretty excited, I think it's going to look really good.
Speaking of looking good, this picture almost makes it look like I can lay down paint!
entry 258 - tags: paint, Martini | | | 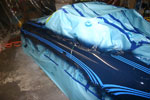 | August 1, 2007 - The next three corners did go faster as I learned what the "right" shape was for the fender flares.
I also got better at running a straight line of tape. The human eye is great at picking up slightly wavy lines - I could spot when my tape lines moved from 10mm to 11mm apart. Of course, so will anyone who's looking at the car, and I know there's going to be something odd that will show up.
A bit of asymmetry revealed itself. On the right side of the car, the red will dip down to touch the fender. On the left, not quite. I can live with that. Overall, the car was surprisingly consistent from side to side.
entry 259 - tags: paint, Martini | | |  | August 1, 2007 - How do you spend four or five hours masking a car without crippling your back?
Well, if you shop at the Snap-On truck, you have a cool little rolling stool that moves up and down and has a padded bench. If you shop at Home Depot, you have a little gardening seat with big wheels. Sure, it's not as cool as the Snap-On version, but it was $10 and it has a cupholder. Beat that!
entry 260 - tags: paint, Martini, tips | | | 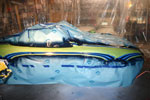 | August 1, 2007 - The world's ugliest Martini livery.
The green tape (well, most of it) is masking off what will eventually be red, the blue tape is masking off dark blue and the exposed dark blue will be cyan. I ended up with a lot of red on the car although not quite as much as it appears here due to tape overlap. How will it look? We'll have to see.
entry 261 - tags: paint, Martini | | | 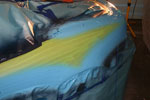 | August 1, 2007 - Cyan time!
Well, that went on pretty easily after all the work. The cyan coat, I realized afterwards, is the one where the masking is most important. It has about 4 times as much edge length as any of the others.
entry 262 - tags: paint, Martini | | | 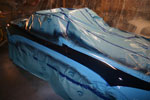 | August 1, 2007 - The tape that covered the red sections has now been pulled off.
Unfortunately, I was wrong about the "tape free" time. It's 12 hours, not 4.
No, it didn't cause a problem with the paint - but it does cause problems with my scheduling. I was planning to shoot the red today so I could move the car out of the way and extract my Seven for a track day tomorrow. Now I'll have to mask off the cyan (a quick and easy job, as long as I don't run out of tape) tomorrow morning, shoot it before I go to work, then spend a bit of time just before the 4 pm track day shuffling the cars about. I won't unmask the whole Targa Miata then, just tear through the cockpit so I can steer it around. At least it means I'll be eager to get home after being at the track!
Oh, such problems to have.
entry 263 - tags: paint, Martini | | | 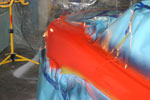 | August 2, 2007 - And now the red.
Officially, it is Flame Red, remember. But it sure looks orange. In person, it's an eye-popping color. I love it. I'll unwrap the car tonight.
entry 266 - tags: paint, Martini | | | 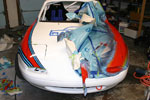 | August 3, 2007 - It's unwrapping time!
I've been both anticipating and dreading this moment. If there's a major slipup, it's going to be brutal to fix. Naturally, I didn't think of this until I started unwrapping. I suppose if I did this more often, I'd use a more professional word like "unmasking", but it seems too much like a present.
And the initial reaction is?
Sex on wheels.
I love the look, it's just what I'd hoped. The stripes are crisp and they just leap out at you. The shape works with the shape of the car and there are no major snafus. Oh, it's not perfect. There are a couple of tiny little lines of colors that got through my masking (next time I'll just buy 3/8" tape and save myself a lot of work), a few small rough edges and a couple of spots where the line width wavers slightly - but unless you're carefully peeling off tape inch by inch, it's unlikely you'll ever see them and they give the car some personality. No souless, computer-cut stripes here! The biggest problem is a shadow on the hood, as if a gust of dark blue got under the masking. It cleaned up easily with some solvent, leaving the fully cured white intact.
I always wondered why you never saw Martini "homage" cars, while the Gulf colors are so popular. It's pretty obvious after all this work!
entry 267 - tags: paint, Martini | | | 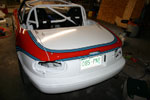 | August 3, 2007 - Eric pointed out I hadn't shown any shots of the tail.
Well, here you go. I actually got a little tricky here, using thinner stripes on the vertical section at the bottom than the horizontal upper stripes. I think it looks better. In fact, the upper stripes don't change width anywhere other than a slight taper right at the front as they enter the lights.
Miatas have nice little round butts. I think this stripe shape accentuates it. I haven't taken many pictures of the stripes back here because it came together really nicely early on.
entry 268 - tags: paint, Martini | | | 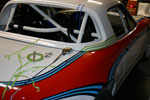 | August 5, 2007 - Almost done with the painting.
All I need to do is add the stripes to the hardtop. There isn't much of them and it's a challenge to make it all flow given the curves in the stripes and the hardtop. You can see one of the attempts to reach the same grace as I found on the side stripes. If I was going to run with the hardtop 100% of the time, this would have been easier. But I'll have the top off occasionally, so it has to work both ways.
The top is in the "paint booth" and the two blues have been laid down. I'll spray the red tomorrow morning.
entry 270 - tags: paint, Martini | | | 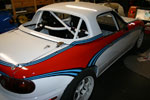 | August 7, 2007 - The hardtop is painted and installed.
It's not the best part of the car, but it still looks pretty good. Now it's time for some final assembly. Brandon came over last night and helped to install the top, clean up wiring and install the dash. Now the windshield can go in. I'm on schedule to have the car ready for the Open House, and it's all coming together nicely.
entry 272 - tags: paint, Martini | | | September 14, 2007 - Martini paint codes.
Someone asked me via email for the paint codes for the Martini paint job, and I realized I'd never really spelled out the final mix. So here it is. I used NAPA Martin-Senour paint in the "Gold 5.0 urethane" single stage mix for the stripes and was very happy with how it laid down. The white was PPG Omni.
Dark blue. VW Marine Blue from a 1988 Golf. VW LA5B, M-S code 23427
Cyan. Mercedes DB5508, apparently. I used M-S 59392
Red. Opel Flame Red from a 1968 GT. Opel L512, M-S 20934
White. Mazda Crystal White from a 1990-93 Miata. Mazda UC, M-S 39783
entry 311 - tags: paint, Martini | | | 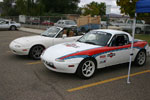 | October 14, 2007 - A study in whites.
Both of these cars are dirty, and photographed under a cold and cloudy sky. The Targa Miata is 1990-93 Miata white and the other Miata is a 1994-97. Okay, it's not that exciting. But it does show the result of the attention to colors - the Targa car pops, while the street car hides.
entry 325 - tags: paint | | |  | July 15, 2008 - With the nose off, I got ready to sand it down for the fresh paint on the lower half.
It sure was thoughtful of Mazda to put that groove halfway down, it's a perfect place to put the seam between the two layers of paint.
Looking at the scratches on this, I can't imagine just what sort of ride Bill went on with this car. I'll bet it was exciting.
entry 495 - tags: crash, paint | | | 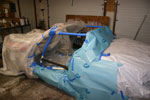 | July 15, 2008 - I've come to the realization that the smaller the piece of the car you have to paint, the more of a pain it is.
That's a whole lot of masking for a couple of feet of steel! I probably could have been a little less careful (or painted more of the interior), but this will do me fine. I did pull the doors and roof off in order to give myself more room to work and less stuff to mask.
entry 496 - tags: paint | | | 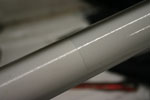 | July 17, 2008 - Old vs new paint.
The new paint (on the right) looks slightly more blue than the old, despite the fact that it's out of the same can. Maybe it'll age a little - I do recall thinking the car had a bit of a blue tinge to it originally. The seam between the two colors is easily sanded down, and I expect nobody will ever notice the difference as most of the joints are well hidden.
The car's almost back together now. I just have to remount the nose after fixing some damaged plastic inside, then it's ready for the final track day test in a bit over a week.
entry 497 - tags: paint | | |  | March 31, 2011 - That's a much nicer engine bay!
Not a concours job, but it'll do the job. I'm now out of the original bucket of white paint, so I'll get a quart mixed up to keep on hand for future touch-ups.
entry 802 - tags: paint, conversion | | | 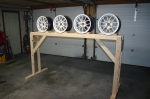 | August 14, 2011 - I have lots of important work to do on the car, but I'm back to painting wheels again.
It would have been a lot easier if I'd just stuck with an off-the-shelf color, but the car looks much better with white. Besides, it's easier to inspect the wheels for damage this way!
So, after trying rattlecan paint from the auto parts store and powdercoating, I'm back to doing things right. That means real automotive paint and clearcoat. First, I had to clean the set of rattlebombed wheels of all the brake dust, rubber and debris from several track days. Simple Green, scotchbrite pads and a session in the bead blaster followed by a wipe-down with wax remover and they're ready to shoot.
I spent 45 minutes building this wheel rack out of a half-dozen 2x4s. It might seem like overkill, but it means I have the wheels at eye level so they'll be much easier to paint. Plus I can do both sides at the same time and, since they're supported by the barrel I don't have to worry about the paint on the rims getting damaged. Well worth the $12 investment in materials. I'll do this set of wheels first, then follow up with the second set later.
Tomorrow I'll be back to work on the car itself!
entry 907 - tags: wheels, paint | | |
|

 THE DIARY