| MIATA BUILD |
|
|
 | | October 28, 2009 - Time to see if the fuel pressure changes did anything!
Background: there's a big dip in the car's torque curve between 3500 and 4500 rpm. Massive, actually. It's about a 10% drop. The theory was presented to me that the B (1999-05) injectors are designed to run at a higher pressure, so they weren't atomizing properly. Thus my work of late to raise the pressure.
Unfortunately, it did nothing. Nothing at all. After a bit of tuning to deal with the different fuel curve that's a result of the fixed fuel pressure, the car didn't change a bit. I spent some time playing with timing and fuel, just to prove that naturally aspirated cars have a pretty big sweet spot. Adding an extra 3 degrees of ignition advance didn't do anything, so I took it out again.
Dyno chart
Okay, so that didn't do anything. While the car was on the dyno, I decided to mess with the intake cam timing because that's quick and easy. I advanced the cam by 5°. This should theoretically help the bottom end while hurting the top. And it did. Kinda. The bottom end got stronger and there was a bit of a taper above 6700 rpm. Pretty good tradeoff. The weird thing is that the dip was unaffected. All the gains were on each side of it. It's obvious that there's something that's just not working in that rpm range, but what is it?
Dyno chart
Next, I retarded the intake cam 5° from my original setting. More overlap, should be a bad idle, a weaker low end and more up top. These are fairly big changes, but I was trying to see trends. Oddly, the car purred at idle. It's always had a very grouchy idle, lumpy and a bit tricky to launch. Not any more. But the car really didn't like the cam settings, losing a huge amount of power down low and only gaining a little bit way up top.
Dyno chart
So, not a terribly successful day really. Although it was educational. The cams in the car are Stage 2 cams from Integral Camshafts, and they say that for some reason their 1.8 hydraulic lifter cams just don't work well. The 1.6 ones do, as do the 1.8 solid lifter cams. Just not these. So the next step is to play with a few different cams. It's the second set I've tried, but I have at least three other options to stick in there and see what happens. Once that's done, I'm going to play with a couple of intake manifold options that are available to me. What I'd really like is a VVT head, as I've seen a very similar engine to mine make big torque right where I have my dip. That engine is in the FM shop, not far from where the Targa car is parked. And the boss is going on vacation...
But still, the engine's getting stronger. Here's a comparison between what it looked like when it first hit the dyno and now. Since then, I've altered the intake pre-throttle, built the header and changed cams.
entry 714 - tags: dyno, fuel pressure, cams | | | 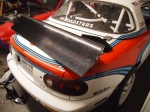 | July 11, 2012 - A new toy showed up.
I've been thinking about doing some more aero investigation. There are a number of things that could be addressed, such as a smoother underbody. I've already made a few steps in that direction of course. But I've also been toying with the idea of a wing. There's no question that they work.
I've been working with a metal fabricator around the idea of building my own wing from scratch. I also have an HPM wing that was previously used in World Challenge racing. But there's a particular option that's available right now that kept drawing me back.
Back when NASCAR introduced the Car of Tomorrow, the cars had a wing on the back. This was fine (well, not according to the traditionalists, but let's ignore them) until it was discovered that they'd generate lift when the cars starting going backwards at high speed, which is something that NASCARs do. So all the Car of Tomorrow wings were torn off and replaced with spoilers. Where did they go? Where old race parts go, into the used market. You can buy a nicely designed carbon fiber wing with interchangeable end plates for under $500. New, they were over $3000.
It's a big boy. Not something for a car that's low on power. But it should be fairly effective. The biggest challenge is going to be figuring out how to mount it - the hood pins on the trunk are in just the wrong place. But I'll think of something. I've got a few ideas. I'm also going to do some research to figure out where the best place to put it will be.
The wing investigation won't happen right away, though. The Flyin' Miata Summer Camp is coming up in three weeks, and I'm going to revert the car back to Targa specification for the Racing The Rock premiere. I also have three days to give joy rides at the local track, that should help burn up the R1R tires! Once that's all done, I'll go back to track spec.
entry 1045 - tags: aero, wing, summer camp | | | 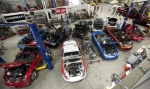 | August 14, 2012 - There was a big V8 Miata meet at the Summer Camp.
Zach took this shot and posted it to Autoblog. 4500 hp spread amongst 11 V8 Miatas. There are also are two more V8s to be hiding under covers in the back. Zach also covered the rest of the Summer Camp and captured yours truly blathering on about V8 Miatas. It happens a lot.
Autoblog also posted about the DVD. So did Hooniverse.
entry 1053 - tags: movie, summer camp | | | 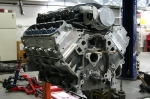 | October 24, 2013 - Cam swap time!
Working on this engine is almost like unwrapping a Christmas present - I'm discovering all sorts of new things. It's fun seeing how all the parts work together. You can look at diagrams and read about how the valvetrain works, but it's something else to actually peer down the cam bore and see the lifters tucked away. After so many years of Miata, Miata, Miata, seeing different solutions is interesting. It's also been a long time since I personally built an engine, I miss it.
The new "ASA" cam is now in place, with the timing chain back on and the front of the motor all buttoned up. All that remains is to flip the fuel rail over so the inlet is on the Miata-friendly side, change out the valve springs and install the new oil pan. Then I can start looking at putting everything back in the car.
By the way, the two dowels were supposed to help hold the lifters in place. I can't see how, I think that was a poor tech tip I found online. But they didn't do any harm.
entry 1102 - tags: engine, 6.2, cam | | | 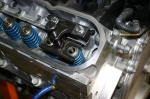 | October 28, 2013 - Time to upgrade the valve springs.
As you may recall, I'm converting an LS376/480 crate engine into an LS376/525. According to GM Performance, the differences are the ASA cam and "higher rate" valve springs. So I called GMPP and got the part number for the new springs: 12586484.
Looking for these springs, I've found they've been superseded by spring 12625033. Fair enough, JEGS even sells the cam and springs as a kit so I picked one up. This handy little Comp Cams tool lets me swap out the springs easily without pulling the heads off.
entry 1103 - tags: engine, 6.2, cam | | | 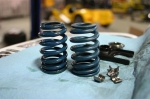 | October 28, 2013 - Curious.
The new valve springs look exactly like the old ones. I checked further, and the 12625033 is the standard spring on an LS3. So I was swapping these out for nothing.
The older 12586484 part number was an LS6 spring, and they were typically yellow. Interestingly, they also have the exact same spring rates as the current LS3 spring, with the only difference being a max lift of 0.570" instead of 0.550".
Just for fun, I peeked under the valve covers of a true LS367/525 engine and what did I see? Blue springs.
Busted! GM doesn't actually change the springs on these engines anymore. Even if they did, the rates aren't any different. The max lift isn't an issue, as the 0.525" max lift is the same as that found on the 480 hp "hot cam".
So I wasted some time and money, but I learned something. Isn't that how it always goes?
entry 1104 - tags: engine, 6.2, cam, valve springs | | |  | August 3, 2014 - FM Summer camp track time!
This is a tough event for the Targa Miata. Two days of double sessions, giving rides to FM customers in brutal heat. I figure I did over 100 hard laps of the track in two days. Everything worked well. Despite the heat and the short, tight track, the car ran at normal temperatures. I wasn't taking it terribly easy on the brakes, and they also dealt well with the heat.
The blue car in this awesome picture by Travis Ingram is Elvis, another V8 car. It's got AFCO suspension with a bit less spring rate and the same basic tire setup that I do - and it provided a very dramatic visual example of how effective the aero is on the long sweeper as I came rampaging up on his rear bumper with a very high closing speed. Quite exciting for the passenger in Elvis as he saw me bearing down, too. There was also a great example of the wing's wake when a drone above the track got thrown around by the rooster tail from the car - I'll try to get the video of that.
I found the car to be pushing a bit on the tight track with the setup that had been working so well at High Plains a few weeks ago. There was no time for tuning, so I just drove around it after softening the front sway bar. I've found the car is fastest with a little bit of aero-induced understeer on the fast sweeper, but it was a bit more than I prefer. Next time, I'll try playing with tire pressures although they were right at my target. Even after about 150 laps of this track and the recent High Plains track day, the tires are looking good. The Toyo RR is my new favorite track day tire.
There was one small area of concern. At the end of the last session, I had an odd noise in the steering. A clunk at a specific point of steering angle. Fearing the worst, I got under the car - and found that a motor mount heat shield had moved out of place and was making contact with a bolt on the steering column. Well, that's an easy fix! Whew.
entry 1126 - tags: testing, summer camp | | |
|

 THE DIARY