| MIATA BUILD |
|
|
 | | 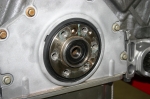 | May 17, 2011 - I found a culprit!
I've been having trouble getting the T56 to sit properly - it hasn't been fully bolted in to place yet. Well, it turns out that the pilot bearing was a special one for the T5, which is too thick (and too large a diameter) for the T56 input shaft. Frustrating, but easy enough to fix once Bill helped me find the problem. Once that's replaced, the engine and transmission can go in - and stay there!
entry 830 - tags: drivetrain | | | 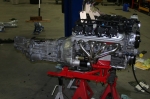 | May 20, 2011 - Finally, the drivetrain is all buttoned up and ready to install.
I installed the headers as well as some of the power steering plumbing while I had easy access.
entry 831 - tags: Drivetrain, v8 | | | 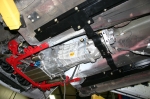 | May 20, 2011 - Much better - the engine and transmission snuggled into place.
The V8Roadster rails are laser cut, so the bolt holes were in the exact same location as the studs I'd welded into place earlier. That saved me a lot of drilling! The transmission crossmember location ended up a bit off because I'd aligned the rails for the T5 setup, but that was easy enough to cope with.
entry 832 - tags: Drivetrain, v8 | | | 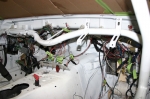 | May 20, 2011 - With the engine in place, it's time for more wiring.
I started to make the small number of connections between the Miata harness and the GM one. This was made a bit more complex by the fact that the GM setup had already been installed in a 2002 Miata so I had to reverse-engineer the modifications - and of course, the harness in the Targa Miata was heavily changed. Still, it's coming together.
entry 833 - tags: Wiring | | | 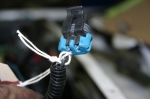 | May 20, 2011 - I'm giving both wiring harnesses a checkup as I install them.
This broken knock sensor wire is a good example of why. The GM harness had been used in Elvis, FM's first V8 Miata and had thus been installed/uninstalled quite a bit over the years.
entry 834 - tags: Wiring | | | 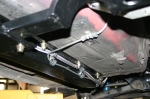 | May 25, 2011 - To take a break from wiring, I decided to run the fuel and brake lines.
It didn't take long really, but it feels good to have that done. They're anchored with rivnuts embedded in the frame rails, making it easy to remove them if required. Not the frame rails so much, the rivnuts fasten them to the car's frame at the same time!
entry 835 - tags: conversion | | | 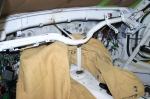 | May 25, 2011 - Long-time followers might remember that I added some custom bracing to my dash support when I built the car.
Well, it had to be cut out when the dash was removed. So I welded it back in! It makes for a very solid steering column mount. The factory adds a big beefy vertical brace but nothing to the firewall.
entry 836 - tags: conversion | | | 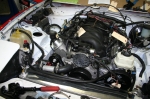 | May 25, 2011 - The wiring continues.
I'm getting pretty close, now it's just a matter of identifying the last few wires, replacing a couple of missing connectors and running the wires to the alternator. Then I'll finish anchoring the harnesses in place (I've done a bunch of work in that area already) and start running some current through the car.
I'm pushing to get the car running for a track day on June 4th. I'll have to take a couple of shortcuts such as temporarily hard-wiring the fans, but it's looking very promising.
entry 837 - tags: conversion, wiring | | | 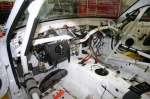 | May 27, 2011 - The wiring is getting close!
It doesn't look like a lot of progress, of course. But wiring a car like this is a series of small jobs - hooking up the reverse lockout solenoid, tracing the oil pressure sensor wire through the harness, etc. But it's close!
entry 838 - tags: wiring, conversion | | |  | May 27, 2011 - The big engine needs a little more power to spin over than the four cylinder did.
The little lightweight PC680 was happy to do the job in 2008, but this year I'm going to run an Optima with more than double the cranking power.
entry 839 - tags: battery | | | 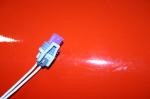 | May 27, 2011 - One of the cool things about GM is that just about anything with a part number can be ordered.
Case in point: this plug for the engine coolant temperature sensor. I don't know why it was removed from the harness by a roving parts scavenger, but a call to the local dealer yielded a replacement on the shelf. Try that with a random Mazda connector!
entry 840 - tags: wiring, conversion | | | 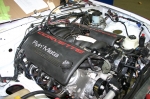 | May 27, 2011 - I found these while unpacking some of the conversion parts.
They're not needed yet (or at all, really) but I couldn't resist sticking them on for a few minutes.
entry 841 - tags: engine | | | 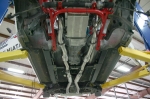 | May 27, 2011 - In preparation for the first noise from the car, I've loosely installed the exhaust system.
I'll have to take it out again after the driveshaft arrives on Tuesday, but it was just too pretty to leave on the floor. Besides, this way I can plug in the O2 sensors.
entry 842 - tags: exhaust, conversion | | |  | May 27, 2011 - Getting closer to that first firing of the engine.
First, I have to make sure there's fluid in everything. The T56 uses ATF for lubrication.
entry 843 - tags: transmission, fluids | | | 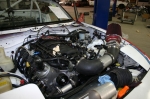 | May 27, 2011 - It's alive!
Obviously, the intake system is temporary. But it makes noise!
First, I unplugged the engine computer (PCM in GM-speak) and powered up the electrical system. I then cranked the engine until I had oil pressure. This took a long time because the pump had to fill the oil cooler as well as the completely dry engine. It probably only took about 30 seconds total of intermittent cranking, but it seemed like forever. Finally, the gauge jumped up.
I pressurized the fuel system and checked for leaks. Then it was time to take a deep breath and hit the key. The car tried to stumble into life, but it wasn't happy about it and was acting like it had very low fuel pressure.
I realized I couldn't hear the fuel pump priming when I turned on the key. Checking out the wiring looked good, and hot-wiring the pump woke the engine up on 6 cylinders. I'm guessing the VATS anti-theft program got turned back on in the PCM so it won't run the pump. I'll turn that off again soon, but in the meantime I can run with the pump hotwired.
The exhaust system isn't bolted together and I have no cooling fan wiring yet - but it runs!
entry 844 - tags: conversion | | | 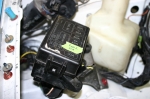 | May 29, 2011 - More wiring!
I could do it faster, but I'm trying to build a car that will survive a week of stressful days without failing - and if it does, it should fail gracefully and be easy to debug. This means a lot of time looking at how I'm going to do something, seeing if there's a better way besides the initial obvious solution. Sometimes yes, sometimes no.
I wired up the fans yesterday, for example. I needed a good power supply for the second one, as I've learned in the past that these particular fans can pull over 20A each on startup. The usual way is to run a wire with an inline fuse. But there's a spot in the factory fusebox that isn't used on my car - it's for the ABS system. It also happens to be right beside the fuse for the main fan. So I removed the fusebox and pulled the appropriate connector off the bottom. Turns out the wire I needed simply wasn't there, but there was a spot in the connector plug for a spade connector. I pulled one out of an unusued plug and slotted it into place. Now I had a factory-designed 30A power source! I ran that down to a new relay which is triggered off the main fan. It worked out pretty slick. I even used the same wiring colors used by the main fan so that I know that yellow is a fan power wire, for example.
I also identified a fan override wire that will let me kick on the fans manually without waiting for the engine to get up to temp. I have an idea for that one, we'll see if it works out.
I also wired up the driver's side O2 sensor which needed extended wires and tightened up all the exhaust system connections. The car sounds pretty good. The PCM hasn't figured out how to idle yet so the car won't stay running without a bit of attention to the throttle pedal, but that's normal for the GM computer when it's lost power.
The new shocks ands the driveshaft should both arrive on Tuesday, and it's my goal to have the car ready for them when they arrive. It's looking promising.
entry 845 - tags: Wiring, conversion | | |  | May 31, 2011 - Visible progress!
I decided the wiring was in good enough shape to install the dash. The harness is still pretty accessible, but it's more awkward of course. It was quite a wrestling match trying to get the dash back in, it's the first time I've tried that while there was a windshield in the car.
The navigator's footrest is in, the defrost system is hooked up, the switches are wired - it's getting closer. There's no functioning speedometer in the car at the moment but with the rally computer that's not a big problem. I'll address that later.
I did realize that my current fan wiring does have a vulnerability - the right fan is completely dependent on the left fan for a trigger. If something goes wrong with the left one, I'll lose both. I know how to wire this so that both fans are independent, but I'll deal with that later.
entry 846 - tags: interior, conversion, wiring | | | 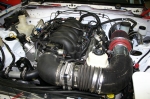 | May 31, 2011 - The engine bay is looking a bit better!
I was able to sort out an intake system that allows the use of both the hood and the driver's headlight - hopefully. It's not ideal, but it'll do for a start. I've also cleaned up and anchored the wiring. Other than a lack of a hood prop, this is pretty much ready to go.
entry 847 - tags: engine bay, conversion | | | 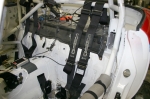 | May 31, 2011 - It's amazing how many small jobs eat up time.
I have a new set of Corbeau harnesses for the car, as the old ones were expired. So I need to set them up for length. It's not a big piece of work, but an hour or so of fiddling around was an hour I couldn't spend on something else.
entry 848 - tags: safety | | | 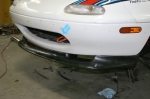 | May 31, 2011 - Aero!
The car will be spending more time at high speed than before, so I'm going to do a bit of work to stick it to the ground. I'll be doing a spoiler on the trunk lid, and this air dam will help balance it out. The relatively high ride height of the car will make the air dam less effective than it would be on a track car, but you work with what you have. The part is made of flexible polyurethane so it'll deal well with impacts.
Due to that higher ride height, it will probably be difficult to balance the downforce of a wing. Still, if I can get time, I'd like to test that.
entry 849 - tags: aerodynamics | | |
|

 THE DIARY