| MIATA BUILD |
|
|
 | |  | May 31, 2011 - Aero!
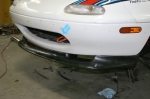
The car will be spending more time at high speed than before, so I'm going to do a bit of work to stick it to the ground. I'll be doing a spoiler on the trunk lid, and this air dam will help balance it out. The relatively high ride height of the car will make the air dam less effective than it would be on a track car, but you work with what you have. The part is made of flexible polyurethane so it'll deal well with impacts.
Due to that higher ride height, it will probably be difficult to balance the downforce of a wing. Still, if I can get time, I'd like to test that.
entry 849 - tags: aerodynamics | | | 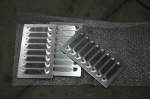 | August 22, 2011 - A bit of extra airflow management thanks to Mark Rivera at Paco Motorsports.
The NACA duct and the turn signal intake helped, but the air pressure underhood is just too high for them to really make a big difference. So these louvered panels will pull hot high pressure air out and make room for the cold stuff. As an added bonus, they'll keep the hood from lifting above 100 mph.
There are some larger ones available on the market, but I wanted a small set for a few reasons: they fit better around the underhood bracing and they'll fit with the Martini livery! Yes, perhaps that last reason is a bit shallow. But I don't care. The panels were punched out by Mark to my dimensions - thanks Mark!
entry 919 - tags: aerodynamics | | | 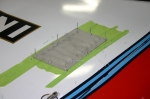 | August 23, 2011 - Time to install those new louver panels.
The first step was to figure out where they should go. Ideally, they'll go at the point of lowest pressure so they do the best job of pulling hot air out of the engine bay. On this 1994, that's roughly where the hood starts to flatten out when viewed from the side. But there are other factors, such as the underhood bracing. It's hard on airflow, and if you cut too much of it your hood gets all floppy.
Plus there are aesthetic considerations. In my case, that means "no vents in the Martini logo".
entry 922 - tags: aerodynamics | | | 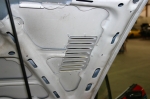 | August 23, 2011 - Here's the location of the vents viewed from underneath.
You can see how they're tucked into the bracing. I also used the rivets to firmly attach the bracing to the bottom of the hood, to retain as much strength as possible. One of the cross bars had to be cut, but it's riveted to the hood on each side (one of those rivets hasn't been installed yet, but you can see the hole) and the louvers actually add strength in this direction.
entry 923 - tags: aerodynamics | | | 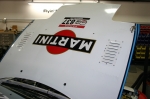 | August 23, 2011 - The view from on top.
For those who are curious, the outermost forward rivet is 210mm from the headlight cutout and 100mm from the side of the hood. It's a bit further forward than is ideal, but any further back and I'd be into the big brace. I could have also placed them in a more central location on the other side of that big brace, which would have let me move them further back. But then they'd be into the Martini logo! Oh, what we do to look good. I think they're still going to be quite effective, and it's possible the more central location would have been too far back.
You'll also notice a couple of rivets below the Martini logo. There's also a black on right by the R. Those attach the big brace to the bottom of the hood, replacing some factory adhesive that had failed. The amount of extra rigidity this adds to the hood is significant. You may also notice an extra oddly-spaced rivet on each of the louver panels, that is anchoring the stump of the brace I had to cut.
In the first "install" picture, you can see a matte finish I got from bead-blasting the raw aluminum. Now they've been sprayed with white paint to match the hood, and they actually blend in very well. I considered making them black or leaving them matte, but I'm happy with this.
entry 924 - tags: aerodynamics | | | 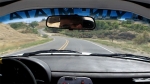 | August 24, 2011 - The tune for the engine computer is coming together pretty quickly.
Changing tacks and concentrating on the MAP-based tables did the trick. It's close enough now that the computer's effective short- and long-term trims will keep everything in line, although I'll do a little extra tweaking once I get down to sea level. I'm also going to keep working on it before I leave to fine-tune as much as possible.
I did discover a vibration from the rear at high speeds. I'll see what I can find. It's not massive, but it's enough to make me look for it.
With exterior temperatures being a solid 100F outside, this was some pretty hot work. It's hard to say exactly how much the intake temperatures have dropped thanks to the louvers, but they're far better than they were when I started. I did confirm that the hood doesn't bulge or flutter at high speed the way it used to, even in 4-cylinder configuration before I had to start altering the underhood bracing. So that's good, and hopefully an indication of the lower underhood pressures.
The screenshot is from the video camera I'll use during the race. I fitted a 0.5x wide angle lens to the camera to get a wider view and I'm pretty happy with the result. Between having the camera wired to car power and the ability to use removable 32GB cards that store over 4 hours of HD video, I should be able to get coverage of every stage without having to worry about space or power.
entry 926 - tags: testing, video, aerodynamics, | | |
|

 THE DIARY