| MIATA BUILD |
|
|
 | |
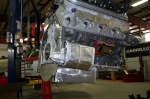
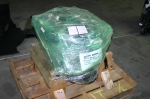 | March 28, 2011 - Cue the happy dance!
The freshly built engine has arrived from V8R Spec. I really want to unwrap it and get fingerprints all over, but I know it'll just look like every other V8 and it's well protected at the moment. I can't wait to fire this puppy up.
entry 797 - tags: engine, v8 |
| |
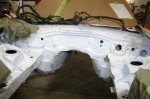
 | March 28, 2011 - Time to get back to work on the car.
Tyler has been busy working on another V8 conversion, but now it's the Targa's turn. He used the plastic engine on the subframe to confirm we have the clearance we need for the bellhousing, and now everything can be welded up.
entry 798 - tags: v8 |
| |
 | March 28, 2011 - The transmission tunnel modifications are complete.
The tunnel is actually big enough to swallow the large T56 transmission, even though we're going to install a T5.
entry 799 - tags: v8 |
| |
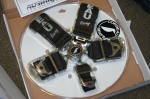 | March 28, 2011 - The original harnesses for the Targa car had expired and had to be replaced.
Corbeau will either re-web them with new straps or, for another $9, send you a new set with new hardware. The new ones are marked with an April 2011 date, that's as fresh as harnesses get! Corbeau is based right near us, it must have been the fast shipping.
entry 800 - tags: safety |
| |
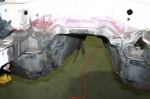
 | March 31, 2011 - Before painting, the car got a coat of sealer in the transmission tunnel as well as primer along the seam welds.
I was conflicted about using the sealer on the tunnel - it'll make it harder to fit heat insulation such as the Reflectix I used earlier, but it'll protect the metal. I'll just put insulation inside the car this time.
entry 801 - tags: v8, tunnel |
| |
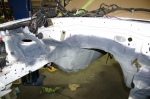
 | March 31, 2011 - That's a much nicer engine bay!
Not a concours job, but it'll do the job. I'm now out of the original bucket of white paint, so I'll get a quart mixed up to keep on hand for future touch-ups.
entry 802 - tags: paint, conversion |
| |
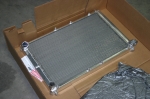 | March 31, 2011 - The radiator was specifically designed for V8 conversions.
It's got the correct size inlet and outlet for the big motor and is a very efficient dual-pass crossflow design. The radiator mounts have to be altered to move the rad forward as much as possible. This involves cutting and welding the stock bits and lots of test-fitting. To avoid damage to the radiator, I wrapped a layer of cardboard around the core.
entry 803 - tags: cooling, v8 |
| |
 | April 19, 2011 - Everything's here.
It's time to start the build. And just in time - the car's supposed to be in Atlanta for the Mitty vintage races. It has to be on the trailer in a week. Can it be done?
Maybe. Between the long period of disassembly, the fact that it's a built engine from a different source than FM's usual crate motor and the different transmission, I've found a lot of little items that have been overlooked. Some are simple to fix, such as the missing motor mount bolts. Some are a bit more complex, such as the remote oil filter mount that was forgotten. Still, if all goes according to plan the engine will be in the car tomorrow.
entry 804 - tags: conversion, V8 |
| |
 | April 19, 2011 - Even though the engine block has been hot-dipped, I ran a tap down the mounting holes in the block.
It made a big difference to how easily the bolts went in. A tap and die kit should be part of every mechanic's tool set.
entry 805 - tags: conversion |
| |
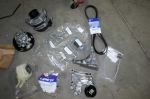 | April 19, 2011 - In order to fit the engine in the Miata's small engine bay, you have to use just the right accessory drive.
GM is thoughtful enough to make several options available as kits, including clear instructions on how to mount it along with well sorted and labeled fasteners. It's a pleasure to work with parts like this.
Of course, there was one little problem. The engine has a non-standard damper with a smaller diameter crank pulley. So the included serpentine belt is too long. This is the sort of thing I ran in to all day, and that's what will keep the car from running at the Mitty.
entry 806 - tags: conversion, accessories |
| |
 | April 19, 2011 - The bellhousing to attach the T5 transmission to the LS engine is a beautiful piece.
That's a special release bearing being test-fit in there at the moment.
entry 807 - tags: conversion, transmission, bellhousing |
| |
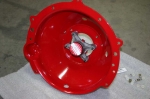
 | April 21, 2011 - That's one cool looking clutch.
It's not an ideal street setup, but it should hold really really well.
entry 808 - tags: conversion |
| |
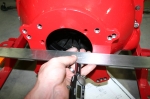 | April 21, 2011 - The release bearing needs to be set up with the correct clearance.
To do this, I installed the bellhousing without the bearing and measured the distance from the mounting surface to the fingers on the pressure plate. Then I pulled the bellhousing off again, installed the release bearing in the housing and made the same measurement. Using some teflon spacers, I set up the bearing with 0.100" clearance to the fingers. Voila! Time to move on.
entry 809 - tags: conversion, clutch, release bearing |
| |
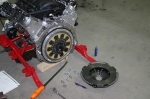
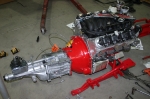 | April 21, 2011 - Ta-daaah!
The drivetrain is ready to install! This is the first T5 V8 car built at Flyin' Miata, and the new transmission caused a number of small problems that had to be resolved. Nothing major, just things like mismatched bolt lengths and different hydraulic plumbing, but it meant I spent most of the day dealing with them.
entry 810 - tags: conversion |
| |
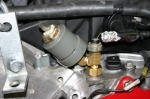 | April 21, 2011 - As with the original engine, I'm going to run both an oil pressure gauge and a warning light.
A 1990-94 Miata provided the sender for the former and a 1995-05 Miata provided the switch for the latter. Packing them both into the tight space at the back of the intake manifold was a bit of a challenge, but with the right collection of pieces they tuck in nicely!
entry 811 - tags: conversion, gauges |
| |
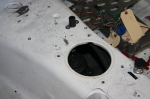 | April 21, 2011 - Time to install the drivetrain!
Unfortunately, I hit a snag immediately. The shifter on the T5 transmission is about 3.5" further forward than stock. Easy enough to solve with a hole and a cover plate.
While speaking with Steve at V8Roadsters about this - just to make sure it's normal and not the result of having the incorrect transmission! - he strongly recommended going to a Pro5.0 shifter instead of the stock setup. Steve's been quite helpful answering questions related to this T5 setup.
entry 812 - tags: conversion, transmission, shifter |
| |
 | April 21, 2011 - A change in plans.
The plan was to get the car up and running and giving rides at the Mitty vintage races in a week and a half. We got started on assembly late because it took longer than it should have to collect all the parts. At this point, we could thrash on the car and get it running in time - but we'd have to take it all apart again to do it right. Remember, this car needs to be reliable like an anvil. Most toy Miatas only have to survive 20 minutes on the track, and if something goes wrong they'll miss a couple of sessions. A Targa car has to be able to take abuse for a solid week.
So we made the decision not to bring the car to the Mitty. I'd rather build the car once, and build it properly, instead of hacking it together just to meet a deadline. The new goal is to take it to High Plains Raceway for shakedown testing on June 4th. That should not be a problem.
entry 813 - tags: conversion, schedule, testing |
| |
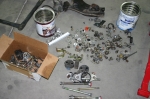 | April 22, 2011 - Here's one of the reasons I was having so much trouble getting any progress made on the car.
When I disassemble a car, I bag all the fasteners and label the bag. Driveshaft bolts go in a bag, front suspension bolts go in a bag, etc. I didn't take the car apart this time. The person who did simply dumped all the fasteners in various coffee cans and boxes. I spent a ridiculous amount of time sifting through them trying to find the one special bolt used to attach the main power feed to the cut-off switch, for example. I never did find the ones for the steering rack.
It takes just a little bit longer to do it right, but it saves so much time overall!
entry 814 - tags: conversion |
| |
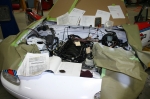
 | May 12, 2011 - Tadahh!
Visible progress is being made. With a 3.5" hole drilled in the transmission tunnel, I was able to drop the engine into place. Actually, I put the engine under the car and lowered the car on top of it - while the original build of the car was done on jackstands in my garage, it's a real treat to have access to a lift for the rebuild.
There's a ratchet strap holding the transmission in place, looped over the roll cage and through the shifter hole.
entry 815 - tags: conversion |
| |
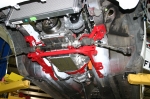
 | May 12, 2011 - With the transmission in place, I was able to locate the frame rails and bolt them in to place.
The mount for the T5 transmission has no adjustability built in, so I wasn't able to do this earlier as can be done with the T56 transmissions.
I did run into a small problem with the transmission crossmember - the bushings on the crossmember were too wide for the brackets. Some grinding ensued, resulting in hot pink urethane dust. Very entertaining.
As per Bill's suggestion, I tack-welded the bolts for the subframe to the floor. This means the rails can be easily removed without the need to pull the seats or to have someone hold the top of the bolts. That's a good thing, as one of the rails needs to be removed in order to pull the transmission.
entry 816 - tags: conversion, transmission |
| |

 THE DIARY