| MIATA BUILD |
|
|
 | |  | February 11, 2008 - While on the way to the rally school, we spent a day in Las Vegas.
There's a Ferrari dealership at the Wynn ($10 to get in if you're not already a Ferrari owner, sir) as well as a Ferrari theme shop. Can you say brand dilution? Perhaps selling pencils and kiddie pajamas with the Ferrari logo is not quite in line with the racing heritage. Anyhow...
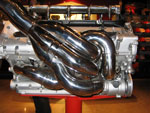
Right inside the doors on a stand is this Formula 1 V10, for a mere $62,000. I got a big grin on my face when I saw this header. They were on sale for $9500 each side if you wanted them separately. I don't need one, I have my own!
entry 401 - tags: header | | | February 12, 2008 - While rooting through the Coralba instructions last night, I got inspired to revisit my plan to use front wheel ABS sensors as triggers for road speed.
I've fired off a technical question to Coralba to see if they can answer me, and done a bit of testing on a Miata to see just how the wheel sensor behaves. The biggest potential problem I see is that the Coralba wants no more than 10 pulses per meter. That means about 18 teeth on the trigger wheel - and as you can see in this picture, I have a lot more than that to deal with. I could grind off every second tooth, or maybe two out of three. First, let's see if Coralba responds with any decent technical information.
The fallback position is to read off the speedometer. This will be affected by wheelspin of course, but it's a very simple installation.
entry 402 - tags: wiring, computer | | | February 13, 2008 - Since I posted the comment about altering the ABS trigger wheel, I've received a number of emails from folks with suggestions.
Unfortunately, trying to find a different way to mount the sensor isn't going to solve my primary problem: how to use the signal. Coralba has told me (in a one-sentence email) that I should use their PGE-V-pres8. There's no record of that unit anywhere on their site or anyone elses that I can find, so I'll see if I can get some information out of a Coralba dealer somewhere.
As for the wheel sensor, Mazda put a lot of effort into mounting that very well for me. It's easy to chop a few teeth off the trigger wheel, much harder to come up with my own mounting that will stand the abuse. So if I can figure out how to set the signal up properly, I will use the factory design.
Adding to the fun is the fact that the wiring harness for my used C-Giant actually comes from another computer. It's missing the wires for the fuel sender (not critical to me, really) and the remote reset (okay, that one matters). I can use the reverse wire as a reset but Janel is really happy about the fact that this unit will count backwards if I have to reverse at all. I'll either have to buy another harness (expensive!) or figure out which of the pins is the remote reset and solder in a new wire.
If it was easy, everyone would do it.
entry 403 - tags: wiring, computer | | | February 14, 2008 - After a conversation with Pete at P-Sport (a US Coralba dealer) as well as Janel, I suspect I'm simply going to spend the money to solve the rally computer hookup.
Coralba does not share technical information and won't even confirm if my existing harness will work at all. Given that these computers retail for huge amounts of money new, it's probably not worth taking a chance. Janel commented that I should spend my time working on something else instead of reverse-engineering her rally computer.
P-Sport does have both the correct C-Giant harness and the PGE-V-pres8 converter I need to hook the factory Mazda ABS sensors to the Coralba.
entry 404 - tags: wiring, computer | | | 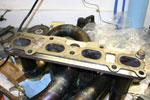 | February 15, 2008 - Before installing the header, I used a die grinder to match the ports to the gasket.
Well, actually, I did this after I installed the header and then removed it again. Can't have too much practice, right?
entry 405 - tags: header | | |  | February 15, 2008 - Before the final installation of the header, I painted it with some high-temperature paint.
This is the same stuff I used on the Seven, and it's staying on there pretty nicely. I thought about going with black to hide the crappy welding, but decided on white. Why white? Because any leaks will show up clearly and it looks like an old-school Formula 1 exhaust that way! Hopefully it won't be too glossy. Now, once it's dry I can bung it in the car, finish installing the differential and the rest of the exhaust and then it'll be good to go! Well, as soon as I get my suspension back it will be.
entry 406 - tags: header | | | 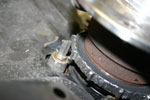 | February 15, 2008 - The appropriate Coralba wiring doodad has been ordered so that I can use the factory ABS sensor as a trigger.
But first, I need to lower the resolution. The factory setup sends 44 pulses per wheel revolution. That's about one for every 41mm! The maximum resolution the computer can cope with is one per 100mm. So I ground away 3/4 of the teeth. Problem solved!
entry 407 - tags: wiring, computer | | | 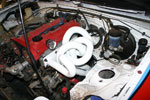 | February 17, 2008 - The header is in and looks very white.
I'm glad to report that it fits perfectly, right down to the angle of the outlet flange and the placement of the O2 sensor. Whew! I haven't fired the car up as I'm still reassembling it, but that's a big step ahead.
Meanwhile, the differential is back in - and this should be the final one. A Torsen with a 4.30 ring and pinion, just like I thought I'd installed almost a year ago. It fought me somewhat and I had to loosen all the bolts on the power plant frame to get everything to line up, but I did prevail. So the car's almost completely assembled now. Hopefully I'll be able to take it out of the garage for the first time in months next week.
entry 408 - tags: header | | | February 19, 2008 - It's alive!
Finally, after being in drydock for months, the car took a trip out of the garage. This means that I've managed to get my hands on the race shocks again (yes), the exhaust system is complete (yes) and I had some time to work on it all (yes).
Initial reactions to driving with the header? Well, it doesn't leak. I didn't have the laptop attached to the computer so I don't know if the engine's asking for more fuel - that's an indication that it's making more power. I'll do that in the next few days. But the car feels good. And it's a bit stinky as that new white paint cures into a light tan.
The suspension feels pretty good, but I got the height wrong when I first installed it. The car's about 1 to 1.5" too low right now. I did install my stiffer springs (450 lb/in front, 300 lb/in rear) at first but almost immediately pulled them out to install the softer 300/225 setup I've been using. While the stiffer setup would be good for a more track-biased car or even an aggressive street car, they're too stiff for the combination of my very light car and the rough roads I need to absorb.
entry 409 - tags: suspension, header | | | 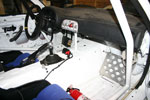 | February 21, 2008 - I spent a few minutes setting an approximate ride height for the car.
Nothing too precise or difficult, but it gets me into the range I want instead of being slammed down low. The driver's rear was down at around 12" (measured from the hub to the fender) so I lifted it up to 13.25". This is a ride height that works pretty well on a street-driven Miata and I think it'll be a good combination of ground clearance and CG location for the Targa car. I'm running 13" in the front. This will be fine-tuned later after the car's up to its final weight with a full load of tools, spare tire and other gear.
I did take a quick spin in the car last night to give the defogging system a test. It worked - if I turned off the fan the window would start to fog up a bit, but flipping it on cleared things up nicely. It wasn't a harsh test, but it was the best I could arrange in our climate.
So, time to install the intercom. First, I need to install the amplifier box itself. This needs to be accessible while driving so I can adjust the volume. It also needs to be accessible so we can easily change batteries - assuming I don't hard-wire it into the car. So I put it in front of the shifter, then spent a bit of time making sure the wires were properly corralled. Everything is on rivnuts so I can quickly pull the intercom (a Peltor FMT100, by the way) out of the car and install it into another. And because I haven't posted many shots of the cockpit, here's the big view!
entry 410 - tags: suspension, intercom, ergonomics | | | 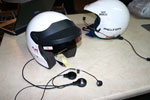 | February 21, 2008 - I tried to locate a Peltor helmet for Janel to match my own.
She wears a size small, and for some reason the small Peltors go for ridiculous sums on eBay when compared to the larger helmets. After trying to win various helmets all over the world, I gave up. She has a G-Force full-face helmet that she uses for track days and finds it very comfortable. We felt an open-face would be better for the race. A quick call to Discovery Parts and this new one was dispatched.
The intercom is a Peltor open-face kit. We stuck with Peltor instead of using something like Terratrip for this because we wanted the best fidelity possible and I felt that sticking with a single brand was best. Besides, this is one Peltor part that's relatively inexpensive.
And yes, Janel has personalised it already with a pink cat.
entry 411 - tags: safety, intercom | | | 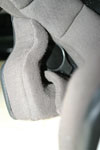 | February 21, 2008 - A happy discovery.
The G-Force helmet has a void to give room for the wearer's ears. The Peltor speakers are the perfect size to fit in this void. I thought I'd be cutting padding to fit these in, but no. They fit well enough that I was able to just stuff them in place so Janel and I could play with the intercom comfortably. While sitting on the couch. This is why we keep the blinds closed at our house.
Foolishness over, I used a bit of Velcro on the back of the speakers to stick them in place. There's even a deep seam between two sections of padding that makes a great wire channel.
entry 412 - tags: intercom | | | 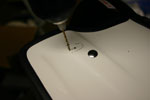 | February 21, 2008 - The microphone required a little more alteration.
A small bracket needed to be bolted to the side of the helmet. Some careful measuring and drilling ensued. Another lucky break, the holes ended up in that same void used by the speakers, right beside the metal bracket that holds the chin strap. It avoided any of the soft padding inside the helmet. It's all too good to be true!
The measurements were accurate, and the holes ended up in exactly the correct place. The supplied bolts (okay, they're machine screws) were just long enough, but not long enough to give me confidence in the threads should the microphone get yanked. So I hunted around and found two more 2.5mm screws out of some Miata application that were the perfect length. So now Janel's helmet has Miata parts. Naturally.
entry 413 - tags: intercom | | | 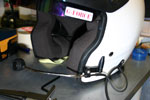 | February 21, 2008 - The final step in headset installation is cable management.
The speaker wire for the far side tucked nicely under the rubber finishing strip that runs around the edge of the fibreglass shell. I added an anchor for the microphone wire as well as the plug that goes to the amplifier. It's easy to forget you're plugged in when you go to get out of the car, and I wanted to avoid pulling half of the headset out of the helmet in this case!
Now that it's all done, I couldn't be happier with the result. Other than two tiny holes for the microphone boom and one slightly larger hole for the wire anchor, the helmet is unmodified. The speakers don't interfere with comfort at all and the sound quality is excellent. Everything went in so easily that you'd almost think this helmet was designed for the purpose at hand. Excellent.
The total cost was only $250, using all new parts. Compare that to $700 for a new Peltor helmet. Granted, the Peltor has better sound isolation but this shouldn't be a problem in our relatively quiet car.
entry 414 - tags: intercom | | | 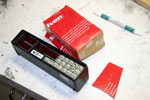 | February 27, 2008 - Time to mount the rally computer on the dash.
My original clever idea was to embed it in the dashboard, but a quick check using a handy co-driver pointed out that this would put the odometer out of reach. Not a clever idea then.
So, after a fair bit of looking and thinking and turning the computer over in my hands, I came up with what should be a fairly strong solution. I'm concerned about the mount vibrating around, causing various failures and making it hard to read. So this box is meant to be nice and solidly mounted.
First step is to prototype it using cardboard. And not just any cardboard, race cardboard! It's the box from Janel's helmet. Reduce, reuse, recycle kids!
entry 415 - tags: ergonomics, computer | | |  | February 27, 2008 - The cardboard template, transformed into aluminum.
I've never welded aluminum before, but after all of the TIG practice with the header I found it really easy. The biggest difference was how the filler rod melted - and it was really fun to simply melt the seams together with no filler at all. I could get to enjoy doing this. After the picture was taken, a bit of work with a wire wheel cleaned up some rough edges on the cuts.
Next, to make it lighter (not that there was a problem in that regard!) I decided to cut some holes in it. Looks as if my hole saws were intended for wood, not metal. Whoops. The holes were rather ugly looking and the saw kinda wandered around. No worries, I was planning to paint the bracket black anyhow. Raw aluminum looks cooler and more racy, but is far more likely to reflect on the windshield.
entry 416 - tags: computer | | | 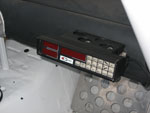 | February 27, 2008 - The Coralba, fully installed.
The bracket turned out to be immensely stable, making the computer a solid part of the car. That's good. It also weighs next to nothing, also good.
The computer is partially wired in, enough that I can verify that it's functioning. Good news, the modified ABS wheel sensor appears to be working perfectly. I did a rough calibration using the car's odometer and drove around town pretending I was on a stage. It's a very cool little unit with a lot of capability, and thus it will take a bit of work to understand it properly.
Other than the wheel sensor, I also wired in the reverse signal. This prevents the odometer from adding distance when the car is reversing. I can add a second remote to the computer if this feature is ignored, which can be used to finish a stage and display all the useful information. Hmm, I'll ask Janel which she wants. She was very excited about the reversing feature though. I sure hope she wants to keep it, it took me an hour to splice in one wire due to the position of that wiring harness. Ouch.
entry 417 - tags: ergonomics, wiring, computer | | | 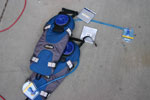 | February 27, 2008 - Since the Targa involves long days - and a full week of those - it's important to stay hydrated.
These Camelbak "Unbottles" are going to get mounted in the car so we always have water available. Here in the desert it's also important to stay watered, and I've found I drink far more water when cycling when I'm using a Camelbak instead of a bottle.
The Unbottles are different than normal Camelbaks in that they don't have shoulder straps. Instead, they're designed to be strapped in using various methods. That's perfect for us.
entry 418 - tags: ergonomics | | | 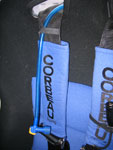 | February 27, 2008 - On the driver's side, there's room for the Camelbak to sit between the seat and the roll cage.
A strap on the top of the Unbottle lets me hook it into place so it won't move. Perfect. Now I just need to figure out how to fit one around the navigator's seat. That seat is moved further aft and there's no room between the seat and bulkhead.
The intercom plugs and water tube are attached to the shoulder straps via some clever little velcro ties. They're more secure and easier to remove than the elastic band I was using before.
entry 419 - tags: ergonomics | | | February 28, 2008 - The car's back from the alignment shop.
Just like last time, the left front won't get as much camber as I'd like. As I've (probably) mentioned before, I'm experimenting a bit with the alignment on this car and running more camber than I usually do. Right now, it's got a "traditional" alignment like I've been using for years. That's not such a terrible thing, but I'm a bit disappointed I can't try the new setup. Maybe I'll bung a couple of adjustable bushings in that control arm. I'll have full access to an alignment machine in a month or two.
So the car's looking pretty complete now. Why the recent improvements? There's a track day coming up next weekend at Pueblo. Janel and I will be testing the intercom, computer and general compatibility in-car. It should be fun.
entry 420 - tags: suspension | | |
|

 THE DIARY