| MIATA BUILD |
|
|
 | |  | January 26, 2008 - A really slick plug.
When I removed the stock antenna from the car, there was a hole left in the rear fender. Not being a fan of bodywork, I didn't fill it before the big paint extravaganza. I altered the base of an antenna to sort of fill the hole, but it was ugly.
A coworker found this trick on one of the Miata forums, and it's brilliant. This plug is from the Miata windshield wipers. It hides the nut that attaches the wiper arms to the shaft. And it is the perfect size to plug the antenna hole. Very slick!
Update! Tom Smith informed me that Mazda provided a similar plug on the early base model Miatas that didn't come with a radio. Mazda Competition can provide them if you want the real thing.
Update #2! "Wreckerboy" found a similar plug at his local hardware store for around 18 cents.
entry 391 - tags: interchange | | |  | January 27, 2008 - I've been informed that heat treating usually takes place at 1000+ degrees, not 500.
And I've been told that my thin-walled pipes won't need it. And I've been told that the header will crack if I don't heat treat it, and that I can heat treat it in the oven. So many opinions!
I figure my home oven heat treating won't hurt anything, and maybe it'll help. Those who are concerned about the safety of my domestic arrangements will be glad to know that the header was not stinky. Remember, I did carefully degrease the part first!
The best part? Check out the cool colors! This picture doesn't do full justice to the neet brownish/purple sheen on the pipes.
entry 392 - tags: header | | | 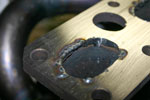 | January 31, 2008 - More header work.
Someday I'll have to move on to something else. But I spent some quality time with the belt sander ensuring the flange is nice and flat. Then I laid a gasket over the flange and did a little porting. In a few spots I needed a bit more material so I added it in with the welder. Now, more sanding then more grinding.
Once that's done, it's time to build the lower half and move on to something else!
In other news, I did install the navigator light provided by Rallylights.com and it will be wired in shortly. I'm also trying to figure out how to put in another door bar on each door. It's not going to make the cockpit any roomier, that's for sure.
entry 393 - tags: header, safety, ergonomics | | | February 4, 2008 - Big work this weekend - I wired up the navigator's light.
Ooo. Plus I went skiing in snow deep enough to drown me. But on a more serious note, we're in the middle of logistics. Hotel bookings, ferry bookings, airline bookings - and I have to figure out how to get to the car to the ferry. Such excitement! There's a lot to be done to simply show up at the starting line for this race.
entry 394 | | | 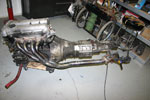 | February 4, 2008 - Time to finish off the header.
Step one is to make a jig. After all, a misalignment here will cause problems all the way down the exhaust system. So I mounted the Racing Beat header up on a spare engine and transmission, then bolted the flange from a stock midpipe to the end of the header. A quick and dirty bracket was welded on to this and bolted to the back of the transmission. Voila, a jig. Flyin' Miata actually has these for all the various Miata models, but nobody could find the 1999-05 one I needed.
entry 395 - tags: header | | |  | February 4, 2008 - A junked catalytic converter supplied the flange for the header along with a nice little bend.
It's handy having extra exhaust pieces all over the place. Much of the rest of the header was built from a prototype turbo exhaust for a 2001 Protege5.
entry 396 - tags: header | | | 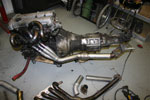 | February 4, 2008 - To do this properly I really should have the engine sitting on a subframe.
But, well, I don't. So I just took the Racing Beat routing as an example and tried to tuck the pipes in close to the transmission. It all went together extremely easily, actually.
I did put a flex joint in the middle of the pipe. I don't usually like to use them, but I figured a bit of flex might be appreciated by the spaghetti up top to decrease the risk of cracking a bit.
entry 397 - tags: header | | | 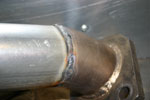 | February 4, 2008 - Another hour or so of playing with pools of molten metal and the header is welded up.
As you can see, my TIG welding has improved quite a bit! This section of the pipe does have the proper curve to it, don't worry. It looks a little kinked in this picture.
So, does it fit in the car? One small problem. That flex joint is in just the perfect place to hang up on the bellhousing as I insert the header into the car. It's a fraction of an inch too large to fit through. By loosening up the nut on one motor mount and sticking a jack under the oil pan, I was able to shift the engine slightly to let it past. Once that's done, it's perfect. Almost like it was meant to be in there!
All that remains to be done is to locate and weld in a bung for the O2 sensor. Then I'll bolt it all up and we'll see if it's airtight. I don't feel like crawling under the car to mark the O2 location tonight so it'll be in a day or two. There's not a huge rush as I can't drive the car until my differential shows up and I can wrest the AFCOs from the car they're in.
entry 398 - tags: header | | | 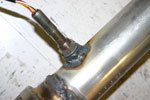 | February 6, 2008 - The final step in the header.
Provided it doesn't crack or cause problems later, of course! I marked the ideal location for the oxygen sensor when it was installed in the car, and then drilled a hole and welded on this fitting. Goofy thing, it was basically a big nut. Well, welding a flat nut on to a curved pipe means lots of filling in. I did an okay job, but I would have preferred to have one of the better-made units that is machined to insert into the hole. It involves less gaping space.
Oh well, it's on now so I can install the unit. I still have to get my hands on the (final) differential, so the rest of the exhaust can't go together until then. The final spec of the shocks was sorted out today - the front body will be 1" shorter with a different upper mount on the production versions to fit the 1999+ cars better - so I should have those back soon. Just in time for the track testing on March 9th, of course.
entry 399 - tags: header | | | February 11, 2008 - Rally school!
Janel and I travelled to Ridgecrest, California for the California Rally Series school on Saturday. This allows us to earn NASA Rally licenses for the Targa as well as teaching us, well, how to be a rally team.
The school's been on for around 12 years or so, and most of the bugs have been worked out. The day started off with a lot of classroom work, covering the basics such as classification, license types and how the heck to get involved. Then we moved on to basic timing and scoring - including a little rally run around the hotel. This is the area that Janel and I really need practice on, and it gave us a good idea of what to expect.
The section on course following and safety was unfortunately given by someone unfamiliar with the material, and she ran over time so some of the most useful sections were glossed over very quickly. We'll go back and spend some time with the workbook that was given to each of us. Still, it gave both Janel and I an idea of how the in-car interaction will work. That's the part we need to practice the most.
Around 2:30, the class split up. The drivers headed for a rallycross course. Now, I'm going to be racing a rear wheel drive 5-speed Miata on tarmac roads with racing tires. So the obvious way to practice for that is by driving a front wheel drive automatic family sedan in mud, isn't it? Okay, maybe not. And maybe I didn't pick up a lot of useful tips in the driving practice because of it and because I have more experience behind the wheel in extremis than some of my classmates. But I did have a lot of fun, and I can definitely not recommend you buy a used rental car. You might get mine.
Meanwhile, as I was throwing mud onto the roof of our respectable sedan and left-foot braking until the car reeked of cooking brake pad, Janel was working hard. She has a good idea now of just how much preparation she's going to have to do each night during the rally. Codriving isn't just about being a lump of ballast as some nutcase tries to get you both killed, it's about preparation and being able to juggle dozens of inputs under fairly stressful conditions. And that's the sort of thing that she does very well. While she's not excited about the amount of work that will have to be done during the event, she's now asking the sort of questions I love to hear - questions about regulations, timing controls and the capabilities of our rally computer. She was disappointed in her practical training during the school, but she's got what she needs to get started. Being a rally fan helped out a lot and she knows a lot more about driving than her classmates.
Overall, a decent school. Both of us would have preferred a higher level of instruction - perhaps by splitting the two groups apart earlier in the day - but we now know enough to learn the rest on our own. If we can find a TSD in our area, that would be ideal.
entry 400 - tags: skills | | | 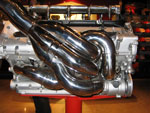 | February 11, 2008 - While on the way to the rally school, we spent a day in Las Vegas.
There's a Ferrari dealership at the Wynn ($10 to get in if you're not already a Ferrari owner, sir) as well as a Ferrari theme shop. Can you say brand dilution? Perhaps selling pencils and kiddie pajamas with the Ferrari logo is not quite in line with the racing heritage. Anyhow...
Right inside the doors on a stand is this Formula 1 V10, for a mere $62,000. I got a big grin on my face when I saw this header. They were on sale for $9500 each side if you wanted them separately. I don't need one, I have my own!
entry 401 - tags: header | | | February 12, 2008 - While rooting through the Coralba instructions last night, I got inspired to revisit my plan to use front wheel ABS sensors as triggers for road speed.
I've fired off a technical question to Coralba to see if they can answer me, and done a bit of testing on a Miata to see just how the wheel sensor behaves. The biggest potential problem I see is that the Coralba wants no more than 10 pulses per meter. That means about 18 teeth on the trigger wheel - and as you can see in this picture, I have a lot more than that to deal with. I could grind off every second tooth, or maybe two out of three. First, let's see if Coralba responds with any decent technical information.
The fallback position is to read off the speedometer. This will be affected by wheelspin of course, but it's a very simple installation.
entry 402 - tags: wiring, computer | | | February 13, 2008 - Since I posted the comment about altering the ABS trigger wheel, I've received a number of emails from folks with suggestions.
Unfortunately, trying to find a different way to mount the sensor isn't going to solve my primary problem: how to use the signal. Coralba has told me (in a one-sentence email) that I should use their PGE-V-pres8. There's no record of that unit anywhere on their site or anyone elses that I can find, so I'll see if I can get some information out of a Coralba dealer somewhere.
As for the wheel sensor, Mazda put a lot of effort into mounting that very well for me. It's easy to chop a few teeth off the trigger wheel, much harder to come up with my own mounting that will stand the abuse. So if I can figure out how to set the signal up properly, I will use the factory design.
Adding to the fun is the fact that the wiring harness for my used C-Giant actually comes from another computer. It's missing the wires for the fuel sender (not critical to me, really) and the remote reset (okay, that one matters). I can use the reverse wire as a reset but Janel is really happy about the fact that this unit will count backwards if I have to reverse at all. I'll either have to buy another harness (expensive!) or figure out which of the pins is the remote reset and solder in a new wire.
If it was easy, everyone would do it.
entry 403 - tags: wiring, computer | | | February 14, 2008 - After a conversation with Pete at P-Sport (a US Coralba dealer) as well as Janel, I suspect I'm simply going to spend the money to solve the rally computer hookup.
Coralba does not share technical information and won't even confirm if my existing harness will work at all. Given that these computers retail for huge amounts of money new, it's probably not worth taking a chance. Janel commented that I should spend my time working on something else instead of reverse-engineering her rally computer.
P-Sport does have both the correct C-Giant harness and the PGE-V-pres8 converter I need to hook the factory Mazda ABS sensors to the Coralba.
entry 404 - tags: wiring, computer | | | 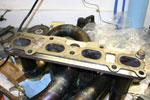 | February 15, 2008 - Before installing the header, I used a die grinder to match the ports to the gasket.
Well, actually, I did this after I installed the header and then removed it again. Can't have too much practice, right?
entry 405 - tags: header | | |  | February 15, 2008 - Before the final installation of the header, I painted it with some high-temperature paint.
This is the same stuff I used on the Seven, and it's staying on there pretty nicely. I thought about going with black to hide the crappy welding, but decided on white. Why white? Because any leaks will show up clearly and it looks like an old-school Formula 1 exhaust that way! Hopefully it won't be too glossy. Now, once it's dry I can bung it in the car, finish installing the differential and the rest of the exhaust and then it'll be good to go! Well, as soon as I get my suspension back it will be.
entry 406 - tags: header | | | 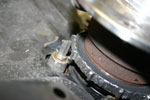 | February 15, 2008 - The appropriate Coralba wiring doodad has been ordered so that I can use the factory ABS sensor as a trigger.
But first, I need to lower the resolution. The factory setup sends 44 pulses per wheel revolution. That's about one for every 41mm! The maximum resolution the computer can cope with is one per 100mm. So I ground away 3/4 of the teeth. Problem solved!
entry 407 - tags: wiring, computer | | | 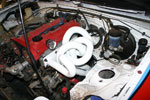 | February 17, 2008 - The header is in and looks very white.
I'm glad to report that it fits perfectly, right down to the angle of the outlet flange and the placement of the O2 sensor. Whew! I haven't fired the car up as I'm still reassembling it, but that's a big step ahead.
Meanwhile, the differential is back in - and this should be the final one. A Torsen with a 4.30 ring and pinion, just like I thought I'd installed almost a year ago. It fought me somewhat and I had to loosen all the bolts on the power plant frame to get everything to line up, but I did prevail. So the car's almost completely assembled now. Hopefully I'll be able to take it out of the garage for the first time in months next week.
entry 408 - tags: header | | | February 19, 2008 - It's alive!
Finally, after being in drydock for months, the car took a trip out of the garage. This means that I've managed to get my hands on the race shocks again (yes), the exhaust system is complete (yes) and I had some time to work on it all (yes).
Initial reactions to driving with the header? Well, it doesn't leak. I didn't have the laptop attached to the computer so I don't know if the engine's asking for more fuel - that's an indication that it's making more power. I'll do that in the next few days. But the car feels good. And it's a bit stinky as that new white paint cures into a light tan.
The suspension feels pretty good, but I got the height wrong when I first installed it. The car's about 1 to 1.5" too low right now. I did install my stiffer springs (450 lb/in front, 300 lb/in rear) at first but almost immediately pulled them out to install the softer 300/225 setup I've been using. While the stiffer setup would be good for a more track-biased car or even an aggressive street car, they're too stiff for the combination of my very light car and the rough roads I need to absorb.
entry 409 - tags: suspension, header | | | 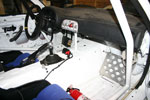 | February 21, 2008 - I spent a few minutes setting an approximate ride height for the car.
Nothing too precise or difficult, but it gets me into the range I want instead of being slammed down low. The driver's rear was down at around 12" (measured from the hub to the fender) so I lifted it up to 13.25". This is a ride height that works pretty well on a street-driven Miata and I think it'll be a good combination of ground clearance and CG location for the Targa car. I'm running 13" in the front. This will be fine-tuned later after the car's up to its final weight with a full load of tools, spare tire and other gear.
I did take a quick spin in the car last night to give the defogging system a test. It worked - if I turned off the fan the window would start to fog up a bit, but flipping it on cleared things up nicely. It wasn't a harsh test, but it was the best I could arrange in our climate.
So, time to install the intercom. First, I need to install the amplifier box itself. This needs to be accessible while driving so I can adjust the volume. It also needs to be accessible so we can easily change batteries - assuming I don't hard-wire it into the car. So I put it in front of the shifter, then spent a bit of time making sure the wires were properly corralled. Everything is on rivnuts so I can quickly pull the intercom (a Peltor FMT100, by the way) out of the car and install it into another. And because I haven't posted many shots of the cockpit, here's the big view!
entry 410 - tags: suspension, intercom, ergonomics | | |
|

 THE DIARY