| MIATA BUILD |
|
|
 | | 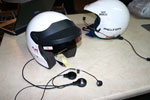 | February 21, 2008 - I tried to locate a Peltor helmet for Janel to match my own.
She wears a size small, and for some reason the small Peltors go for ridiculous sums on eBay when compared to the larger helmets. After trying to win various helmets all over the world, I gave up. She has a G-Force full-face helmet that she uses for track days and finds it very comfortable. We felt an open-face would be better for the race. A quick call to Discovery Parts and this new one was dispatched.
The intercom is a Peltor open-face kit. We stuck with Peltor instead of using something like Terratrip for this because we wanted the best fidelity possible and I felt that sticking with a single brand was best. Besides, this is one Peltor part that's relatively inexpensive.
And yes, Janel has personalised it already with a pink cat.
entry 411 - tags: safety, intercom | | | 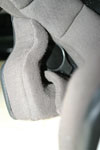 | February 21, 2008 - A happy discovery.
The G-Force helmet has a void to give room for the wearer's ears. The Peltor speakers are the perfect size to fit in this void. I thought I'd be cutting padding to fit these in, but no. They fit well enough that I was able to just stuff them in place so Janel and I could play with the intercom comfortably. While sitting on the couch. This is why we keep the blinds closed at our house.
Foolishness over, I used a bit of Velcro on the back of the speakers to stick them in place. There's even a deep seam between two sections of padding that makes a great wire channel.
entry 412 - tags: intercom | | | 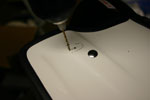 | February 21, 2008 - The microphone required a little more alteration.
A small bracket needed to be bolted to the side of the helmet. Some careful measuring and drilling ensued. Another lucky break, the holes ended up in that same void used by the speakers, right beside the metal bracket that holds the chin strap. It avoided any of the soft padding inside the helmet. It's all too good to be true!
The measurements were accurate, and the holes ended up in exactly the correct place. The supplied bolts (okay, they're machine screws) were just long enough, but not long enough to give me confidence in the threads should the microphone get yanked. So I hunted around and found two more 2.5mm screws out of some Miata application that were the perfect length. So now Janel's helmet has Miata parts. Naturally.
entry 413 - tags: intercom | | | 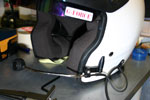 | February 21, 2008 - The final step in headset installation is cable management.
The speaker wire for the far side tucked nicely under the rubber finishing strip that runs around the edge of the fibreglass shell. I added an anchor for the microphone wire as well as the plug that goes to the amplifier. It's easy to forget you're plugged in when you go to get out of the car, and I wanted to avoid pulling half of the headset out of the helmet in this case!
Now that it's all done, I couldn't be happier with the result. Other than two tiny holes for the microphone boom and one slightly larger hole for the wire anchor, the helmet is unmodified. The speakers don't interfere with comfort at all and the sound quality is excellent. Everything went in so easily that you'd almost think this helmet was designed for the purpose at hand. Excellent.
The total cost was only $250, using all new parts. Compare that to $700 for a new Peltor helmet. Granted, the Peltor has better sound isolation but this shouldn't be a problem in our relatively quiet car.
entry 414 - tags: intercom | | | 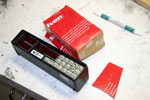 | February 27, 2008 - Time to mount the rally computer on the dash.
My original clever idea was to embed it in the dashboard, but a quick check using a handy co-driver pointed out that this would put the odometer out of reach. Not a clever idea then.
So, after a fair bit of looking and thinking and turning the computer over in my hands, I came up with what should be a fairly strong solution. I'm concerned about the mount vibrating around, causing various failures and making it hard to read. So this box is meant to be nice and solidly mounted.
First step is to prototype it using cardboard. And not just any cardboard, race cardboard! It's the box from Janel's helmet. Reduce, reuse, recycle kids!
entry 415 - tags: ergonomics, computer | | |  | February 27, 2008 - The cardboard template, transformed into aluminum.
I've never welded aluminum before, but after all of the TIG practice with the header I found it really easy. The biggest difference was how the filler rod melted - and it was really fun to simply melt the seams together with no filler at all. I could get to enjoy doing this. After the picture was taken, a bit of work with a wire wheel cleaned up some rough edges on the cuts.
Next, to make it lighter (not that there was a problem in that regard!) I decided to cut some holes in it. Looks as if my hole saws were intended for wood, not metal. Whoops. The holes were rather ugly looking and the saw kinda wandered around. No worries, I was planning to paint the bracket black anyhow. Raw aluminum looks cooler and more racy, but is far more likely to reflect on the windshield.
entry 416 - tags: computer | | | 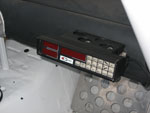 | February 27, 2008 - The Coralba, fully installed.
The bracket turned out to be immensely stable, making the computer a solid part of the car. That's good. It also weighs next to nothing, also good.
The computer is partially wired in, enough that I can verify that it's functioning. Good news, the modified ABS wheel sensor appears to be working perfectly. I did a rough calibration using the car's odometer and drove around town pretending I was on a stage. It's a very cool little unit with a lot of capability, and thus it will take a bit of work to understand it properly.
Other than the wheel sensor, I also wired in the reverse signal. This prevents the odometer from adding distance when the car is reversing. I can add a second remote to the computer if this feature is ignored, which can be used to finish a stage and display all the useful information. Hmm, I'll ask Janel which she wants. She was very excited about the reversing feature though. I sure hope she wants to keep it, it took me an hour to splice in one wire due to the position of that wiring harness. Ouch.
entry 417 - tags: ergonomics, wiring, computer | | | 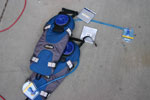 | February 27, 2008 - Since the Targa involves long days - and a full week of those - it's important to stay hydrated.
These Camelbak "Unbottles" are going to get mounted in the car so we always have water available. Here in the desert it's also important to stay watered, and I've found I drink far more water when cycling when I'm using a Camelbak instead of a bottle.
The Unbottles are different than normal Camelbaks in that they don't have shoulder straps. Instead, they're designed to be strapped in using various methods. That's perfect for us.
entry 418 - tags: ergonomics | | | 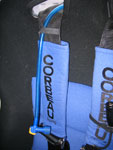 | February 27, 2008 - On the driver's side, there's room for the Camelbak to sit between the seat and the roll cage.
A strap on the top of the Unbottle lets me hook it into place so it won't move. Perfect. Now I just need to figure out how to fit one around the navigator's seat. That seat is moved further aft and there's no room between the seat and bulkhead.
The intercom plugs and water tube are attached to the shoulder straps via some clever little velcro ties. They're more secure and easier to remove than the elastic band I was using before.
entry 419 - tags: ergonomics | | | February 28, 2008 - The car's back from the alignment shop.
Just like last time, the left front won't get as much camber as I'd like. As I've (probably) mentioned before, I'm experimenting a bit with the alignment on this car and running more camber than I usually do. Right now, it's got a "traditional" alignment like I've been using for years. That's not such a terrible thing, but I'm a bit disappointed I can't try the new setup. Maybe I'll bung a couple of adjustable bushings in that control arm. I'll have full access to an alignment machine in a month or two.
So the car's looking pretty complete now. Why the recent improvements? There's a track day coming up next weekend at Pueblo. Janel and I will be testing the intercom, computer and general compatibility in-car. It should be fun.
entry 420 - tags: suspension | | | February 28, 2008 - I've always wanted a license plate that says CON BRIO.
What can I say, it's the result of a musical education. It means "with life, with spirit" and I've always felt it summed up a sports car.
Eric pointed out to me today that the ideal plate for the Targa car would be "allegro ma non troppo". Fast, but not too fast. Perfect! Although I'm not sure it's going to fit on a plate.
entry 421 | | | February 28, 2008 - For sale - two seats in the Targa Newfoundland driving school. Due to logistical problems, we're not going to be able to attend the Targa Newfoundland school put on by Open Road Motorsports.
By all accounts, this is an excellent school that's highly recommended for any Targa competitor. We'd go if we could. But we can't.
We paid $795 for our entry, so that's what we're asking for our seats. If you sign up for a 2008 school now, you'll pay $1045. It's an excellent opportunity to save $250.
School website
Sold!
entry 422 - tags: for sale | | | February 29, 2008 - I did a bit of autotuning on the way in to work.
The long way, of course. After looking at the changes, it appears the engine is hungry for all sorts of extra fuel up top. This is excellent, as it implies the engine is making more power. Yay! The car should hit the dyno on Monday and then I'll know a bit more. Jeremy at Flyin' Miata took a look at the maps and massaged them somewhat, so I have a better starting point for more autotuning on the weekend.
I also discovered that the Coralba shuts down when the headlights are on. Interesting. I'll have to trace that one back and find out what's going on. Running lights are fine, it's just the main lights that shut it down.
entry 423 - tags: tuning, wiring, computer | | | February 29, 2008 - Aha!
The relationship between the rally computer and the headlights is now clear. It started when I went looking for an unswitched power supply for the computer. The last thing I wanted was for me to accidentally reset the computer by turning off the ignition, you see, as then I would have to face the wrath of Janel and the potential of a retaliatory "flat left over crest into rock wall" call further along in a stage. I installed a separate switch for the computer instead. Anyhow, right beside the switch was the headlight retractor switch. It has unswitched power. So I tee'd into that.
Well, it turns out that when the headlights are powered up, the electricity to the retractor switch is cut off. Makes sense, you don't want someone dropping the lights when they're supposed to be up. But this nicely cut the power to the Coralba at the same time. I can't see this in the wiring diagram, but a check with the test light confirmed that's what was going on.
I had a handy wire coiled up behind the dash that was labelled "BATT +". See, I'd been thinking ahead. But it didn't work. I pulled out a wiring diagram and it seemed as if it should. But it wasn't used for anything else. So I checked the fusebox. Aha! A blown fuse. Popping in a new one lit up the wire and it was a simple matter of teasing it out of the harness and rerouting it to the back of my computer switch.
This was one of those examples where doing something else paid off. My brain kept flipping through options until the "retractors don't work when the lights are on" solution came to mind.
entry 424 - tags: wiring, computer | | | 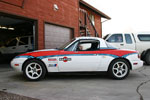 | March 1, 2008 - I think this will be the final ride height for the car.
I usually measure from the center of the hub to the bottom of the fender, as that's a measurement that's independent of wheel/tire sizing. It's about 13" front, 13.25" rear. Just to be more accurate, I decided to use the bottom of the frame rails to confirm the car was sitting level. After all, my fenders have been a little reshaped. Turns out I was dead on on all four corners. Good!
I like the stance. It's obviously not a road racer, but it looks capable. I have ground clearance and lots of travel, but the car's not unstable. We'll see how it likes the track next weekend.
entry 425 - tags: suspension | | |  | March 4, 2008 - The moment of truth for the header.
Did all that work actually get me anything? In short, yes! I saw a gain of 15 lb-ft at 3500 rpm and around 10 hp at 5200 rpm. Cue the happy dance.
The car sure sounded different, as you could hear some strong resonances and beats coming from underhood. That's good, the header is all about resonant frequencies.
On the dyno run, you can see the Racing Beat header in blue and the new one in red. Other than a minor loss between 4000-4500 rpm, the new one is a winner right across the board. It didn't unplug the engine above 6000 rpm as I'd hoped, but a big slug of torque across the range is a lot more useful on the Targa.
Dyno chart
Now, the engine still isn't anywhere near its potential. Keep that in mind when looking at the dyno chart. I don't know if my 200 hp at the wheels goal is attainable, but 170 should be possible. The cams are under suspicion, as sister engines to this one have held power a bit longer without giving up the bottom end. I have another couple of options to try and there hasn't been any experimentation with the cam gears yet. Since they typically trade off low end for high end and vice versa, I don't think they're going to solve things overall. Still, it's worth trying.
Jeremy Ferber from Flyin' Miata was the tuning meister, working in temporary conditions as FM is in the middle of a move.
It wasn't all good news, though. It turns out the car has a problem with the wideband O2 sensor, so we couldn't do a whole lot with tuning. Normally, Jeremy has enough experience to tune via injector pulse width against horsepower, but the 2001 injectors I'm using aren't in his mental program. So I'll be doing a little diagnosis to sort that out - we suspect the heater circuit isn't working. The car was also running hotter than it should, so I'll take a look to make sure the thermostat is working properly.
entry 426 - tags: header, engine, dyno | | | 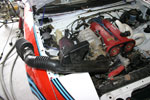 | March 4, 2008 - Despite the problems, we did get a chance for some comparative testing on the dyno.
My temporary intake pulled hot air from behind the radiator. That's one reason it was temporary, and why it was mounted upside down in the previous picture of the car on the dyno.
For interest's sake, we pulled out a stock 1994 intake tract that includes a resonating Heimholtz chamber. It's not perfectly sized for my engine - I believe the theory says it should be equivalent to 1.5 cylinders worth of displacement - but it was worth trying. And whaddya know, it did something! Nothing major, but 4 lb-ft at 4000 rpm for free is nothing to complain about. The red graph is the stock setup.
Dyno chart
Using the stock crossover tube will also let me put the filter in a cooler place than right behind the rad, which will reap benefits in the real world where having a filter sticking through the hood is awkward to arrange.
In the picture, you can see the filter from my original intake resting inside the engine bay. Don't be fooled, we don't have some sort of bizarre dual-filter setup going here.
entry 427 - tags: engine, dyno, intake | | | March 5, 2008 - As expected, some people have been focusing in on the peak horsepower of the engine and scoffing.
Sure, that's understandable. It would be an expensive engine to buy and it's not making the headline horsepower numbers that people expect to see. But it's also not finished development yet, and it's doing well in the range I need for the Targa. I'll get those headline numbers eventually, although the driver and suspension are more important at this point.
In the meantime, here's a comparison between a fully built CSP-legal 1.8 with 10.5:1 compression. It's a pretty nice engine and the car feels quick. Which of these would be faster on the road?
2.0 vs 1.8 dyno chart
entry 428 - tags: engine | | | 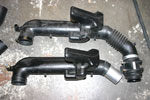 | March 6, 2008 - The stock intake needed to be modified to fit my car.
The biggest problem was the big loop in the #1 runner in the header. The stock setup basically drove directly into that. Not good. So, a little bit of trimming and a chunk of pipe later, and voila! The tube is made of hard rubber, so it fit around the pipe really nicely. A clamp ensures nothing comes free.
On the left side of the picture, you can see how my air temperature sensor fits in the bung originally used for the idle speed control valve intake on this 1994 part. On my 1999 throttle body, that intake is inside the throttle body so the fitting is unused. The air temperature sensor screwed right in there tightly as if it was meant to be installed in this location.
entry 429 - tags: intake, engine | | | 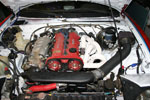 | March 6, 2008 - The intake in place.
Okay, that black plastic/rubber crossover tube isn't really very sexy. But it works, and that's what counts here.
There's a bracket supporting the crossover tube at the short piece of pipe, then another supporting the air filter. It's not an ideal spot for the filter, really, but I'll make a heat shield to protect it - and the brake lines - from the header heat before too long. That flexible hose isn't as tightly stretched as it appears in this picture, by the way.
Speaking of the header, note what happens when you forget to degrease the pipes before painting with high-temp paint. Whoops.
I also sorted out the wideband oxygen sensor problem. It appears to have been a bad heater in the sensor. I popped in another to check it out, and on a test drive I saw a good range of numbers. The old sensor would work fine until exhaust flow got high, then it would just sit at 14.7:1. The new one showed numbers as rich at 10:1 under wide open throttle. Obviously not good for power, but at least I know the sensor's working! I'll let the car autotune itself at the track this weekend. I don't think I'll have time to dyno the car tomorrow.
entry 430 - tags: intake, header, engine | | |
|

 THE DIARY