| MIATA BUILD |
|
|
 | | 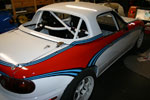 | August 7, 2007 - The hardtop is painted and installed.
It's not the best part of the car, but it still looks pretty good. Now it's time for some final assembly. Brandon came over last night and helped to install the top, clean up wiring and install the dash. Now the windshield can go in. I'm on schedule to have the car ready for the Open House, and it's all coming together nicely.
entry 272 - tags: paint, Martini | | |  | August 7, 2007 - Now that the hardtop is painted, it's time to make the rear window.
I'm going to cut one out of 1/8" Lexan for lighter weight.
Step one, take a pattern off a glass window. Tape the paper to the outside of the glass and trace the shape (then take a blurry picture when you're done). Looks as if a 60x24" piece will be more than enough.
entry 273 - tags: weight loss, lexan window | | | 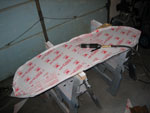 | August 8, 2007 - Next step in the rear window: cut it out.
I use a pneumatic reciprocating saw, but a bandsaw or jigsaw works just as well. If you have a good template, you can have the plastic shop cut it out for you. The problem with that is that I've always had to do a bit of trimming afterwards to get the edges right. In this picture, I'm partway through that process. The first few rivet holes are drilled and various alterations to the shape have been marked and cut. The protective plastic was peeled up so I could see the lip on the hardtop.
entry 274 - tags: weight loss, lexan window | | | 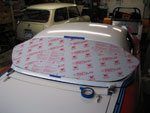 | August 8, 2007 - Installing the window is fairly easy.
Just start in the middle and pop in some rivets every few inches. In this case, I used a 6" spacing until I got to the hard curves at the edges, when I dropped down to 3-4". It's also important to mark which way is us, I've learned the hard way in the past that it's easy to install the window upside down!
entry 275 - tags: weight loss, lexan window | | | 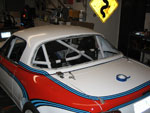 | August 8, 2007 - After about three fittings, I riveted the window into place.
To keep the rivets from pulling through the fibreglass hardtop, I used washers on the back side. The polycarbonate (generic term for Lexan) is flexible enough that it will simply bend around the curves without any need for forming, and the rivets will easily hold it in place even before they're popped..
I also tried sealing the window in to place with silicone, I'm thinking this wasn't a good idea aesthetically. I've never had to worry about weatherproofing before. It's supposed to dry clear, we'll see if that happens after more than 12 hours. The fact that I painted the lip around the inside of the window black before starting didn't help there.
By the way, the original glass window weighed a bit over 11 lbs. I didn't weigh the polycarbonate, but based on the density of the material it should be right around 5-6 lbs. A Miata windshield is 20.9 lbs.
entry 276 - tags: weight loss, lexan window | | | 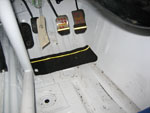 | August 8, 2007 - This looks worse in the picture than it does in person.
I took some high-traction tape for stairs and stuck it on to the floorboards to keep my feet from sliding around. I've also found the Momo pedals to be on the slippery side despite the stylish rubber nubs, so they got some traction tape as well. As an added bonus, the yellow reflective strip will make it easy for me to see the footwell in the dark!
entry 277 - tags: ergonomics | | | 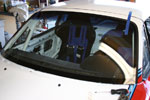 | August 9, 2007 - The windshield fairy has been here!
Having the windshield in makes the car look so much more complete - and smaller. At least, that's what I think. Janel and Brandon think I'm nuts. This isn't the same windshield I pulled out a few months ago. It turns out that one had a small stone chip, and may not have survived the implantation process. New glass was only about $70 or so, so that was an easy decision to make. Now that there's glass between me and the bugs, the car is much more driveable.
Brandon came over and we tore into the car. He pulled the co-driver's seat and installed the sub belt for me while I worked on suspension and also installed the undertray for the engine bay.
entry 278 - tags: seats | | | 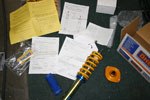 | August 9, 2007 - Finally, some real suspension.
These Öhlins are beautifully built with an obsessive attention to detail in some places and are carefully documented - in Japanese. There's a shortage of numbers so I'm guessing there's little information on setup. I was able to figure it all out though.
They're also very, very short shocks. At full droop, the front wheels are only at about 13.25" from the hub to the fender. That's close to what I wanted to run for static height, so they're unlikely to be the suspension of choice for the Targa. Still, it gives me the chance to test them out and get the car on track next weekend at the Flyin' Miata open house.
The spring rates are approximately 450 lb front and 330 rear. That's a good aggressive street rate, but again a bit more than I'd want for Targa. I went out for a short run after installing them and the ride is very good. There's a suppleness to it that bodes well. On short acquaintance I like them, but I don't think they'll work on the rough Newfoundland roads. We'll see how they work on the track, I don't have much else to test at this point.
entry 279 - tags: suspension | | | 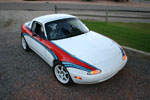 | August 9, 2007 - Out of the garage!
The Targa Miata visited Flyin' Miata today for the first time. Well, it's been there before, one piece at a time. But this is the first self-propelled visit. The car behaved itself and all of my coworkers were suitably impressed with the paint job.
I spent enough time looking at the car from a distance to start spotting sections of the stripes that I could have done better. It's time to get the decals on the car and distract myself from all that, I think.
One good note - the silicone on the rear window is slowly drying and going clear. In another couple of days, it should be all done.
entry 280 - tags: testing, Martini, lexan window | | | 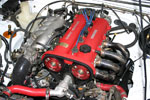 | August 9, 2007 - A lot of little jobs got done on the car tonight.
The most obvious underhood is the installation of the red valve cover - that's an instant 15 hp gain for sure, although I need to get a filter for that cam cover breather. I installed an interior rear view mirror, the plastic cowl at the base of the windshield, cleaned up a bit of wiring, changed the throttle cable bracket and generally did a few small things on the car.
The Mazdaspeed MX-5 turbo muffler sounded terrible, so it's been replaced by a Flyin' Miata part instead. That sounds a lot better and also drops a few pounds. I also determined that my recent addition of a no-slip patch was a total failure, as it started to creep around the footwell and announced itself to be a hazard. So it's gone now although the bits on the pedals remain.
The car's heading for the alignment shop tomorrow morning and then on to the dyno to get the engine into shape. It's part of the push for the track debut at the Flyin' Miata open house.
entry 281 - tags: ergonomics, exhaust, alignment, engine | | | 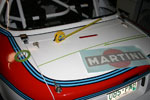 | August 11, 2007 - Sticker time!
I picked up all the various Martini logos and sponsor names yesterday. It's not quite a complete set, but it'll do to get the primary look of the car done. First step is to figure the exact location of the stickers and make sure they're straight!
entry 282 - tags: Martini, decals | | | 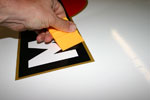 | August 11, 2007 - After the car's cleaned off, I wetted the surface down with slightly soapy water.
This gives me the ability to reposition the decals if necessary, although it can make it difficult to position strips of letters if you have things too wet. A small squeegee was used to chase out the bubbles and make sure everything conforms to the complex shape of the car.
entry 283 - tags: Martini, decals | | | 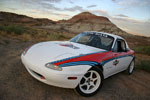 | August 11, 2007 - And here it is.
The Targa Miata, in (almost) full livery and ready for the track. As you can tell from the background, I live in an area that is about as different from Newfoundland as it is possible to be!
If anyone wants a larger version of this picture (or more shots of the car, I have piles of them), just let me know.
entry 284 - tags: Martini | | | 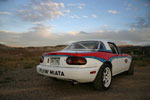 | August 11, 2007 - From the rear.
The chunky black lettering on the rear bumper is taken off the Martini cars as well. I'm considering something for the nose, but it'll have to be smaller to work. Maybe a MAZDA logotype. You can't tell from this photo, but the silicone around the rear window is finally going clear.
entry 285 - tags: Martini, lexan window | | | 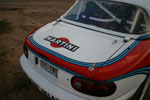 | August 11, 2007 - The trunk logo is placed near the trailing edge of the trunk.
I'm not 100% sure this is the best place for it, or if it should be centered.
entry 286 - tags: Martini, decals | | | 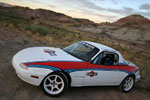 | August 11, 2007 - I've put the driver/codriver names above the window.
They're pretty visible!
I'm pretty sure I asked for a larger version of the logo for the hood, but it's pretty well balanced. There needs to be room for race numbers, race sponsors and more of our own sponsors on the sides of the cars.
entry 287 - tags: Martini, decals | | | 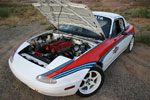 | August 11, 2007 - Open wide!
The powdercoated valve cover isn't a perfect match to the stripes, but that's fine by me.
It's interesting to see just how red the stripes do photograph despite the orange hue of the paint. That's why I spent so long searching for the perfect red, it had to have that ability to pop. I'll get some photos in direct sunlight later and see how it looks.
entry 288 - tags: Martini | | |  | August 12, 2007 - A number of little things were done today in order to prep the car for the track day on Friday.
This little filter is on the valve cover to feed the PCV system. That's a pretty misunderstood system, and in most cases a filter on the cover would be a bad idea. In my case, I have an engine management system that uses manifold vacuum to determine load, so there's no problem if some air comes through the valve cover first.
The car also got the first oil change and is now running full synthetic. The transmission and diff were drained and refilled with the correct fluids this time (whoops), and judging by the condition of the stuff coming out of the diff it's not a bad thing that I "flushed" it. I spent a bit of time working on exhaust system alignment, I'm afraid I'll have a bit of a rattle on hard cornering.
On the less mechanical side of things, I put some small rubber bumpers under the trunklid to ensure it doesn't rattle at all. Windshield wipers are in place (and functioning) and I added Grassroots Motorsports and SSR decals to the side of the car in front of the door. This is partly to acknowledge the support from GRM (go pick up a copy of the October 2007 Grassroots, you'll find my Seven in there) and to give SSR a bit of credit for originally supplying the wheels being used on the car. It's also partly a test of how to arrange sponsor decals on the car. Oh, and there's a big black FLYIN' MIATA on the nose of the car now to match the rear bumper. Pictures will come.
entry 289 - tags: drivetrain, exhaust, decals | | | August 13, 2007 - Car gallery added to the website.
After being innundated with a request, I've put up a gallery of the car from a bunch of angles. Yes, it's completely self-indulgent. But I don't mind at all.
So, if you'd like a Targa Miata wallpaper or just want the chance to critique the stripes carefully yourself, check it out: Targa Miata gallery.
Meanwhile, the car got aligned today. A bit of tuning on the computer and it's ready for the track. I've been driving it around for the last few days. I'll post some driving impressions soon.
entry 290 - tags: alignment | | | August 14, 2007 - So, how does it drive?
The engine isn't fully tuned yet so the car doesn't have full power, nor does it like to idle much. But ignoring those little foibles, it's a blast. The car is conspicuously light. It's surprising just how much difference an extra 300 lbs can make to a car, but it will happily surge forward on even just a tickle of the throttle. Even in the semi-tuned state there's a real snap to the throttle response. The car wants to run, and the short gearing exaggerates this.
The power steering is very light. A bit too light, perhaps. I'll try disabling it to see how that feels and if I'd want to deal with hundreds of kilometers of shattered roads without it.
The car is very rigid, with absolutely no flex - even compared to a modified Miata with a butterfly brace, structural foam in the frame rails and a rollbar. Amazingly, there are no rattles although there's a fair bit of noise and vibration through the uninsulated chassis and competition motor mounts. It's also rather warm inside as the engine and exhaust heat gets nicely transmitted. I'll have to do something about that.
The springs are stiff, but the Öhlins shocks control them very well. It'll be interesting to see how well that works on the track even without sway bars.
In short, the car is a ball to drive. It's a reminder that it's not just a Miata with a cool paint job.
entry 291 - tags: testing, stiffness, suspension | | |
|

 THE DIARY