| MIATA BUILD |
|
|
 | |
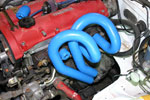
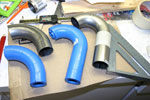
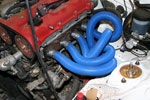 | December 22, 2007 - In order to sort out general packaging, I pulled out the blue pool hose again.
The collector is duct taped to the steering column as it fits well there. That means that I have about 10 feet of tubing to deal with, mostly in the engine bay.
The tubing is stuffed into the flange and duct taped into place. Since it slips into the collector, it's relatively easy for me to explore basic configurations - does the #4 runner go in front or behind of the #3? - and get an idea of how complex this will be. It seems that the first three tubes are simple enough, but that #4 is going to be a bit of a pain. Let's just hope I can make it a little bit artistic as well.
entry 355 - tags: header |
| |
 | December 26, 2007 - In order to attach the header design bits to the head, I attached some little expandable plugs to the header flange.
They're all set up so the base of the first piece of header is 1" from the port.
entry 356 - tags: header |
| |
 | December 26, 2007 - Because the #4 runner was the one that I was most worried about, I started there.
Here's the first version of the first three tubes - unfortunately I don't have enough of the right curves to finish off the #1 primary. While this configuration looks fairly simple, the tubes are more complex that you'd think. Plus they just don't look all that good and #1 is going to be a challenge.
entry 357 - tags: header |
| |
 | December 26, 2007 - All of the pieces of header Lego are marked not only with the radius of the bend, but with witness marks.
This makes it easy to make sure you're not cheating by twisting a bend to make it work for you. It also makes it easy to recreate the bends later.
I used these to document the current tubes so I could take another try.
entry 358 - tags: header |
| |
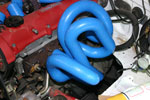
 | December 26, 2007 - On the second try, the #3 and #4 runners worked out really well.
They're basically the same shape and stay nice and close to the block, but with enough clearance to get at the various header nuts. They're also a bit lower for more hood clearance.
The long straight sections at the bottom are not only easy to fabricate, they also make it easy for me to adjust the length of the tubes if desired. By putting a couple of slip joints in there, I could set it up so I could tune the header. Hmm.
entry 359 - tags: header |
| |
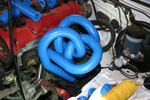 | December 26, 2007 - And now it starts to get crazy.
This #2 tube looks brutal to fabricate, but it will actually involve fewer pieces than the previous design did. I suspect I could also make that big loop with a single radius, but unfortunately the combination of being forced to work in 1" increments and a lack of remaining 3" radius pieces made things a bit awkward.
I've figured out how the #1 runner will go, I just don't have the parts to build it. The good thing is that I've managed to keep everything almost perfect in terms of matching lengths.
entry 360 - tags: header |
| |
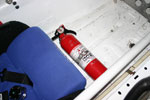 | December 26, 2007 - I didn't just work on the header today - although I certainly did spend most of my time on it!
This fire extinguisher got mounted in place. Okay, it's not a big job. But it's an important thing to have on board!
entry 361 - tags: safety |
| |
 | December 29, 2007 - The header will be constructed out of mandrel-bent tubes - and lots of them.
I've been looking around online and pricing them out, then decided to stop by my local muffler shop. They had most of what I needed in stock, for the same price as the best online stores! I've said it before, but if you're ever looking for exhaust work in Grand Junction you want to stop by Scotty's Muffler.
I'll know on Wednesday (hopefully) if they can source 2" radius bends as well as the 3" and 4" I have now. If not, I'll order them in. Until I have 2", I can't build any of the pipes yet.
entry 362 - tags: header |
| |
January 2, 2008 - Well, my local shop can't source the 2" radius bends I need.
So it's off to Summit Racing for them.
I've also been chatting with the engineers at AFCO. The shocks are off getting a tweak to the valving, based on shock dyno tests of a few other options that did well on the comparison drives. I feel like such an amateur when talking to them, but every time I learn something and the shocks seem to come back a little bit better. This should be the last iteration.
entry 363 - tags: header, suspension |
| |
January 8, 2008 - A big box of pipes arrived yesterday.
Janel didn't seem to understand my excitement. Oh well. Now I just need to get up the nerve to start cutting and tacking tubes. It's a big step, but I know from last time that a solid day's work should show good progress. Last time I didn't have the cool design tools I do now...but I also had a much simpler header to build.
In other news, the shocks are revalved and should be heading back this way shortly. Not that I can drive it right now, the diff is gone and of course the engine bay is full of blue snakes.
I've also been talking to the new technical director for the Targa. As you may remember, the cage I'm using is an SCCA Spec Miata cage. I was given the okay to use this, but it doesn't meet the Targa rulebook. Well, apparently it does meet the approval of the new tech inspector with the exception of door bars. They're putting an emphasis on door bars for 2008. I'm going to have to find space to stick another one in there on top of the one I have now. I think I know how I'll fit it in place. Hopefully I won't have to disassemble the car too far to weld it.
entry 364 - tags: header, suspension, safety |
| |
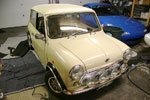 | January 8, 2008 - So, I didn't have any work I could do on the Targa car last weekend.
So I worked on something else. We seriously considered this little guy as a potential Targa car. It certainly would have been fun.
entry 365 - tags: other cars |
| |
 | January 10, 2008 - Okay, time to start building this header.
The first step is triple-checking the fitment of the #4 tube. I made sure all of the witness marks on the icengineworks "header lego" were marked so I didn't twist anything, then removed the #4 runner. I'm going to build this header from the back forward.
When designing the tubes, I was careful not to cheat and have every piece of lego twisted at a different angle. So it was easy to break the runner up into pieces that were chopped out of my pre-bent tubes. The hardest part is making sure the cut is straight across the tube and not at an angle.
entry 366 - tags: header |
| |
 | January 10, 2008 - The #4 runner is broken down into four tubes.
I cut these by hand with a hacksaw. A good bandsaw would have been faster, of course, but I don't have one. I used a bench grinder to clean up the ends - again, a belt sander would have been better but I don't have one of those either.
There are three different radii across these four pieces of tube. I transferred the witness marks over from the plastic pieces and grabbed the welder.
entry 367 - tags: header |
| |
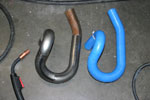 | January 10, 2008 - And voila!
The first runner. They're almost a perfect match, with a very slight difference in one angle (not visible here) that I think comes from a cut that's not 100% straight across the tube. From this angle, they're identical. The reason they look a little different is because of the way they're sitting on the ground.
So far, so good. I have to admit I'm cheating a bit and doing the really rewarding, fast work first. But that's part of keeping motivated, isn't it?
entry 368 - tags: header |
| |
January 10, 2008 - An unfortunate turn of events.
Due to personal reasons, Eric's not going to be able to take part in the Targa Newfoundland for at least several years. It was his enthusiasm that got us committed to this race in the first place, and it's a real shame he can't make it to the starting line in September. We've been friends for a long time and this was going to be the realization of a dream.
The effort isn't going away, though. I'm still going to drive in the race. I'm not sure who my codriver is going to be at this point. Eric is still going to be involved as much as he can, and who knows what will happen eventually. But for 2008, someone else is going to be in the codriver's seat.
entry 369 - tags: announcements |
| |
January 13, 2008 - Excellent news.
The team has a new codriver - my wife Janel. This is not as obvious a choice as it seems, and it took some careful consideration on her part. Personally, I'm very happy with her decision.
She's a bit of a gearhead, with a turbo Miata that sees track and autocross use whenever possible. She can also explain why she prefers her existing turbo system over the supercharger she had before. She's spent lots of time at the track both riding shotgun and helping me set up cars. She's a WRC fan who was mistakenly rooting for Grunholm in 2007. Her organizational skills are far better than mine and she's good under pressure. In short, she has the potential to be an excellent codriver. It doesn't hurt that it'll be easy for us to practice together - much easier than for Eric and I living in different countries.
There are some problems we'll have to overcome. A complete lack of codriving experience of course. Motion sickness is liable to be the biggest concern. There's also the matter of available vacation time to actually participate in the Targa - it looks as if the honeymoon might get pushed off yet another year. I'm going to end up paying dearly for that one! But both of us are excited about the prospect.
entry 370 - tags: announcements |
| |
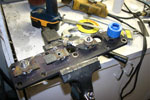
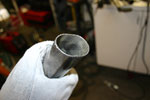
 | January 13, 2008 - Back to the header.
Now that the #4 tube is stuck together, it's time to try it in the car. I started with a die grinder to cut the remaining stub of the original header out of the flange, and discovered that this was going to be both long and noisy. Especially with my poor bits. So I grabbed the plasma cutter and cut it out that way. Much more satisfying.
The hole was cut with a taper to make it easier to force the pipe in to place. This picture was taken before a bit of cleanup with the die grinder.
entry 371 - tags: header |
| |
 | January 13, 2008 - The pipe itself was carefully formed.
I put the end of a stub of tube in a vice and cranked it down. Voila.
entry 372 - tags: header |
| |
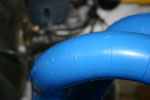
 | January 13, 2008 - With the shape of the hole just right and a bit of hammer action, here's the fit of the pipe in the hole.
Not bad at all.
entry 373 - tags: header |
| |
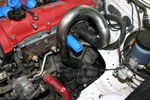 | January 13, 2008 - With the #4 runner tack-welded to the new stub, I was able to see how well the metal pipe coincided with the plastic prototype.
Almost perfectly. The only problem came when I slid the collector on the end and discovered that it was too close to the motor mount. Changing the last 2" long bend in the pipe from a 4" radius to a 3" radius did the trick.
The #3 runner was then checked again with the prototyping pieces and tweaked slightly to take the change into account. It ended up fitting better overall of course. So now it's time to cut that one up and stick it together. It's only going to get more difficult from here on in of course!
I have had one person ask me why I'm making my own header when there are commercially available ones. Well, it has to do with engine output. Mass-produced headers like the Racing Beat are designed for almost-stock engines. That means stock cams, 1.8 litres of displacement and about 110 hp at the wheels with a redline of 7000 rpm. My engine is a 2.0 with more aggressive cams, a redline that could go as high as 9000 rpm if required and a hopeful output of close to 200 hp at the wheels. So the dimensions will be different. There are some very expensive race headers that might be pretty close, but I don't have the budget for one of those. Besides, this is a fun learning experience.
entry 374 - tags: header |
| |

 THE DIARY