| MIATA BUILD |
|
|
 | |  | July 31, 2007 - So much for playing by the rules.
The stripes running along the hood didn't look right at 1/2" wide, so I narrowed them down to 1/4" plus 1/8". I also tapered them down slightly at the front. This small change altered the front from being a little stodgy to being very graceful. This is a game of millimeters.
entry 257 - tags: paint, Martini | | | 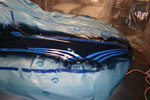 | July 31, 2007 - One fender done!
Okay, not quite done. The top stripe at the rear of the wheel opening has too much curve and doesn't quite work in the "graceful" stakes. I hadn't planned on having the dark blue stripes meeting in a point on the fender, but that's how it wants to go.
This is taking a while. I'm learning fast, though, and I think I'll be able to do the rest of the car pretty quickly. The door is almost done already, but it's easy because the stripes are a constant width. It's the flares at the wheelwells that take a while. Only three of those left, and I'm hoping the layout I'm doing now will help. I'm pretty excited, I think it's going to look really good.
Speaking of looking good, this picture almost makes it look like I can lay down paint!
entry 258 - tags: paint, Martini | | | 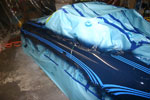 | August 1, 2007 - The next three corners did go faster as I learned what the "right" shape was for the fender flares.
I also got better at running a straight line of tape. The human eye is great at picking up slightly wavy lines - I could spot when my tape lines moved from 10mm to 11mm apart. Of course, so will anyone who's looking at the car, and I know there's going to be something odd that will show up.
A bit of asymmetry revealed itself. On the right side of the car, the red will dip down to touch the fender. On the left, not quite. I can live with that. Overall, the car was surprisingly consistent from side to side.
entry 259 - tags: paint, Martini | | | 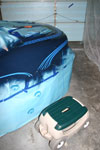 | August 1, 2007 - How do you spend four or five hours masking a car without crippling your back?
Well, if you shop at the Snap-On truck, you have a cool little rolling stool that moves up and down and has a padded bench. If you shop at Home Depot, you have a little gardening seat with big wheels. Sure, it's not as cool as the Snap-On version, but it was $10 and it has a cupholder. Beat that!
entry 260 - tags: paint, Martini, tips | | | 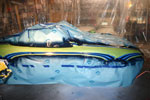 | August 1, 2007 - The world's ugliest Martini livery.
The green tape (well, most of it) is masking off what will eventually be red, the blue tape is masking off dark blue and the exposed dark blue will be cyan. I ended up with a lot of red on the car although not quite as much as it appears here due to tape overlap. How will it look? We'll have to see.
entry 261 - tags: paint, Martini | | | 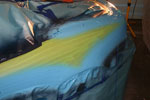 | August 1, 2007 - Cyan time!
Well, that went on pretty easily after all the work. The cyan coat, I realized afterwards, is the one where the masking is most important. It has about 4 times as much edge length as any of the others.
entry 262 - tags: paint, Martini | | | 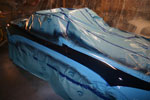 | August 1, 2007 - The tape that covered the red sections has now been pulled off.
Unfortunately, I was wrong about the "tape free" time. It's 12 hours, not 4.
No, it didn't cause a problem with the paint - but it does cause problems with my scheduling. I was planning to shoot the red today so I could move the car out of the way and extract my Seven for a track day tomorrow. Now I'll have to mask off the cyan (a quick and easy job, as long as I don't run out of tape) tomorrow morning, shoot it before I go to work, then spend a bit of time just before the 4 pm track day shuffling the cars about. I won't unmask the whole Targa Miata then, just tear through the cockpit so I can steer it around. At least it means I'll be eager to get home after being at the track!
Oh, such problems to have.
entry 263 - tags: paint, Martini | | | 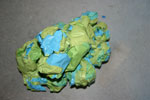 | August 1, 2007 - I think the most recent car to wear the Martini colors in world rally competition was the Ford Focus.
That was a couple of years back. Now they're sponsored by BP and their team colors look a whole lot like this tape ball.
entry 264 - tags: Martini | | | August 3, 2007 - Sorry, I doubled up on an entry.
Carry on, there's nothing to see here.
entry 265 | | | 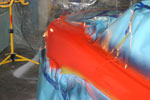 | August 2, 2007 - And now the red.
Officially, it is Flame Red, remember. But it sure looks orange. In person, it's an eye-popping color. I love it. I'll unwrap the car tonight.
entry 266 - tags: paint, Martini | | | 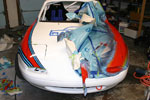 | August 3, 2007 - It's unwrapping time!
I've been both anticipating and dreading this moment. If there's a major slipup, it's going to be brutal to fix. Naturally, I didn't think of this until I started unwrapping. I suppose if I did this more often, I'd use a more professional word like "unmasking", but it seems too much like a present.
And the initial reaction is?
Sex on wheels.
I love the look, it's just what I'd hoped. The stripes are crisp and they just leap out at you. The shape works with the shape of the car and there are no major snafus. Oh, it's not perfect. There are a couple of tiny little lines of colors that got through my masking (next time I'll just buy 3/8" tape and save myself a lot of work), a few small rough edges and a couple of spots where the line width wavers slightly - but unless you're carefully peeling off tape inch by inch, it's unlikely you'll ever see them and they give the car some personality. No souless, computer-cut stripes here! The biggest problem is a shadow on the hood, as if a gust of dark blue got under the masking. It cleaned up easily with some solvent, leaving the fully cured white intact.
I always wondered why you never saw Martini "homage" cars, while the Gulf colors are so popular. It's pretty obvious after all this work!
entry 267 - tags: paint, Martini | | | 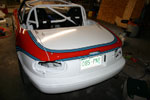 | August 3, 2007 - Eric pointed out I hadn't shown any shots of the tail.
Well, here you go. I actually got a little tricky here, using thinner stripes on the vertical section at the bottom than the horizontal upper stripes. I think it looks better. In fact, the upper stripes don't change width anywhere other than a slight taper right at the front as they enter the lights.
Miatas have nice little round butts. I think this stripe shape accentuates it. I haven't taken many pictures of the stripes back here because it came together really nicely early on.
entry 268 - tags: paint, Martini | | | 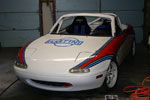 | August 3, 2007 - The final product.
I'll take it outside and get some better pictures later, but this stance just caught my eye as I was walking through the garage.
Compare it to the original rendering. I think it's better looking, mostly due to all the hours spent moving tape around.
entry 269 - tags: Martini | | | 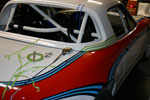 | August 5, 2007 - Almost done with the painting.
All I need to do is add the stripes to the hardtop. There isn't much of them and it's a challenge to make it all flow given the curves in the stripes and the hardtop. You can see one of the attempts to reach the same grace as I found on the side stripes. If I was going to run with the hardtop 100% of the time, this would have been easier. But I'll have the top off occasionally, so it has to work both ways.
The top is in the "paint booth" and the two blues have been laid down. I'll spray the red tomorrow morning.
entry 270 - tags: paint, Martini | | | 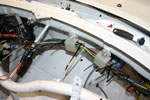 | August 5, 2007 - I'm trying to get the car ready in time for the Flyin' Miata Open House.
This implies a windshield, which means the dash will be permanently installed. So first, time to clean up and secure the wiring. I'm doing the rough bundling first, the final anchoring will come later.
entry 271 | | | 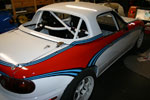 | August 7, 2007 - The hardtop is painted and installed.
It's not the best part of the car, but it still looks pretty good. Now it's time for some final assembly. Brandon came over last night and helped to install the top, clean up wiring and install the dash. Now the windshield can go in. I'm on schedule to have the car ready for the Open House, and it's all coming together nicely.
entry 272 - tags: paint, Martini | | |  | August 7, 2007 - Now that the hardtop is painted, it's time to make the rear window.
I'm going to cut one out of 1/8" Lexan for lighter weight.
Step one, take a pattern off a glass window. Tape the paper to the outside of the glass and trace the shape (then take a blurry picture when you're done). Looks as if a 60x24" piece will be more than enough.
entry 273 - tags: weight loss, lexan window | | | 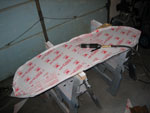 | August 8, 2007 - Next step in the rear window: cut it out.
I use a pneumatic reciprocating saw, but a bandsaw or jigsaw works just as well. If you have a good template, you can have the plastic shop cut it out for you. The problem with that is that I've always had to do a bit of trimming afterwards to get the edges right. In this picture, I'm partway through that process. The first few rivet holes are drilled and various alterations to the shape have been marked and cut. The protective plastic was peeled up so I could see the lip on the hardtop.
entry 274 - tags: weight loss, lexan window | | | 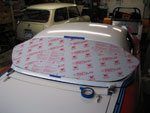 | August 8, 2007 - Installing the window is fairly easy.
Just start in the middle and pop in some rivets every few inches. In this case, I used a 6" spacing until I got to the hard curves at the edges, when I dropped down to 3-4". It's also important to mark which way is us, I've learned the hard way in the past that it's easy to install the window upside down!
entry 275 - tags: weight loss, lexan window | | | 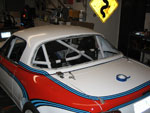 | August 8, 2007 - After about three fittings, I riveted the window into place.
To keep the rivets from pulling through the fibreglass hardtop, I used washers on the back side. The polycarbonate (generic term for Lexan) is flexible enough that it will simply bend around the curves without any need for forming, and the rivets will easily hold it in place even before they're popped..
I also tried sealing the window in to place with silicone, I'm thinking this wasn't a good idea aesthetically. I've never had to worry about weatherproofing before. It's supposed to dry clear, we'll see if that happens after more than 12 hours. The fact that I painted the lip around the inside of the window black before starting didn't help there.
By the way, the original glass window weighed a bit over 11 lbs. I didn't weigh the polycarbonate, but based on the density of the material it should be right around 5-6 lbs. A Miata windshield is 20.9 lbs.
entry 276 - tags: weight loss, lexan window | | |
|

 THE DIARY