| MIATA BUILD |
|
|
 | | 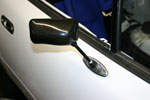 | June 10, 2007 - Sexy, lightweight carbon and aluminum mirrors.
Those aren't plastic made to look like carbon, they are carbon. Oooh. I've been waiting for a while to bolt these on!
Did you know that Mazda used the same door for power and manual window cars, but the outer door skin is different for cars with power mirrors? Go figure. Naturally, these mirrors need the power mirror door and one of my doors was a manual mirror type. That meant I got to do some cutting on my nice new paint.
entry 197 - tags: weight loss, interchange | | | 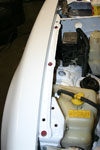 | June 10, 2007 - I've been amusing myself with colored fasteners again.
The door hinges are black or red as are the hood hinges. This amuses me, I don't know why.
entry 198 | | | 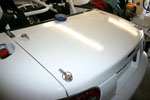 | June 10, 2007 - The most difficult job I did this weekend was installing the pins for the trunklid.
Usually you only have to deal with two of them, but I'm a glutton for punishment. They're all on now and the trunklid slips on and off easily. The panel gaps are pretty much perfect, but they look bad in this photo.
Was this really necessary? Well, I was able to cut a bunch of weight out. But no, it wasn't necessary at all.
entry 199 - tags: weight loss | | |  | June 10, 2007 - The hood has been pinned as well.
Notice that oddly colored headlight cover? Not the missing one, the one on the driver's side. That's the original 1990 Miata white. I like mine a whole lot better.
The body of the car is complete, with the exception of the headlight covers, the gas cap lid and the hardtop. The latter only needs a window. Before I install the windshield again, I also need to install the dash. That means bundling up a bunch of wires, but I'm not 100% sure they all work. I'll have to do something before test driving! Or I could just go without a windshield...
entry 200 - tags: weight loss, paint | | | 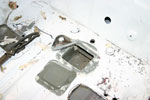 | June 10, 2007 - I didn't just bolt on body panels this weekend.
I also finished the installation of the driver's seat, and that involved finding a way to bolt in the sub belt. Naturally, the anchor point has to go right in the middle of a longitudinal frame rail. This means I can't access the back side of it to put in a nut.
But check this out - Mazda put a nice little access panel in the floor for the frame rail! After cutting out a bit of seam sealer, the panel popped off. As an added bonus, I was able to feel that there were multiple layers at the base of the bulkhead so I had a very solid anchor point. A bit of "Automotive Goop" (a nice silicone glue) and the panel was back in place. This made me happy, as I was expecting to have to build some sort of odd bracketry.
I've also learned that it's hard to take detail pictures of a blinding white car. Sorry about the over-exposed shot here.
entry 201 - tags: seats, safety | | | June 10, 2007 - This is a very sad announcement to have to make.
We are postponing our Targa effort until 2008.
The culprit? My marriage. I'm a Canadian citizen, and Janel is American. This will result in a green card for me, but until that is granted I am not able to leave the country as my existing visa is now void. The turnaround time for a green card is 2-3 months and I have to gather some other paperwork from Canada that will take a couple of weeks. If you look at a calendar, you'll see that it's very likely that I won't have a green card in time and there's no way to speed the process.
I can get permission to leave the country - but this also takes 2-3 months to obtain. In the meantime, Eric and I were scheduled for a Targa driving school at Mosport next weekend and there was a good chance I wouldn't be able to get back into the country. Meanwhile, there's the added complication of a ridiculously slow Canadian passport office, who have been sitting on my paperwork for about three months now. I did consider trying to bluff my way through, but the long-term consequences of getting discovered are too great.
This was a surprise to say the least. Had I known about this, I would have scheduled the wedding (at least the legal part) differently. Janel's the sort of girl who was willing to forgo an immediate honeymoon so I could run the Targa, so she would have been fine with that.
There is a bit of a silver lining. This will give me more time to test and prepare the car. Eric's job was interfering with his preparations pretty badly and now he has an extra 12 months to get ready.
I'm torn up inside. I've known about this for about four days. It's not the reason I've been working so hard on the car over the weekend, but it does make the postponement seem like less of a defeat. I'm used to overcoming obstacles with race cars and races - the ability to knuckle down and get things done is one of the skills that separates the lightweights from the serious competitor. But the combination of the Canadian and US governments has defeated me temporarily.
While we will not be competing in Targa 2007, we will be in Newfoundland in 2008. We've already registered.
entry 202 - tags: announcements | | |  | June 13, 2007 - These inner fender liners weigh nothing at all, but they'll keep rocks and other stuff from piling up inside nooks and crannies.
They were rescued from a salvage car headed for the crusher. Now if only I can find all of the fasteners!
entry 203 | | | 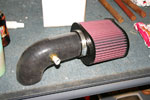 | June 13, 2007 - A temporary intake.
I'd like to run individual throttle bodies eventually, but that's a project for a bit later. With the Hydra Nemesis, the intake doesn't need a whole lot of complication! The sensor is an intake air temperature sensor stuffed in a grommet in the silicone. The filter will end up right behind the radiator, a poor choice for temperature. It's just temporary, remember.
entry 204 - tags: engine | | | 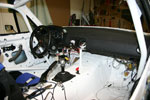 | June 13, 2007 - I did a bit of cleanup on the wiring and stuffed the dash in the car.
The dash isn't removable with the windshield in place thanks to the cage and the welded-in structure. So it would be best if I had all the wiring sorted out or at least well wrapped and secured before the dash was attached.
I expect I'll have the dash out again soon, but it feels really good to have it in there!
entry 205 - tags: wiring, weight loss | | | June 13, 2007 - While flipping through a Classic and Sports Car magazine, Eric found an ad for a Lancia Delta S4.
Very sexy car mechanically, but it's also a Martini car. The shop's website has a number of excellent photo galleries of various classic rally cars under restoration, and it's fascinating stuff to see. Definitely worth a visit, especially the painting of an Integrale - step-by-step on a Martini paint job! That's useful.
Makela Auto Tuning
entry 206 - tags: Martini | | | 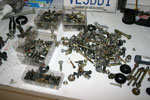 | June 13, 2007 - Time out for a bit of organization!
I was running low on certain common fasteners, so I dumped out one more box of random parts and sorted them into their appropriate places. This makes life much easier.
entry 207 - tags: tips | | | 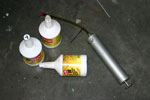 | June 13, 2007 - Time to fill up the transmission and differential with some good fluid.
It was a quick and easy job - until I was cleaning up and I noticed an empty MT-90 bottle by the back of the car, and an MT-90 and 75-90 bottle by the middle. Whoops!
So, do I drain out the fluid and replace it all? Or do I figure that I'm probably in good shape? Or do I run this for a few miles and use it to flush out the diff and transmission? The latter could probably use it, honestly. I checked into the history of this particular unit and it turns out it spent a fair bit of time bolted to a 250+ hp car. Let's just say it's not the transmission that will be used in the race!
All I know is that I don't feel like making the change tonight.
entry 208 - tags: drivetrain | | | 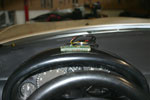 | June 13, 2007 - One of the gauges I'm going to run is a Revlight.
It's a tachometer made of 11 LEDs that light up sequentially. Six green, three yellows and two reds - and it automatically dims at night. I have one on the Seven and I love the little thing. Of course, they're not made anymore and Flyin' Miata (at my recommendation) managed to empty out the last stash in the country.
I've been trying to figure out where to mount it. On the rollbar? On the gauge cluster? The A-pillar? I'm thinking the top of the gauge cluster is the best bet.
entry 209 - tags: ergonomics | | | 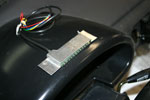 | June 13, 2007 - This particular unit is a used one that I picked up off eBay, and it doesn't have the usual black housing that makes it a little less obvious and prevents accidental backlighting.
Five minutes of work and I have a little aluminum house for my Revlight. I'll clean it up a bit, paint it black and rivet it to the top of the cluster.
entry 210 - tags: ergonomics | | | 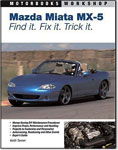 | June 15, 2007 - My latest Miata book, Mazda MX-5 Miata: Find it, Fix it, Trick it is now available.
FindFixTrickMiata.com is a sponsor of the Targa Miata. Everyone should run out and get a copy. I think it's a pretty good book, covering every aspect of the Miata from history to annual specification changes to how to install a turbo system. And yes, there are a few pictures of the Targa Miata components in the book but you'll need a sharp eye to recognize them.
entry 211 - tags: announcements, sponsors | | | 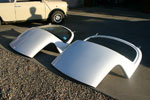 | June 16, 2007 - A comparison between my white paint (foreground) and Mazda's version.
There is a slight difference - but that's fine with me. I like mine better! My only concern is if I have to touch up the car. There's a fair bit of paint left, but not quite enough for major work.
Oh well.
entry 212 - tags: paint | | |  | June 16, 2007 - So, after a final wander around the car, Brandon and I bolted on some wheels.
Okay, in the rear we fixed the alignment of the brake lines, then we bolted on some wheels and lowered the car to the ground.
It's funny. I work around Miatas all day. There's another one in the garage parked by the Targa car. But as we dropped the white Miata down on to the ground, it looked smaller. Much more compact than its usual stance of being nearly 2' in the air, that's for sure.
The suspension currently consists of "whatever I could find sitting around", and I suspect the rear springs came out of a late 1996-97 car while I know the fronts are from a 1990. There's a bit of rake going on. It doesn't matter, the car rolls and suspends. Its best angle is from the rear quarter, where the white roll cage is most obvious.
The wheels are a +30mm offset with 225/45-15 tires. I'll be running +20 offset with 205/50-15 tires, so the outer edges of the tires are in the correct place with this setup. The car looks good. Very white.
entry 213 - tags: tires | | | 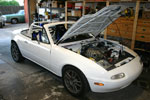 | June 16, 2007 - The first drive!
It wasn't much. I drove the car out of the garage and did a short run up and down the street. I probably spent more time doing three-point turns than driving. But it moves! A longer test drive will have to wait until I fix a bad exhaust leak (left a clamp off) and get a little more comfortable with the ECU so I know the engine is getting the fuel it needs. I do have the car registered.
However, I can report on initial impressions. It feels very, very eager. The engine has that sharp, low-inertia feel I'd been hoping. It's going to be a great engine once it's tuned and I can explore full throttle, just blipping it reminds me why I like high compression so much. The clutch is nicely weighted and even without a power steering belt the steering isn't excessive.
I can't wait to get this up and running completely.
entry 214 - tags: testing | | |  | June 16, 2007 - It wasn't a perfect test drive.
The car was idling high, indicating a vacuum leak. Popping the hood showed that it wasn't just one vacuum leak - I hadn't bothered to do anything about a bunch of vacuum ports on the intake manifold, two or three of which are in this picture! Whoops. Well, at least it's not a complicated fix.
entry 215 - tags: testing | | | June 17, 2007 - The car also had an exhaust leak on the short test drive.
The two-piece midpipe didn't have a clamp on the slip joint, so I figured I'd put that on. And I discovered that I'd left the entire exhaust system put together with bolts that were just finger tight. Well, it's not difficult to solve that particular problem. It should be nice and quiet now.
I've also fixed the vacuum leaks and painted the headlight covers and fuel door. Now I have a complete white body. All I need to do is read the manual for the ECU cover to cover a couple of times so I can break everything in properly...
entry 216 - tags: exhaust, testing | | |
|

 THE DIARY