| MIATA BUILD |
|
|
 | |  | May 24, 2007 - Chop chop!
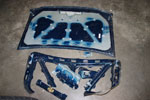
A bit of work with the angle grinder and some tin snips took a bunch of weight out of the trunklid. This steel panel is about as heavy as the aluminum hood! The hinges and latch are removed, and I'll pin it on. The bracing removed from the bottom of the trunklid is probably about the same weight as the spoiler I'm going to glue to the top, but I can't resist it.
Last time I did this to a trunklid I went a little further, but I'd prefer to keep the Targa Miata's trunklid weatherproof so I used the gasket mounting surface as my cut line.
entry 180 - tags: weight loss | | | 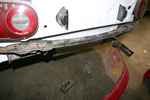 | May 24, 2007 - The rear bumper support is bolted on the car, and the bumper is ready to be attached.
The two black pieces on the floor were redundant, so all that's left to add here is the actual skin. It should be light, and an initial fit indicates that it doesn't move around much.
I'm working on the body panels so I can give them a squirt of paint soon and make the car appear to be streetable. That will make it a lot easier to break in the engine!
entry 181 - tags: weight loss | | | May 26, 2007 - I got an email from Ander Tenno about tire selection.
He's tried both the R888 and the RA-1 on his car in the past, and here's what he has to say:
The short summary is this: the RA-1 gives up very little grip in optimal circumstances (~20-25 C sunny weather with heat in the tires) to the R888 while being significantly better in the wet and when the tires are cold. If the RA-1 was still available in Europe, I’d be still using those.
It certainly sounds as if the RA-1 would be the better choice for the Targa! Thanks so much for the feedback, Ander!
entry 182 - tags: tires | | | 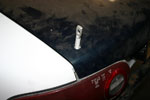 | May 28, 2007 - One last step before preparing the panels for paint - locating the pins to hold the trunklid in place.
I'll do the hood once there are fenders in the car to help me align it. Unfortunately, the location of the pins precludes the use of the cool factory R package spoiler I'd been planning to run. Oh well, that's 3 lbs less weight in the tail.
entry 183 - tags: weight loss | | |  | May 28, 2007 - I'm committed to hood pins for the hood now.
This is the hood latch loop. It was a little disappointing, I was hoping for more weight. Given that the entire hood weighs about the same as the tiny trunk lid, I guess that it's not surprising the latch mechanism would be super-light.
entry 184 - tags: weight loss | | | 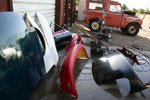 | May 28, 2007 - Bath time!
The body panels came outside for a date with the pressure washer. There are a lot of parts left to install to put the body together! They'll all go on quickly enough - that rear bumper will take about 3 minutes - but it's a bit daunting to see them all arrayed in the driveway like this.
The pressure washer (I love this thing) did a good job of removing all the various grime, oil and gunk from the used parts. Some are very used.
For those who are curious, we have Montego Blue Mica, Brilliant Black, Crystal White and Classic Red represented here. There's also a Silverstone Metallic trunklid in the garage but it's not going to be used.
entry 185 - tags: paint | | | 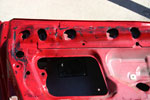 | May 28, 2007 - The worst part of the cleaning - the gunk on the inside of the doors.
Miata owners know what I'm talking about here. It turns out that WD-40 does a real number on this stuff, diluting it slightly and defeating its tenacity. This is the result of a bit of WD-40 and rag work. The pressure washer took care of much of the rest, and the pre-paint clean should finish the job.
Those with sharp eyes will note that the doors that were gutted before were black and this one is not. It was pointed out to me that the particular Spec Miata cage we're using does not have a substitute for the factory door bars. Since I'd cut the door bars out of the other, I'd left Eric and myself without much in the way of side impact protection. That's not a smart thing to do, so a new set of doors was substituted and left whole.
entry 186 - tags: paint, safety | | |  | May 28, 2007 - I like this little thing.
It makes me giggle. When I asked other Targa competitors about tools to carry, most seem to keep a spare in the car along with a jack. Adding a 1/2" drive socket to the factory scissor jack was suggested so an electric impact could be used to lift the car. I went one better and welded on a nut with a 17mm head - the same size as our lug nuts. This way I don't need to swap the socket on the impact gun.
The jack works ridiculously fast. I'm going to make another one to keep around the shop, partly because I'm going to wear this one out zipping it up and down. It'll make tire changes in the shop a snap as well though.
Oh, and Eric - if you're looking for the jack for your Miata, that's it.
entry 187 | | | June 4, 2007 - My house is conspiring against me.
My "Targa time" has been eaten up by a recalcitrant irrigation system (if you think of electronic sprinkler valves as fuel injectors it's all quite obvious, although I do prefer that fuel injectors aren't buried in the dirt) and some interior plumbing problems. Regardless, I've managed to make some progress. The remaining body panels are now scuffed up and clean, so they just need a final wipe down and then it's time to paint. I'm hoping to have the primer on them tonight.
entry 188 - tags: paint | | |  | June 5, 2007 - Primer time!
I don't have enough stands for all the parts, so I'm having to do this in stages. However, most of the body panels have primer on at least one side now. I'll finish the rest tonight.
Thanks to better gun setup, I'm seeing a far superior finish than on the car body. The larger smooth surfaces of the body panels - as opposed to engine bay crevices and roll cage - make it a lot easier to practice, and I've learned just how critical gun distance is. I've also learned it's really hard to tell where you've applied white primer to white panels!
entry 189 - tags: paint | | |  | June 6, 2007 - Okay, that's it for primer.
Tomorrow I'll break out the top coat and then it will be time to start assembling great big chunks of car!
I'm really enjoying the painting. Once you get the paint gun in hand, progress is very visible and very rapid. I wouldn't want to do it for a living, but it makes a great contrast to wiring!
entry 190 - tags: paint | | |  | June 8, 2007 - The painting is done.
Well, almost. I forgot to do the headlight covers and the gas cap cover. But those can wait.
The end result was pretty good. I did the top coats in two sessions. The parts in the second session (the big obvious surfaces such as the top, hood and trunk) didn't turn out that well. I think I laid down too thin a layer of paint and it didn't get glossy. You can see on the hardtop that the edges are quite nice, but the top is just dull. The edges got about twice as much paint as I hit them first to make sure they got full coverage, then they got covered in the sweeps for the body of the part.
It's not a big problem. This picture exaggerates it and it's under fluorescent lights, always the toughest test. In the sun and at speed, I think it will look just fine.
entry 191 - tags: paint | | |  | June 8, 2007 - The front fenders turned out very nicely.
You can tell they weren't factory fresh fenders to start with - they have a little character - but at least the paint's pretty smooth.
The white I used is supposed to be the white from 1990-93 Miatas. However, I have an original 1990 white hardtop in the garage and it's not as blinding as this stuff. Looking at the mix, my paint is almost pure base with just a touch of blue and a tiny bit of black. No wonder it's so bright!
entry 192 - tags: paint | | | 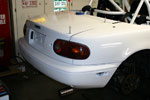 | June 8, 2007 - Naturally, as soon as the paint was dry enough I had to put some panels on the car.
They're not bolted in place yet, but it's a start!
You can see the 2005 Mazdaspeed MX-5 turbo exhaust protruding beyond the bumper. Those cars have a deeper rear bumper. I'll cut the pipe down a bit, it's goofy looking.
I never thought I'd get so excited about seeing a white Miata.
entry 193 - tags: paint, exhaust, interchange | | | 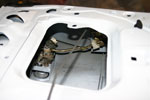 | June 8, 2007 - Now that the doors are painted, it's time to reassemble.
This is quite a puzzle. I'm building the car with the regular glass right now, although future plans involve Lexan for at least the triangular side window.
entry 194 | | | 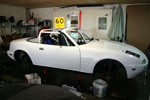 | June 10, 2007 - It's been a busy weekend.
While I've been building the car, the body panels were stacked all over the garage. The finish didn't really matter - but now it does. The best place to "store" the body panels is on the car so I've been busy installing them. It doesn't hurt that it's really satisfying work with very obvious results. It's also very interesting work as I try to figure out all the little tricks that Mazda used to put the car together with minimal gaps. My old Cadillac has stacks of spacers under various body panels to get things to line up, while the Miata is designed so that everything just goes in the right place the first time. Hanging the doors was probably the most complex part of the operation.
It was also a challenge figuring out the order of operations - to put the nose of the car on, I had to put the exterior door handles on the door, install the window regulator, the vent window and then the window glass. Now the door could go on. Hood hinges, then fenders, then the nose could go on. Amazingly, I didn't have to backtrack much at all.
Since this picture was taken, I've also installed the missing light at the front. Having the big bulky panels (and assorted trim pieces) on the car has freed up a huge amount of room in my garage - which was my excuse for putting it all together.
entry 195 | | | 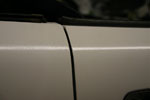 | June 10, 2007 - The door (right) and the rear fender.
In other words, my original paint and my new and improved job. It's good to see I'm learning something!
entry 196 - tags: paint | | | 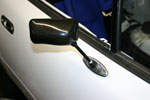 | June 10, 2007 - Sexy, lightweight carbon and aluminum mirrors.
Those aren't plastic made to look like carbon, they are carbon. Oooh. I've been waiting for a while to bolt these on!
Did you know that Mazda used the same door for power and manual window cars, but the outer door skin is different for cars with power mirrors? Go figure. Naturally, these mirrors need the power mirror door and one of my doors was a manual mirror type. That meant I got to do some cutting on my nice new paint.
entry 197 - tags: weight loss, interchange | | | 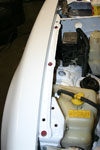 | June 10, 2007 - I've been amusing myself with colored fasteners again.
The door hinges are black or red as are the hood hinges. This amuses me, I don't know why.
entry 198 | | | 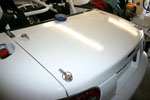 | June 10, 2007 - The most difficult job I did this weekend was installing the pins for the trunklid.
Usually you only have to deal with two of them, but I'm a glutton for punishment. They're all on now and the trunklid slips on and off easily. The panel gaps are pretty much perfect, but they look bad in this photo.
Was this really necessary? Well, I was able to cut a bunch of weight out. But no, it wasn't necessary at all.
entry 199 - tags: weight loss | | |
|

 THE DIARY