| MIATA BUILD |
|
|
 | | 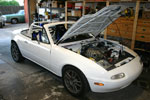 | June 16, 2007 - The first drive!
It wasn't much. I drove the car out of the garage and did a short run up and down the street. I probably spent more time doing three-point turns than driving. But it moves! A longer test drive will have to wait until I fix a bad exhaust leak (left a clamp off) and get a little more comfortable with the ECU so I know the engine is getting the fuel it needs. I do have the car registered.
However, I can report on initial impressions. It feels very, very eager. The engine has that sharp, low-inertia feel I'd been hoping. It's going to be a great engine once it's tuned and I can explore full throttle, just blipping it reminds me why I like high compression so much. The clutch is nicely weighted and even without a power steering belt the steering isn't excessive.
I can't wait to get this up and running completely.
entry 214 - tags: testing | | |  | June 16, 2007 - It wasn't a perfect test drive.
The car was idling high, indicating a vacuum leak. Popping the hood showed that it wasn't just one vacuum leak - I hadn't bothered to do anything about a bunch of vacuum ports on the intake manifold, two or three of which are in this picture! Whoops. Well, at least it's not a complicated fix.
entry 215 - tags: testing | | | June 17, 2007 - The car also had an exhaust leak on the short test drive.
The two-piece midpipe didn't have a clamp on the slip joint, so I figured I'd put that on. And I discovered that I'd left the entire exhaust system put together with bolts that were just finger tight. Well, it's not difficult to solve that particular problem. It should be nice and quiet now.
I've also fixed the vacuum leaks and painted the headlight covers and fuel door. Now I have a complete white body. All I need to do is read the manual for the ECU cover to cover a couple of times so I can break everything in properly...
entry 216 - tags: exhaust, testing | | | 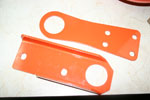 | June 19, 2007 - Another part in the "I hope I don't need this" category.
These tow hoops are required in case the car needs to be yanked back on to the road. The front one attaches where a front tie-down hook was, the rear attaches to where the rear tie-down hook was. But, umm, someone cut that rear mounting point off. So I'll have to figure a better way to mount it. Since my bumper is cut out, I have options not usually available to Spec Miata drivers. I'll weld something to the frame.
These things are heavy! But that's what you have to do. Anyone want to buy the rear one?
entry 217 | | | 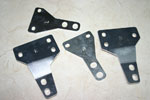 | June 19, 2007 - I got lazy.
I've made hardtop bolt plates before, and it's not any fun. SafeRacer.com had these aluminum ones for sale, and I figured I'd save myself some trouble. Initial tests show they're not perfect - they need to twist a bit to fit - but they should do pretty nicely. And I'm not going to have to fabricate them.
Like I said, lazy.
entry 218 | | | June 21, 2007 - Now that's a little odd.
I went to install the front recovery point last night. It bolts in to the four threaded holes used for the tie-down hooks in the front. But on my car, two of those holes aren't threaded on one side of the car. On the other side, a different hole isn't threaded and another seems to have a thread problem.
Weird.
I'll probably weld the plate to the frame rail and use the two holes I have.
In the rear, I'll have to get a little creative. VWs use a little hoop that screws into a receiver in the bumper, maybe I could adapt one of those. It's tempting to find a place to mount a big D shackle - perhaps I've been spending too long off-road.
entry 219 | | | 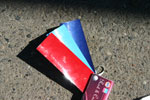 | June 24, 2007 - Martini colors!
Thanks to a member of the Grassroots Motorsports board, I have the right colors for the stripes. They're not perfect, the dark blue is metallic instead of...well, not metellic. I'm not sure if I can get that mixed up. Still, metallic isn't a big problem, it'll always be a small area (unlike red) and this will make it look blue instead of black.
For those who want to know, these are MS "Rod and Custom" colors Blue #59398, Blue #59392 and Red #59352.
entry 220 - tags: Martini | | | 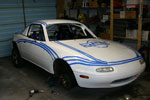 | June 24, 2007 - Martini stripes!
Okay, not really. But I couldn't help myself. I grabbed a roll of tape and, well, this happened. It's both easier and harder to do this on the car than on the computer. I've spent a lot of time thinking about the layout over the last few days, and it turned out about as well as I'd hoped. I'm not convinced about the door area yet. I don't want the whole stripes to go in a big arch, I want the width to shrink and expand. Maybe I won't go all the way to the roof, but cut across the windshield pillar. Hmm...
The stripes are continuous around the car, narrowing down to a band that crosses the nose and the tail. I'll mock this up in the computer to see how much red will be on the car and then it's time to start laying it out.
Why all the excitement about stripes? Because I realized that it will be easiest to stripe the car when it's still basically clean, and before the windshield and rear glass goes on. Once the masking starts, it'll be a pretty quick process. But nerve-wracking! It's a crazy way to learn to mask well.
entry 221 - tags: Martini | | | 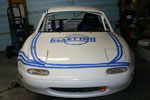 | June 24, 2007 - I'm very happy with how the stripes work from the front.
I think they'll flatter the car quite well. The design will also work with and without the hardtop. That's not an issue for Newfoundland, of course, but it's hot here in Grand Junction.
entry 222 - tags: Martini | | | 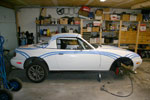 | June 26, 2007 - A side view of the proposed stripes.
It's not bad, although I'm not crazy about the curve over the top. There's too much of an arc to the stripes.
Let's call this shape "A".
entry 223 - tags: Martini | | | 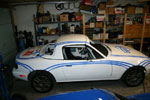 | June 26, 2007 - Another side version.
Let's call it version B. I like this a bit better than shape A. You can't tell from the pictures, but it comes straight off the top instead of a big curve. There will be more red on the side of the car this way, including a large patch on the side of the hardtop.
entry 224 - tags: Martini | | | 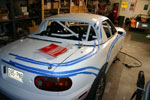 | June 26, 2007 - Version A from the rear.
I'm not happy with how it transitions into the rear. I suspect once the full blue stripes are laid out (two light blue, three dark) there won't be much room for the red.
entry 225 - tags: Martini | | |  | June 26, 2007 - Version B from the rear.
The transition is much better. Other than the large panel of red on the hardtop side (the C pillar, to add to our alphabet soup), I'm pretty happy with this design.
As you can probably tell, I'm having fun with this. I'll wander into the garage and stare at the car for a while, then maybe play with some tape. Then I'll go dig through my library of Martini pictures and decide if what I'm doing is appropriate. I'm trying to come up with the design that Martini would have used on a factory Miata.
entry 226 - tags: Martini | | | 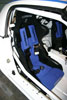 | June 27, 2007 - In anticipation of upcoming test drives with a computer jockey riding shotgun, I installed the passenger's seat.
It went in ridiculously easily. I'll pay for that later I'm sure. Due to the shape of the transmission tunnel, I was able to mount the codriver's seat about 1" further inboard than the driver's. It's also further back.
Eric's reaction to the proposed Martini schemes? "BBBBBBBBBBB!"
entry 227 - tags: seats, Martini | | | 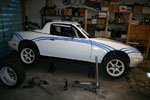 | July 1, 2007 - I spent the weekend working on another Miata.
Janel's little supercharged Miata is now turbocharged. The operation was a great success.
But that doesn't mean the Targa Miata was completely neglected. The new tires (Toyo RA-1 in a 205/50-15 size) came in so I had them mounted up. The wheels are some white SSR Competitions. Hang on, they never came in white! Ah, but they did in Japan. These date back from a previous race effort that was sponsored by SSR Japan. They're a custom 15x7 with a +20 offset, and are perfect for this application. The fact that they have a little tricolor stripe that happens to match the Martini colors is simply icing on the cake!
entry 228 - tags: tires, other cars, Martini | | |  | July 1, 2007 - Speaking of Martini colors, this book arrived in the mail today.
It's the "Martini Racing Story, 1983-1987". From the text, I think it's been translated from Italian. I bought it (half price!) for the pictures and it's even better than I'd hoped. There's a 6-page chapter on designing the stripes, and it confirms my thoughts about how it was done. The stripes were used to accentuate the curves of the car. Or boat.
entry 229 - tags: Martini | | | July 1, 2007 - I calibrated the wideband oxygen sensor today.
This has been holding me up because it needed to be wired in. Finally I just decided to get on with it, and it was a pretty straightforward procedure. So that's it for setting up the drivetrain. Now it's time to actually drive the car. I'll probably take it out of the garage for an extended drive on Wednesday, which is a holiday for some reason. It's also the third anniversary of the first drive of the Seven for a nice piece of symmetry. The Targa car is more complete than the Seven was at that point, though.
I hope.
entry 230 - tags: tuning, other cars | | | 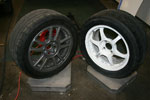 | July 1, 2007 - Wheel weigh in time.
The white wheel is the race setup. The graphite one is a Kazera KZ-M with a 225/45-15 RA-1. The weight difference? Just over 5 lbs! The white SSR package showed up between 28 and 29 lbs on the scale, the KZ-M was a solid 34. Not bad, but that extra 5 lbs is significant.
entry 231 - tags: weight loss, tires | | |  | July 1, 2007 - See?
Martini stripes!
entry 232 - tags: Martini | | | July 2, 2007 - The official color codes!
The shop that did those beautiful Martini restorations (Makela Tuning) answered my email about paint codes. I'm blown away - I think they actually contacted their paint shop to get the codes on my behalf and that's why it took so long. It's great information.
Here you have the color codes, as I have got those from Carrozziere
Nitro Taurus (Official Italian Martini paintshop)
VERNICE SIKKENS / MAX MAYER # TIPO # TINTE COLORI
ROSSO OPEL 512
BLU INNOCENTI 5208
CELESTE FORD 537
LOGHI LAGANA' ADESIVI CHIVASSO (TO) #
(CHIEDERE ARKENTIS)
CARROZZIERE NITRO TAURUS
I have also used:
RED: Lamborghini 231240 (arancio diablo)
LIGHT BLUE: Mercedes DB5508 (cyan blau)
DARK BLUE: Volkswagen VAG.LA5B (marine blau)
I've managed to track down the PPG code for the Lamborghini red/orange and the VW color was used in the US on the Golf in the late 80's. The cyan is proving elusive though, both the Mercedes hue and the Innocenti. Are there any paint shop magicians who can help out with the Opel red or the cyan? Heck, can anyone translate some of those lines in all caps. My Italian is a little rusty.
The cyan I found in the MS Rod and Custom colors can be used, but since I'm so close I'd love to use the "real" colors straight from the legit Martini paint shop.
I'm blown away by the helpfulness of MAT.
entry 233 - tags: Martini | | |
|

 THE DIARY