| MIATA BUILD |
|
|
 |  | December 4, 2007 - The car is all healthy.
I finally got around to taking it for a short test drive after catching up on some of the rest of my life. Using the scientific method of the steering wheel location when driving in a straight line, it appears that I have a healthy car. When it came off the track, the problems meant that the steering wheel was badly off center. Now it's almost right, which means I just need to align the car and I should be good. The car sure is dusty, and the temporary suspension that's installed sure isn't any good!
So, it's time to get down to work. I have a good list of jobs to do on the car, all in nice bite-size chunks. None of this "weld in roll cage, build an engine and paint a complex paint scheme" that I had before. I have some time between now and the new year so it's an excellent chance to get a lot of the required detail work done.
I also took the opportunity to take both my Mini and the Seven out for a spin yesterday. In all three cases, the last time the car was driven was either on the track or the autocross course. I think that's a promising sign.
entry 343 - tags: crash, suspension, other cars |  |  |  | December 5, 2007 - I fabricated a plate to cover the missing center console cutout and give me a place to mount some switches.
Of course, I counted the switches I needed, came up with four and then carefully drilled 5 holes. Nice work. That's okay, I'm sure something will come up that needs an extra switch. The one under the guard is for the wiring for auxiliary lights. I don't expect to have them installed very often and I'd prefer not to accidentally turn them on. Of course, that's just a justification for using the cool guard.
Finally, some work that isn't suspension!
entry 344 - tags: ergonomics, wiring |  |  |  | December 5, 2007 - Since the switch panel stood a bit proud of the dash surface, I wanted to try to make it integrate a bit.
So I curled the edges back. I'd love to take credit for mad metal shaping skills, but really I just bent the lip with a set of pliers and a vise, then did a little extra forming with a body hammer. A grinding wheel cleaned up the edges and a wire wheel gave it a nice sheen. I might paint it black, but it looks pretty good au naturel.
In other news, I ordered the bilge blower for the defrosting system today. First I visited a local boating store, where I had a hard time communicating that I needed a bilge blower and not a bilge pump. They were completely unhelpful, so Amazon came to the rescue. Maybe I'll set it up so it acts as an electric supercharger when I don't need the windshield defrosted!
entry 345 - tags: ergonomics, wiring |  |  |  | December 7, 2007 - Video time!
A friend of mine gave me a DVD of the car at the autocross back in October. Of the six runs I took, only a couple have any decent video. Still, quite instructive. Naturally, the car's development has progressed since that point but there is some behavior visible from outside that I'll take into consideration.
I've tried a different video setup than I've used on previous websites, using the DivX web player. I like the video quality and the ease in which you can pop it out to full screen. Comments are welcome.
Besides, if you've been watching the WRC footage as I have, you already have DivX on your system. Congratulations to Loeb for the world championship!
See the videos here.
entry 346 - tags: testing |  |  |  | December 10, 2007 - Ah, a 3-day weekend with no plans.
Time for a whole lot of work on the car, right?
Well, I did get the navigator's footrest installed. This is the one that was donated by Jason over on the Grassroots Motorsports forum. Thanks again, Jason! My original design for the bracket was made of steel tube. I took a second look before starting up the welder, and realized I could do better. The rear support is aluminum angle, putting the strength where I need it. The side brackets have a couple of holes so I can adjust the angle of the footrest, remove the whole thing or simply lower the main plate to get access to whatever's behind it. It's nice and solid and probably 1/4 the weight of the original plan. I'm pretty happy with this.
I also discovered that the switch for raising and lowering the headlights is double-throw, so I've ordered a few switches to allow me to wire the car properly and this has put off the installation of the switch panel. I've also been doing some research into header collectors, more on that later.
So, what else got done? Well, the master bedroom in the house has been repainted. Didn't see that coming, did you?
entry 347 - tags: ergonomics, wiring |  |  |  | December 15, 2007 - An electric supercharger has arrived for the car.
Well, it would be an electric supercharger if it were being sold on eBay, anyhow. For me, it's a bilge blower that moves about 240 cfm. Perfect for defogging a windshield. The SPDT switches I need to finish up the switch panel also arrived.
entry 348 - tags: ergonomics, wiring |  |  |  | December 15, 2007 - After a bit of crawling around, the switches are installed.
And labelled, of course. The "eject" switch is for Eric if he gets too nervous.
Almost out of sight is the bilge blower. It's been mounted in the footwell under the new Sparco footrest. The plumbing worked fairly well (you can see a bit of it in the picture) and there's a distinct breeze coming up the surface of the glass. This is the time of year to test it, too - next time it rains (instead of snow) I'm going to get all wet and try to fog up the car.
entry 349 - tags: ergonomics, wiring |  |  |  | December 19, 2007 - Time for a fun job.
The engine just isn't performing the way it should. At higher rpm, it's choking off. So it's time to replace the Racing Beat header (designed for a 110 hp car) with one a little more robust.
I had a very interesting conversation with an E Production racer, and he shared his header specifications with me. Yes, I know, they should be scientifically matched to my cams and port lengths and everything else. But an E Production Miata is the closest thing out there to my car, so I figured I'd take advantage of their knowledge base and see if uncorking the exhaust does anything at all. If so, I'll make another with a little more specificity.
31" primaries with a 1.75" tube size, right then. The first step is to get a collector. These are expensive - but a bit of searching turned up this beauty. Edelbrock makes merge collectors with 1.75" inlets for only $90 or so, street price. Sure, they're not as pretty as the $300+ units, but I can cope with that. Especially when it turns out the $90 price is for a pair!
Nice. Now all I need to do is figure out how to stuff all those big pipes underhood. The EP guys gave me some ideas there as well...
entry 350 - tags: header |  |  |  | December 19, 2007 - The last time I built a header was for my little Seven.
I used pool hose to work out the basic routing, then improved on that with some welding rod. It worked out well, but that car did have a lot of space available to work with. You can read the whole saga starting here, you'll have to skip over a few days worth of installing side panels and the like as I procrastinated.
This time, I have the advantage of a very cool tool. This "header Lego" from icengineworks is exactly what it sounds like - 1" pieces of tube that snap together into whatever shape I need. I have 2", 3" and 4" radius bends as well as short bits, and they're all beautifully marked up to make fabrication of the final product easy. Well, easier. This is going to be quite interesting to play with. I'm going to have some fun. Although I do think the pool hose might have to make a comeback to get me started on layout. Where did it go?
entry 351 - tags: header, other cars |  |  |  | December 20, 2007 - The starting point.
Except for a lapse in 1999-00, Mazda used a nice 4-1 header on the North American naturally aspirated cars. Overseas, some models got a long 4-2-1 design. It's actually a reasonable setup, much better than most stock exhaust manifolds.
I'll cut this up and use it for the flange, just as I did on the last header I made. The iceengineworks parts are designed to be fastened to a stub of round tube.
entry 352 - tags: header |  |  |  | December 22, 2007 - Step one complete!
A Sawzall made short work of the stock piece.
entry 353 - tags: header |  |  |  | December 22, 2007 - A couple of other Miata headers.
The complete one is the Racing Beat unit I pulled out of the car. It has 1.675" primaries - only 0.125" smaller than I'm planning to use - but they're much shorter. There's a bit of inconsistency in their length, but I'm coming up with about 15-16". Really, this header is tuned to work best at very high rpm according to the math.
The other pipe is from a Boig Motorsports header, one that had a great reputation in the Miata world for a while. It's for a 1.6. 1.75" primaries that are about 29" long. I'm going a little bit longer - about twice as long as the ones in that Racing Beat unit! Packaging is going to be a concern.
entry 354 - tags: header |  |  | 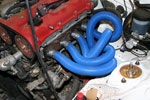 | December 22, 2007 - In order to sort out general packaging, I pulled out the blue pool hose again.
The collector is duct taped to the steering column as it fits well there. That means that I have about 10 feet of tubing to deal with, mostly in the engine bay.
The tubing is stuffed into the flange and duct taped into place. Since it slips into the collector, it's relatively easy for me to explore basic configurations - does the #4 runner go in front or behind of the #3? - and get an idea of how complex this will be. It seems that the first three tubes are simple enough, but that #4 is going to be a bit of a pain. Let's just hope I can make it a little bit artistic as well.
entry 355 - tags: header |  |  | 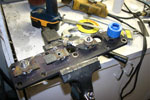 | December 26, 2007 - In order to attach the header design bits to the head, I attached some little expandable plugs to the header flange.
They're all set up so the base of the first piece of header is 1" from the port.
entry 356 - tags: header |  |  | 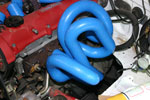 | December 26, 2007 - Because the #4 runner was the one that I was most worried about, I started there.
Here's the first version of the first three tubes - unfortunately I don't have enough of the right curves to finish off the #1 primary. While this configuration looks fairly simple, the tubes are more complex that you'd think. Plus they just don't look all that good and #1 is going to be a challenge.
entry 357 - tags: header |  |  | 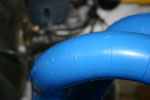 | December 26, 2007 - All of the pieces of header Lego are marked not only with the radius of the bend, but with witness marks.
This makes it easy to make sure you're not cheating by twisting a bend to make it work for you. It also makes it easy to recreate the bends later.
I used these to document the current tubes so I could take another try.
entry 358 - tags: header |  |  | 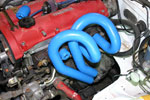 | December 26, 2007 - On the second try, the #3 and #4 runners worked out really well.
They're basically the same shape and stay nice and close to the block, but with enough clearance to get at the various header nuts. They're also a bit lower for more hood clearance.
The long straight sections at the bottom are not only easy to fabricate, they also make it easy for me to adjust the length of the tubes if desired. By putting a couple of slip joints in there, I could set it up so I could tune the header. Hmm.
entry 359 - tags: header |  |  | 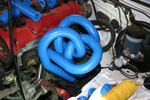 | December 26, 2007 - And now it starts to get crazy.
This #2 tube looks brutal to fabricate, but it will actually involve fewer pieces than the previous design did. I suspect I could also make that big loop with a single radius, but unfortunately the combination of being forced to work in 1" increments and a lack of remaining 3" radius pieces made things a bit awkward.
I've figured out how the #1 runner will go, I just don't have the parts to build it. The good thing is that I've managed to keep everything almost perfect in terms of matching lengths.
entry 360 - tags: header |  |  | 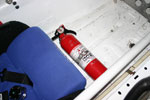 | December 26, 2007 - I didn't just work on the header today - although I certainly did spend most of my time on it!
This fire extinguisher got mounted in place. Okay, it's not a big job. But it's an important thing to have on board!
entry 361 - tags: safety |  |  | 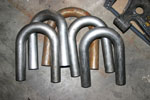 | December 29, 2007 - The header will be constructed out of mandrel-bent tubes - and lots of them.
I've been looking around online and pricing them out, then decided to stop by my local muffler shop. They had most of what I needed in stock, for the same price as the best online stores! I've said it before, but if you're ever looking for exhaust work in Grand Junction you want to stop by Scotty's Muffler.
I'll know on Wednesday (hopefully) if they can source 2" radius bends as well as the 3" and 4" I have now. If not, I'll order them in. Until I have 2", I can't build any of the pipes yet.
entry 362 - tags: header |  |  |
|

 THE DIARY