| MIATA BUILD |
|
|
 |  |  | July 3, 2007 - Weigh-in time!
2020 lbs as it sits. There's still weight to be gained, as the car doesn't have sway bars, a full tank of gas or a windshield. I'm going to estimate the final wet weight at about 2150. That's what my street Miata used to be, but it didn't have a hardtop or a full roll cage installed. There's also a fair bit of bracing under the car that is overkill for a lot of applications. So while I was hoping for a bit less (I wanted to be under 2000 at this point), it's not a bad start. The power/weight ratio should still be pretty healthy. The rules limit us to 2070 lbs in race trim.
For those who don't want to do the math, the car currently has 53% of its weight on the front wheels. Cross weights are perfect as is the left-right split. Not bad!
entry 235 - tags: weight loss |  |  | 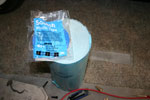 | July 5, 2007 - I stopped by the paint store (they love it when I drop in, it's good for their bottom line) and picked up some plastic tape and masking paper.
The plastic tape should let me do nice smooth curves with sharp edges, just what I need for laying out my stripes. I'm a bit worried about this, it would be easy to end up with a goofy looking setup if I let my line widths vary the wrong way.
entry 236 - tags: paint |  |  |  | July 5, 2007 - Bill Cardell stopped by on the July 4th holiday to help me take the car for its first significant run.
We bolted on the hardtop, fixed a small brake leak at one wheel, set the timing and then headed out for a spin. The car did very well overall. The fuel and timing maps, based on a "best guess" by Jeremy at Flyin' Miata, are pretty close and the autotuning abilities of the Hydra Nemesis will take care of the former quite easily.
The car feels good. The engine comes on cam at about 4000 rpm and pulls strongly up to my self-imposed redline of 5500. I'll stretch the engine past that next time I go for a drive. The steering was surprisingly light even without the power steering belt installed, but I'll have that fixed soon. It's too early to say anything about the suspension as it's currently on junkyard parts. Brakes feel strong though. Overall, it's giving the impression of being a very promising, entertaining car.
It wasn't completely free of problems, of course. The temperature gauge on the dash isn't working, but that's an easy fix because it's a very simple system. I wired the fans off the same switch which seemed easier at the time, but having them staged makes more sense and takes a load off the wiring. The front tires rubbed on light corners but I think I have that sorted now by bending some mounting tabs for the inner fender liners. The lack of a windshield made the car fairly drafty as well.
Time for more driving! And then the masking for the new paint job.
entry 237 - tags: testing, tuning |  |  |  | July 7, 2007 - We have paint!
Okay, it's not on the car. But still, I do have the magic stuff to make my stripes happen.
I chose the Lamborghini "Arancio Diablo" because I wasn't having any luck finding Opel 512. But it's orange. Really orange as you can see in the picture. I expected an orange-red, but there's little or no red here.
This has me conflicted.
entry 238 - tags: paint, Martini |  |  | 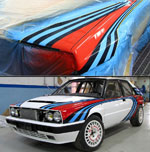 | July 7, 2007 - Looking at pictures of legitimate Martini cars on the MAT site, I can see that they do indeed use an orange.
But it shifts with the light - this is the same car under different light. I've tried photographing my brushed-on stripes in fluorescent, shade and sun light and it's always orange. I never get this shift into red.
entry 239 - tags: Martini |  |  | 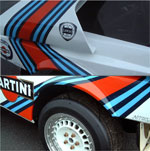 | July 7, 2007 - Another orange/red shift on a MAT car.
I can't make this happen. Hmm. The orange looks good beside the two blues, it's just not as red as I think it should be based on pictures.
entry 240 - tags: Martini |  |  | July 7, 2007 - While rooting around in one of the paint websites, I dug a little deeper and discovered my Opel red!
Most sites don't go back to 1968, and of course Lancia wasn't using 2000 model year colors back in the 80's. But this site did go back, and it turns out that Opel Flame Red has the color code L512 and was used on the GT. Knowing that, it's not difficult to find pictures of the cars in that color, and we may have a winner!
The Flame Red is mostly "Red Orange" in the mixture with just a touch of other colors. It's pretty pure though. Pictures seem to show an intense red or an orangish red as far as I can tell. I'll get a sample mixed up on Monday and compare it.
entry 241 - tags: Martini |  |  |  | July 9, 2007 - Success!
The Opel Rosso (aka "Flame Red") is the right color. It's a bit orange, just enough to make it really pop both in person and on film. This is what I was looking for. That's the Lamborghini Arancio Diablo on the right and Opel Rosso on the left.
There's a problem, though. I was planning on painting the stripes in a base/clear combination so I wouldn't have steps between the various colors. I'll lay down the dark blue first, then the cyan and red on top of that. The clear will flatten all the steps out. But the Opel paint isn't available in a basecoat formulation, only a single stage. You can't mix chemistries (I'm told) and you can't put clear over a single stage until it's cured for a month.
I could also try to add red to the Lamborghini color, but it'll be difficult to do and also end up with a mix I can duplicate if required.
Argh.
So what I'll have to do is get another two cans of blue and cyan mixed up in single stage. If I decide they need clear, I can shoot that a month down the road. The good news is that the single stage paint is about 40% cheaper, so it won't be as big an expense as the first purchase. I could return my clear coat materials as well.
And if you look carefully, you'll notice that the cyan and orange look a whole lot like another iconic vintage paint scheme. Hmm, I wonder when that will come in handy?
entry 242 - tags: Martini |  |  |  | July 15, 2007 - A big change in the stripe design.
I was grabbing a few parts before heading out to the shop to work on a car, and got distracted by the racer again. The shape of the stripes over the hardtop has been bothering me. They have too much of an arch shape. I've been trying to find the best way to bring them over the hardtop but to no avail. It always looked like a New Beetle.
So yesterday I decided to stick to the lower body. I tried to exaggerate the shapes of the car. I think this works much better, giving the car a longer, lower appearance and flowing better. I'm not sure how to deal with the hardtop yet. The Lancias would probably just leave it all white, but I want a bit of color on it. The current upper edge of the stripe on the bottom edge of the hardtop is awkward, and I'm thinking I should just leave it off the hardtop and A pillar completely. We'll see...
entry 243 - tags: Martini |  |  | 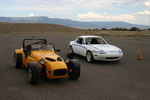 | July 15, 2007 - The Targa Miata visits the track for the first time.
I didn't take it out at all, it's not ready for that sort of use. I was the support vehicle for the FM Westfield. But I did put about 50 miles on the car today. There's a lot of tuning left to be done on the engine management and I did a bit of that today. It certainly has that very eager lightweight feel that I enjoy so much. The lack of a windshield or rear window helps exaggerate that of course! The car had very few problems and although the suspension leaves a lot to be desired, it will grip quite well already.
Getting the car out of the garage also let me walk around and look at the stripes from a few angles. The rear is great, I love it. It does the job of highlighting the rear arches. The way the front loops around is less successful, but I'm getting close. The recent change to the straighter, lower stripe was a good one. The car looks longer because of it.
A good day, but I'm a little windburned.
entry 244 - tags: testing, Martini |  |  | August 3, 2007 - Operator error.
Whoops, ignore this particular entry.
entry 245 |  |  |  | July 26, 2007 - Battery comparison time.
I've become fed up with trying to keep used batteries alive, so I sprung for a new one. See if you can guess which one it is!
The big one is a stock Miata Panasonic battery, only available in a new Miata - and no longer available at all, I guess. The blue stickers are on the Mazda replacement one, and the little red thing is an Odyssey PC680. It's about half the weight of the others, has more cranking power and it's a tough little AGM. I've been using one of these in the Seven for a couple of years and I love it.
entry 246 - tags: weight loss, other cars |  |  |  | July 26, 2007 - Carbon fibre!
Ricky Nietubicz offered this to me in the hopes that I'll do something cool with it. At least, that's how I understood things.
And I will do something cool. I'm thinking headlight covers. Small, relatively simple and a good place to learn. Plus the factory covers are amazingly heavy. Once I learn how to do this, there will be no stopping me.
First step, though, is to get the car painted in time for the Flyin' Miata Open House.
entry 247 |  |  | July 27, 2007 - I'm going backwards!
In order to paint the stripes, I need to strip off some parts of the car. A couple of pairs of hood pins, the door handles, mirrors, taillights, various trim pieces - I'm starting to pull it off now. Now I just have to finalise the shape of the stripes on the nose and I'm good to go.
entry 248 - tags: paint, Martini |  |  |  | July 29, 2007 - It's masking time.
This is an ambitious job for someone who's only just learned how to spray paint. But that's how you learn, right?
For masking the stripes, I'm using plastic "fine line" tape. It bends and curves much easier than masking tape and should leave a nice sharp edge. I sure hope so, I'd hate to have to do this again.
entry 249 - tags: paint, Martini |  |  | 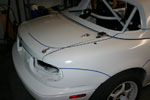 | July 29, 2007 - The fine line tape makes it very easy to lay down nice curves.
I've reworked almost every section of the car slightly, and pulled the tape up over and over to get a slightly better arc. I'm very happy with how the rear's turned out, but the front was still bugging me.
entry 250 - tags: paint, Martini |  |  | 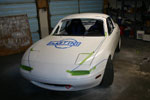 | July 29, 2007 - The lateral stripe across the nose had never worked to my satisfaction.
The original mockup had the stripes originating from the turn signal lens, so I tried going back to that. Think Lancia S4 instead of Porsche 911 for the source.
It took a whole lot of trial and error, but finally I stumbled across a look that I think is a big improvement. I was careful to have the stripe width constantly increasing, that was trickier than it sounds given the compound curves of the nose.
With both sides taped up like this, there was no question. I'd found the shape.
This picture shows the detail masking starting up. I spent a lot of time underhood and inside door jambs making sure I didn't get ugly overspray. I probably still will, but at least I tried.
entry 251 - tags: paint, Martini |  |  | 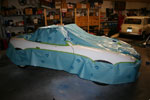 | July 29, 2007 - The big masking job begins.
It's tricky masking a convertible with a roll cage and no glass. The masking paper I bought from the paint store makes the job a lot easier than it could be. I thought about using plastic but I'm pretty sure this was the right decision.
One thing I did realize is that the hardtop complicates things. The top covers some of the rear fender when it's installed, so I have to paint the stripes on the topless car. But that's going to make it very difficult to align the stripes properly on the hardtop, and it's pretty obvious I can't pop it on and off when the car is masked. So I'll paint stripes on the car and the base color on the hardtop. Then I'll unmask the car, install the hardtop, mask off the remaining stripes (cyan and red) and spray it then. It means five painting sessions instead of three, but it'll also mean a much better look when I'm done.
I will mask off the wheels properly before spraying, and I might extend the "skirt" right to the floor. I sure hope this tape gives a clean edge. Not that I'm worried.
entry 252 - tags: paint, Martini |  |  | 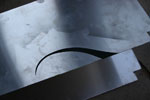 | July 30, 2007 - Eric suggested that I do a test panel with my tape since I'm so worried about it.
Duh. So I taped up a random piece of metal and shot it with spray paint. The metal was unsanded, slippery and slightly greasy aluminum. The end result? Very good. So that's all right then.
entry 253 - tags: paint |  |  | 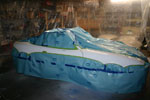 | July 30, 2007 - All bundled up and ready to go.
I sanded down the rear fenders a bit with some 600 and 1500 grit to smooth out the rough original paint - remember, that had a fair bit of bonus texture. The rest was scuffed up, then cleaned. I went over every bit of the tape to ensure it was well attached for a nice clean line.
One thing that isn't immediately obvious in this picture is that after doing the update last night, I noticed that the arc going into the front wheel was a touch more aggressive than it should be. So I eased it off a bit to match all the other arcs going into the wheel wells. Can you see the difference?
entry 254 - tags: paint, Martini |  |  |
|

 THE DIARY