| MIATA BUILD |
|
|
 | | 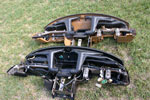 | July 5, 2006 - The 1991 dash (tan) is significantly lighter than the 1994 dash.
It's difficult to say why. The only big difference between the two appears to be the thickness of the plastic.
entry 7 - tags: weight loss, interchange | | | 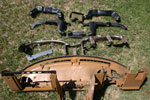 | July 5, 2006 - A disassembled 1991 dash without wiring harness.
The black ducts are for the HVAC system. I'll retain what we need for defrosting and strip out the rest. Current weight is 20.8 lbs.
entry 8 - tags: weight loss | | | 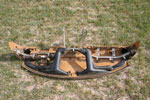 | July 5, 2006 - The modified lightweight dash.
A bilge blower will probably be used for the defrosting. The metal bracing was trimmed back somewhat. Interestingly, the 1991 dash has a reinforced section where the steering column bolts in while the 1994 dash did not. The welding on some of these joints on the 1991 dash are done by hand and it looks as if there was some experimentation going on.
The current weight is 14.8 lbs, a 6 lb savings. I've been eying a few more spots where some weight can come out, but I need to make sure we have room to mount everything we need first.
entry 9 - tags: weight loss | | | 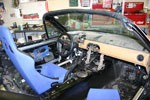 | July 6, 2006 - The trimmed dash in the car along with a seat and wheel.
The steel supports in the center will be used to mount intercoms and navigation gear. Or they'll be cut out completely. Sharp eyes will notice that the car has somehow become black. Well, yes. That was one of the previous chassis.
entry 10 - tags: weight loss | | | 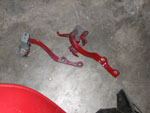 | January 25, 2007 - The car is on a major weight loss program.
These are the hinges for the trunklid. The lid will be cut down and then attached with pins. I'm going through the car front to back looking for little places to save weight. There's more to come out of the dashboard as well despite the previous work.
entry 18 - tags: weight loss | | | 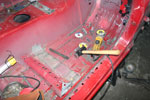 | January 28, 2007 - It's chopping time on the car.
I cut out this folded steel bracket. It's the original seat mount. In order to maintain both a low seating position and some adjustability, I decided to remove it. I'll bolt the seat rails directly to the floor. For those concerned about the strength implications, the car will have reinforced floorboards and frame rails as well as the full cage. I might put a small cross bar in front of the seats but I don't anticipate there to be any need.
entry 20 - tags: weight loss, ergonomics | | | 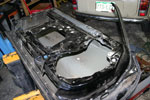 | January 28, 2007 - Time to lighten the doors.
I recently saw a picture of a Miata with every removable panel made out of carbon fibre. The owner claims the doors are 9 lbs each. We don't have that budget, but this door has been dropped from 32.45 to 24.35 lbs. Enough structure is being left in place to allow the retention of a manual window crank and windows.
It's not as extreme as I've gone in the past. For a previous race car I helped build at Flyin' Miata, was built a door that wouldn't support its own weight! That one was about 14 lbs. However, we are required to run the factory inner door panels for the Targa and we also want windows for the Newfoundland weather.
entry 21 - tags: weight loss | | | 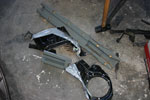 | January 28, 2007 - The bits and pieces that came out of the door.
The side impact beam is the heaviest piece. Switching from power to manual windows also saves over a pound.
entry 22 - tags: weight loss | | | 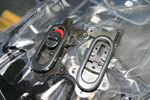 | January 28, 2007 - Extreme lightening.
In order to shave precious ounces, I removed the plastic locking levers from the door handles. Actually, I really did it to keep them from rattling. We won't have locks on the doors because 1) we won't need some of the inner door structure and 2) we don't actually have the keys to these locks.
entry 23 - tags: weight loss | | | 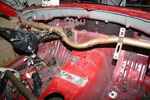 | January 29, 2007 - A test fit of the dashboard substructure.
It's a little shocking how light all this is. I did remove one of the support braces in the middle of the beam, and this may not have been a great idea. I've spent a fair bit of time on track with a car with a similar dashboard and never noticed any steering column movement, but it is possible to flex the beam slightly by hand if you yank on it. Perhaps one vertical brace would be a good idea.
It would also be a good idea to clean up the footwell of the car!
entry 24 - tags: ergonomics, weight loss | | | 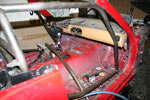 | January 29, 2007 - A hurdle to overcome.
The cage was designed to be installed on a car with the dashboard in place, it seems. I can install the structure underneath, but the plastic covering (which seems to weigh about a pound!) won't go in without more surgery. Since we want to paint the cage along with the body of the car, I do need to be able to pull and replace the dash somehow. There's a way, I just have to figure out the best way to do it.
entry 26 - tags: safety, weight loss | | | 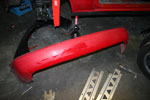 | January 31, 2007 - The rear bumper cover has been cut up fairly drastically.
Why? Because it will offer less aerodynamic drag. It will allow us to remove some substructure and weight. And also because the car that donated the rear bumper cover had a center exit exhaust, so it had a goofy cut right in the middle of it!
entry 30 - tags: weight loss | | | 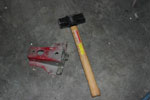 | February 4, 2007 - Now that the bumper cover has been cut down, I've removed the appropriate bits of the car as well.
This frame horn exists primarily to support the tie-down hooks used when the Miata is transported from Japan. There are two of them in the back and they're surprisingly hefty. Well, they were.
entry 32 - tags: weight loss | | | 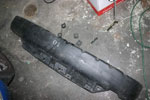 | February 4, 2007 - Behind the rear bumper skin is this large piece of black plastic.
It's pretty light considering, but all we really need are the four small squares of plastic seen sitting on the floor beside it.
entry 33 - tags: weight loss | | | 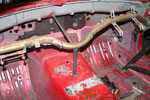 | February 4, 2007 - The dashboard substructure has been beefed up a touch.
I decided than an extra pound or so was worth it for an extremely solidly mounted steering column. There's also no way to remove the dash structure any more, but that's not bothering anyone. One thing that does become obvious when trying to lighten a Miata is just how light Mazda managed to make it in the first place. There aren't any easy places to remove large amounts of weight. The similarly-sized Honda S2000 can drop a significant amount of mass very easily.
entry 34 - tags: weight loss | | | 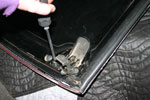 | February 11, 2007 - We'll bolt the hardtop on.
This means the very heavy latches need to be removed. These are held in with some industrial threadlocker. You have to be very careful not to let the screwdriver slip or you can easily round out the screw heads. A previous owner did just that on the screw closest to the camera. Some careful screwdriver work and I got it out - I've learned some good lessons about recalcitrant and damaged fasteners from my old Land Rover.
entry 51 - tags: weight loss | | | 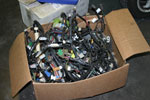 | February 20, 2007 - The part that nobody looks forward to.
Before assembly carries on much further, I have to install the wiring. I also have to trim it down so we don't bother carrying around the extra weight of stereo and electric window wiring.
entry 76 - tags: wiring, weight loss | | | 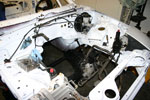 | February 21, 2007 - A few more things are bolted on.
The front subframe (from a 2003) and steering rack are in, along with the headlights and some of the mechanism for the wipers. It would be really nice to drop some weight off those headlights as they're really beefy. I think the steel covers for the lights are the heaviest body panels in the whole car! Maybe later.
entry 77 - tags: weight loss, interchange | | | 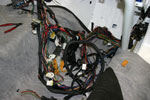 | February 25, 2007 - I swore I wasn't going to do this.
But it bugs me to know of all the airbag wiring in the car, and when I came across the rear window defroster and the power antenna connectors I just couldn't help myself. It's sticky work with miles of masking tape involved, but it's also really good to know that a number of useless wires are gone. That not only lightens the car, but makes troubleshooting easier.
The airbag harness is the thick section that's still wrapped up in black loom. It's all out of the car now, and the only other system that is affected is the horn. That's easy to put back.
entry 84 - tags: wiring, weight loss | | | 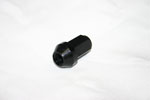 | March 7, 2007 - Lightweight lug nuts!
Fellow racer Joe Woodward at the Tire Rack sent us a set of these. It's a little eerie to hold them in your hand as they're less than half the weight of a set of stock lug nuts. I've been using these on the Seven for the last few years.
entry 87 - tags: weight loss | | | 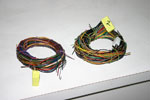 | April 8, 2007 - This is the wiring saved by moving the ECU to the firewall instead of the rear bulkhead.
It's shockingly heavy, especially when rolled up like this.
Race cars don't need as much wiring as street cars. There's no need for air conditioning or heaters, for example. Our aftermarket ECU also uses some onboard sensors or alternate sensors that use different wiring than the factory unit. Once it was wired in, I traced back all the unused wires from the stock plugs, confirmed that I didn't need them and then cut them out. Yes, it saves a few ounces but that's not the main purpose. The fewer wires there are in the harness, the easier it is to debug any potential problems in the future. Today I pulled out the wiring for the power windows (big fat wires - that was significant), the optional foglights (I'll probably wire in some lights myself in the future, but they'll need better wiring than the factory stuff), the mass air flow sensor (our ECU uses a MAP sensor instead), the diagnosis connector underhood (we can talk directly to the ECU) and a few other bits and pieces that aren't needed. The harness is getting simpler and simpler.
entry 119 - tags: wiring, weight loss | | | 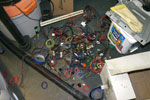 | April 9, 2007 - The great wiring exodus continues.
This pile may not look like all that much, but there's probably more wire out of the car now than in. The harness is getting much thinner and easier to work on.
It's amazing how much of a modern car's (assuming a 1994 Miata is considered "modern") wiring is due to the audio system. Between headrest speakers, door speakers and power antennas there's a lot of it snaked around the car. Imagine a car with a premium sound system!
entry 120 - tags: wiring, weight loss | | | 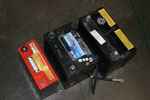 | May 15, 2007 - In order to exorcise my battery woes, I brought home a collection.
The largest is an original equipment Panasonic AGM, much sought-after by many Miata enthusiasts. The middle size is the standard Mazda "High Performance" replacement. The small one is the killer Odyssey PC680. Similar power to the others, but half the size and weight. The latter is what I use in the Seven and this particular new one was stolen from my boss' Westfield "to be installed" pile. I wouldn't mind running a PC680 if only due to the weight, but today it was the mid-size Mazda replacement that was put to work.
entry 174 - tags: wiring, interchange, weight loss | | | 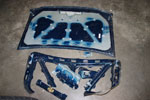 | May 24, 2007 - Chop chop!
A bit of work with the angle grinder and some tin snips took a bunch of weight out of the trunklid. This steel panel is about as heavy as the aluminum hood! The hinges and latch are removed, and I'll pin it on. The bracing removed from the bottom of the trunklid is probably about the same weight as the spoiler I'm going to glue to the top, but I can't resist it.
Last time I did this to a trunklid I went a little further, but I'd prefer to keep the Targa Miata's trunklid weatherproof so I used the gasket mounting surface as my cut line.
entry 180 - tags: weight loss | | | 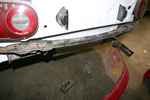 | May 24, 2007 - The rear bumper support is bolted on the car, and the bumper is ready to be attached.
The two black pieces on the floor were redundant, so all that's left to add here is the actual skin. It should be light, and an initial fit indicates that it doesn't move around much.
I'm working on the body panels so I can give them a squirt of paint soon and make the car appear to be streetable. That will make it a lot easier to break in the engine!
entry 181 - tags: weight loss | | | 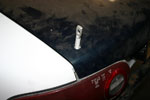 | May 28, 2007 - One last step before preparing the panels for paint - locating the pins to hold the trunklid in place.
I'll do the hood once there are fenders in the car to help me align it. Unfortunately, the location of the pins precludes the use of the cool factory R package spoiler I'd been planning to run. Oh well, that's 3 lbs less weight in the tail.
entry 183 - tags: weight loss | | | 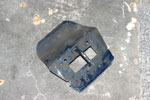 | May 28, 2007 - I'm committed to hood pins for the hood now.
This is the hood latch loop. It was a little disappointing, I was hoping for more weight. Given that the entire hood weighs about the same as the tiny trunk lid, I guess that it's not surprising the latch mechanism would be super-light.
entry 184 - tags: weight loss | | | 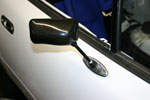 | June 10, 2007 - Sexy, lightweight carbon and aluminum mirrors.
Those aren't plastic made to look like carbon, they are carbon. Oooh. I've been waiting for a while to bolt these on!
Did you know that Mazda used the same door for power and manual window cars, but the outer door skin is different for cars with power mirrors? Go figure. Naturally, these mirrors need the power mirror door and one of my doors was a manual mirror type. That meant I got to do some cutting on my nice new paint.
entry 197 - tags: weight loss, interchange | | | 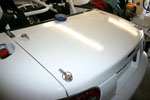 | June 10, 2007 - The most difficult job I did this weekend was installing the pins for the trunklid.
Usually you only have to deal with two of them, but I'm a glutton for punishment. They're all on now and the trunklid slips on and off easily. The panel gaps are pretty much perfect, but they look bad in this photo.
Was this really necessary? Well, I was able to cut a bunch of weight out. But no, it wasn't necessary at all.
entry 199 - tags: weight loss | | |  | June 10, 2007 - The hood has been pinned as well.
Notice that oddly colored headlight cover? Not the missing one, the one on the driver's side. That's the original 1990 Miata white. I like mine a whole lot better.
The body of the car is complete, with the exception of the headlight covers, the gas cap lid and the hardtop. The latter only needs a window. Before I install the windshield again, I also need to install the dash. That means bundling up a bunch of wires, but I'm not 100% sure they all work. I'll have to do something before test driving! Or I could just go without a windshield...
entry 200 - tags: weight loss, paint | | | 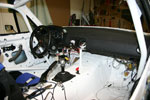 | June 13, 2007 - I did a bit of cleanup on the wiring and stuffed the dash in the car.
The dash isn't removable with the windshield in place thanks to the cage and the welded-in structure. So it would be best if I had all the wiring sorted out or at least well wrapped and secured before the dash was attached.
I expect I'll have the dash out again soon, but it feels really good to have it in there!
entry 205 - tags: wiring, weight loss | | | 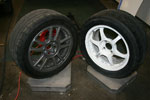 | July 1, 2007 - Wheel weigh in time.
The white wheel is the race setup. The graphite one is a Kazera KZ-M with a 225/45-15 RA-1. The weight difference? Just over 5 lbs! The white SSR package showed up between 28 and 29 lbs on the scale, the KZ-M was a solid 34. Not bad, but that extra 5 lbs is significant.
entry 231 - tags: weight loss, tires | | | 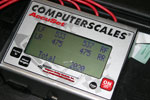 | July 3, 2007 - Weigh-in time!
2020 lbs as it sits. There's still weight to be gained, as the car doesn't have sway bars, a full tank of gas or a windshield. I'm going to estimate the final wet weight at about 2150. That's what my street Miata used to be, but it didn't have a hardtop or a full roll cage installed. There's also a fair bit of bracing under the car that is overkill for a lot of applications. So while I was hoping for a bit less (I wanted to be under 2000 at this point), it's not a bad start. The power/weight ratio should still be pretty healthy. The rules limit us to 2070 lbs in race trim.
For those who don't want to do the math, the car currently has 53% of its weight on the front wheels. Cross weights are perfect as is the left-right split. Not bad!
entry 235 - tags: weight loss | | |  | July 26, 2007 - Battery comparison time.
I've become fed up with trying to keep used batteries alive, so I sprung for a new one. See if you can guess which one it is!
The big one is a stock Miata Panasonic battery, only available in a new Miata - and no longer available at all, I guess. The blue stickers are on the Mazda replacement one, and the little red thing is an Odyssey PC680. It's about half the weight of the others, has more cranking power and it's a tough little AGM. I've been using one of these in the Seven for a couple of years and I love it.
entry 246 - tags: weight loss, other cars | | |  | August 7, 2007 - Now that the hardtop is painted, it's time to make the rear window.
I'm going to cut one out of 1/8" Lexan for lighter weight.
Step one, take a pattern off a glass window. Tape the paper to the outside of the glass and trace the shape (then take a blurry picture when you're done). Looks as if a 60x24" piece will be more than enough.
entry 273 - tags: weight loss, lexan window | | | 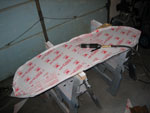 | August 8, 2007 - Next step in the rear window: cut it out.
I use a pneumatic reciprocating saw, but a bandsaw or jigsaw works just as well. If you have a good template, you can have the plastic shop cut it out for you. The problem with that is that I've always had to do a bit of trimming afterwards to get the edges right. In this picture, I'm partway through that process. The first few rivet holes are drilled and various alterations to the shape have been marked and cut. The protective plastic was peeled up so I could see the lip on the hardtop.
entry 274 - tags: weight loss, lexan window | | | 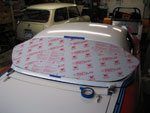 | August 8, 2007 - Installing the window is fairly easy.
Just start in the middle and pop in some rivets every few inches. In this case, I used a 6" spacing until I got to the hard curves at the edges, when I dropped down to 3-4". It's also important to mark which way is us, I've learned the hard way in the past that it's easy to install the window upside down!
entry 275 - tags: weight loss, lexan window | | |  | August 8, 2007 - After about three fittings, I riveted the window into place.
To keep the rivets from pulling through the fibreglass hardtop, I used washers on the back side. The polycarbonate (generic term for Lexan) is flexible enough that it will simply bend around the curves without any need for forming, and the rivets will easily hold it in place even before they're popped..
I also tried sealing the window in to place with silicone, I'm thinking this wasn't a good idea aesthetically. I've never had to worry about weatherproofing before. It's supposed to dry clear, we'll see if that happens after more than 12 hours. The fact that I painted the lip around the inside of the window black before starting didn't help there.
By the way, the original glass window weighed a bit over 11 lbs. I didn't weigh the polycarbonate, but based on the density of the material it should be right around 5-6 lbs. A Miata windshield is 20.9 lbs.
entry 276 - tags: weight loss, lexan window | | | 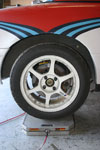 | November 1, 2007 - Cornerweight time.
This wasn't a very serious cornerweight session, as I'll be taking the suspension apart before too long. I mostly wanted to make sure there weren't any really major problems, and to set the ride height.
The car's fairly tall, as fast Miatas go. It's about 13.5" front and rear, although I need to recheck that after driving it home tonight.
The real question is - what does it weigh? A quick disclaimer first, I always weigh cars with a full tank of gas. Not in this case, because I forgot to fill up on the way in to the shop this morning. The car is showing 3/4" on the gauge. I'll fill it up on the way home and then add the weight of the fuel so I can get a good, comparable number.
Anyhow, with the 3/4 tank, the car came in at 2080 lbs. Not bad! It's nose-heavy, with 53.1% of the weight on the front wheels. That's okay, I'll have more weight in the trunk during the race and the occupant weight lands more on the rear than the front. I'm pretty happy with that. My target weight was 2070 lbs wet, and I'm pretty darn close.
update: it took almost exactly 4 gallons to fill the tank. At 6 lbs/gallon, that means the car is just a hair over 2100 lbs with a full tank. The final choice of sway bars will affect this, as will the installation of the rally computer - but it's a good start.
entry 332 - tags: alignment, weight loss | | |  | January 26, 2008 - I made a comment a while back about accounting for the weight of the rally computer.
Well, it arrived from Eric a couple of days ago and there's not really a whole lot of grounds for concern. It's tiny! It's a Coralba C-Giant, although it's also quite possibly the least accurately named piece of electronics I've seen for a while.
entry 390 - tags: wiring, weight loss, computer | | | 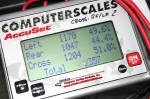 | June 6, 2011 - Before dropping the car to the ground for the last time, I decided to check the weight.
I'd been hoping for about 2300 lbs wet. Well, not quite. It's closer to 2400 by the time a full load of fuel is taken into account - I was only at around 1/4 tank. Assuming there's room for another 8 gallons of fuel in the car, that's about 50 lbs and it'll all land on the rear wheels. That brings the fore/aft weight distribution to 54:46. By the time I've loaded in a spare and the tools in the trunk, I think the final balance should be pretty good. It's interesting to note that the first time I weighed the car in the initial form, it had a 53.8% front weight bias. But by the time it went into the trailer for the race with a spare tire and tools and the like, that had changed to 50.2% front. So I'm not that far off.
The reason I was hoping it would be 2300 lbs is that I was assuming a 200 lb weight gain over the 2100 lb naturally aspirated form. But when I think back, I think it was closer to 2200 in race weight. There will be a few more changes, but probably nothing drastic.
entry 856 - tags: weight, conversion | | |  | July 30, 2011 - A number of carbon fiber parts arrived for the car.
After a few previous posts on the intake air temperature, I decided to install a NACA duct in the driver's side headlight. And that's when Jeff Lee at Slick Auto contacted us. Slick Auto makes the carbon rear finish panel sold by Flyin' Miata and does some really nice work. He offered to send a couple of prototypes of his upcoming pre-preg headlight covers. The driver's side has the largest NACA duct he could squeeze into it. Like any real carbon fiber part, they're creepy light. The stock headlight covers are the heaviest panel on the car per square inch, so there's a definite weight savings here as well. A nice functional upgrade, and thanks to Slick Auto for helping out!
The other piece is a fuel pump cover. Nic Huffman donated it to the car after checking on suitability for the rules. It's 300g (about 10.5 oz) lighter than stock. It also looks killer, especially against the bare, white parcel shelf. It's a perfect fit. Nic actually sent this out months and months ago, but I've been too busy working on other aspects of the car to install it before now. My apologies for taking so long, Nic! It's a work of art.
entry 894 - tags: carbon fiber, air intake, NACA, weight loss | | | 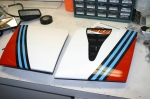 | July 31, 2011 - The headlight covers looked really good in bare carbon.
Well, on their own they did. On the car, they didn't look good because of what they did to the stripes. Besides, I don't like accentuating the pop-up lights. So out came the paint guns.
I originally was going to leave the white sections as bare cf, but that was still a bit too low-rent for my taste. So I went with something more subtle. Check out the stripe that's supposed to be dark blue. I'm pretty happy with how it turned out. The NACA duct, of course, was left bare.
entry 895 - tags: carbon fiber, Martini, weight loss, air intake | | |
|

 THE DIARY