| MIATA BUILD |
|
|
 | | March 30, 2010 - Results for the intake runner length testing.
This was interesting. Not because of what happened, but because of what didn't.
Each engine setup was dynoed three times in quick succession, because I found the first one tended to be erratic. The second and third would be almost exact copies of each other. When I was done, I went back to the beginning to test both the silver runners and the filtered option.
Here's the biggest difference: Short (blue) vs long (red). The shorties did indeed suffer in the midrange, with the biggest difference right around 4500. They didn't gain much up top though, which is a bit odd. Cam limitations? The medium and short runners were basically identical. The silver runners and the black ones of the same length were identical despite the difference in lip design.
But here's the really telling test: Filtered (blue) vs unfiltered (red). That's where my high-end gain came from last time. I'm a bit surprised by this, because the ITG filter I use on the Seven makes no difference at all. It's a big boy and apparently very free-flowing. Something will have to be done - read on for more.
So, the long runners were the winners. Everything else was the same. The short runners make the same power as the ones that came with the throttle bodies.
I need to quieten this car down for a 92 dB day at Laguna Seca in a bit less than two weeks. Ideally, I'd build a plenum to enclose those long runners and see what happens. But there's a way to cheat. A friend who runs a business selling parts for Titan race cars has a nice Pipercross 600 plenum I can use. I'll have to stick with the short runners to fit it, but it's a quick and easy way to quieten the car and bring in cold air. It should be here on Thursday and I'll fit it then.
entry 740 - tags: dyno, intake, IRTB, plenum | | | April 1, 2010 - Spent a long day working on the intake.
And of course, I didn't take any pictures. The Pipercross plenum showed up. These are made in either left-hand or right-hand configurations, with my application being the right-hand version. Naturally, I was only able to obtain the opposite.
No worries, all I had to do was to fit the base plate on upside down. But that interfered with my fuel rail. After some poking and prodding, I figured out that the plenum was made in a couple of pieces. I separated the two, flipped one over and voila, my left-hand plenum was now the right-hand version! I had to epoxy everything back together, so that meant I wasn't going to be finishing today.
In the meantime, I cut the base plate to match my runners and installed the short air horns. Due to the shape of the plenum, I also had to relocate the idle speed control valve and reroute some wiring. The latter needed to be done anyhow, it was kind of rough looking. Since I knew I wouldn't have time to test the car any more before the track day on Saturday, I unshackled the car from the dyno.
Over to a lift, I swapped out the current exhaust midpipe (with an empty cat) for anther one that we'd been using for testing. I also needed to find a place to fit an air filter. One of the problems I'd found with the IRTBs on the road was that my intake air temperatures were quite high. The new plenum will not only hush the car (important for Laguna Seca on Friday!) but will give me the opportunity to pipe in fresh, cool air. I decided to try a filter mounted behind the front bumper. It's not the best place if I decide to ford a river, of course, but for normal use it should do just fine. After a bit of thinking, I decided to bolt the top of the filter to a handy flange. Three bolts with big backing washers going through a top that's about 3/4" thick (really, I was amazed at it!) and it's solidly mounted. I'll run the air hose in it tomorrow and the car will be ready. I'll also take some photos.
Is it going to be quieter? Oh man, I hope so.
entry 741 - tags: ITRB, plenum | | | 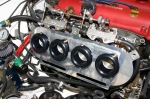 | April 5, 2010 - Time for some pictures of the new plenum!
First, I had to drill a backing plate for my intake setup. In order to clear the fuel rail mounts, it has to sit a bit low.
entry 743 - tags: intake, plenum, IRTB | | | 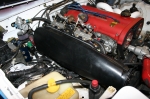 | April 5, 2010 - The plenum clips on over the base plate.
I had to notch the edge of the plenum slightly to get clearance for the fuel rail, but here it is in place.
You can see the relocated IAC back by the fuel pressure regulator. It's a tight fit wiggling this on!
entry 744 - tags: intake, plenum, IRTB | | | 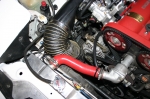 | April 5, 2010 - Now, I have to get cold filtered air into that plenum.
I have a conical filter that fits into the inlet, but I need to do some dyno testing to see how well that works. The ideal plumbing here would be to put the conical filter in, then run straight to a hole in the hood. But not today.
So instead, I used some flexible 4" hose and ran it down to the filter. It's a tight fit and I'm not excited about the tight radius bends from an airflow standpoint. But it's critical I get this car as quiet as possible.
entry 745 - tags: intake, plenum, IRTB | | | 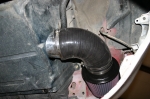 | April 5, 2010 - The filter is a monster.
I needed one with a 4" inlet to match the inlet on the plenum, so I grabbed the same filter we use for our V8 Miatas. It's Honda sized! A 90 degree piece of silicone and a slightly-fudged adapter into a piece of 4" tube, and we're hooked up to the hose.
entry 746 - tags: plenum, IRTB, intake | | |
|

 THE DIARY