| MIATA BUILD |
|
|
 | |  | February 20, 2007 - Time for assembly!
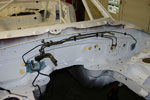
I started by installing the brake and fuel lines. A big reason for this is because they're a really big pile of tubes and I've been tripping over them for months. Time to get them out of the way! The gas tank is also installed.
The fact that someone else stripped the car down might make things a little difficult, although the biggest problem so far has been dealing with lines that were bent while off the car.
This is the sort of work that's really fun, because you see the car coming together in a big hurry. It's also where I can get sucked into what I'm doing and accidentally work until the wee small hours of the morning.
entry 70 - tags: brakes | | | 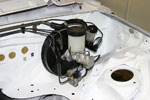 | February 20, 2007 - Assembly continues.
And here's where things start to get interesting. The brake booster and master cylinder are from a Miata with the larger "Sport" brakes. They should give a firmer pedal and are well suited to our big brake setup. The proportioning valve is obviously mounted in a different place on our 1995 as opposed to the 2005 that donated the master so we'll have to deal with that. Actually, it's not a proportioning valve at all as this particular car used the ABS instead. This sort of interchange is fun.
We'll have our own cockpit-adjustable proportioning valve which will involve bending and running some new brake lines anyhow.
entry 71 - tags: interchange, brakes | | | 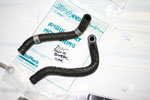 | February 20, 2007 - Another bit of interchange information - one we weren't expecting.
It turns out that when the brake booster was changed in 2001, so was the vacuum nipple. And possibly the location of the brake fluid reservoir. So there are two different shapes of hose to join the hard vacuum line that runs across the firewall (visible in the previous picture) to the booster. It's possible to make the early one (top) fit, but the later one is much happier and gives more clearance.
Upon inspection, it appears the new design has less restriction in the hard pipe going into the booster. It's not drastic, but the Mazda engineers felt it was important.
entry 72 - tags: interchange, brakes | | |  | February 20, 2007 - Time to test-fit the cockpit!
The seat isn't the FX1 Pro that we'll be using, but an older Forza. But it lets us try things out while we wait. The pedals are the ones that were on our chassis originally, and have big MOMO pads on them. The one on the clutch pedal is in the way if I want to use a dead pedal, but the gas and brake ones should come in handy for heel-toe. The doodad taped to the transmission tunnel is the proportioning valve, as I'm trying to find a good place put it where it's out of the way, easy to plumb and accessible from the driver's seat.
entry 73 - tags: seats, ergonomics, brakes | | | 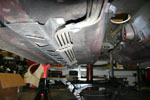 | February 20, 2007 - The fuel and brake lines in place.
They're well protected by the armored frame rail. The lowest of these lines is the rear brake line - it will be rerouted along the top of the transmission tunnel for the proportioning valve.
entry 75 - tags: brakes, stiffness | | | 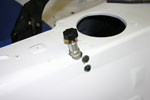 | February 22, 2007 - The final positioning of the brake proportioning valve.
I can't take credit for this, Josh Castaldi emailed me with pictures of his own setup. I'll have to buy some touch-up paint due to a bit of paint damage, but it's very well placed to be out of the way and easily accessible. The brake lines stay in the transmission tunnel and a minimum of alteration is required. Very nice!
entry 80 - tags: ergonomics, brakes | | | 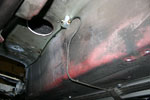 | February 25, 2007 - The rear brake plumbing from under the car.
A new line was run from the master cylinder to the valve, then the stock line was cut, reshaped and reflared to meet up with the back of the valve. The rear line still needs some work to anchor it down, but I'm pretty happy with how it turned out.
entry 81 - tags: brakes | | | 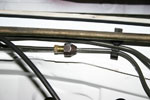 | February 25, 2007 - The 6' (180 cm) length of new line wasn't long enough to reach from the valve to the master cylinder, and it's quite difficult to find brake line on a roll in this town.
So a short extension was used. Just to keep things interesting, the female fitting is from an old Land Rover. I had to use at least one part from that car!
entry 82 - tags: brakes, interchange | | | 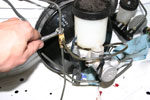 | March 27, 2007 - A mystery solved.
For some reason, the brake master cylinder only had two outlets instead of the usual three - one for the rear and one for each front. It was driving me crazy until a coworker remembered the donor car had ABS. The ABS module took care of the distribution between each side, of course!
Now that's sorted out, I needed a junction to feed both front wheels. Voila! This picture sure makes that lower line look crinkly - I'll smooth that out for aesthetics. The ziptie is to help anchor the lines and cut down on vibration.
It's possible to see what a little dribble of brake fluid, left to sit for a couple of days, did to my fresh white paint. Oh well...
entry 104 - tags: brakes, interchange | | | 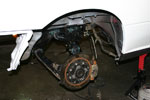 | March 31, 2007 - The rear suspension together, minus the spring/shock assembly.
Because there's no preload in the polyurethane bushings, the suspension is free to droop as far as it wants. This isn't great for the brake line that's currently limiting travel, but it sure makes it easy to work on the suspension.
The rear brakes use 2-piece rotors measuring 11" across, part of a big brake kit from Flyin' Miata. They're lighter than the stock brakes.
entry 110 - tags: suspension, brakes | | | 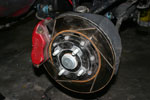 | March 31, 2007 - A similar big brake kit is used on the front.
There's a significant weight advantage and the Wilwood calipers make it really easy to change pads.
Hidden behind the rotor is the 44-tooth sensor for the ABS. If we can find enough technical information, we'll use this as a sensor for the Coralba rally computer. Coralba is not being helpful at all - we know exactly what the ABS signal looks like, but they won't tell us the required signal for the computer. Instead, we're told to buy expensive peripherals and patch them into the car instead of using the sensors that Mazda spent a lot of money developing. I want to just plug this one in, figuring that there's not a lot of variation in hall-effect sensors. Eric's not so sure, probably because he's the one who gets to use the computer! If anyone out there knows what sort of voltage range is acceptable as an input for a C-Giant rally computer, let us know!
entry 111 - tags: brakes, wiring, computer | | | 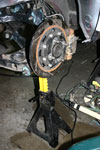 | April 2, 2007 - The suspension is so eager to droop that it was putting stress on the brake lines - so an extra set of jackstands was needed in the rear.
All four corners now have full suspension and brakes. The brakes have been bled, resulting in just two leaks where I had simply screwed fittings in by hand (just 15 minutes before in one case). The pedal feels really good, a promising sign.
Now that there's steering, a seat, brakes and suspension (without shocks), I have a soapbox derby car.
entry 112 - tags: suspension, brakes | | | 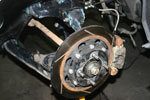 | April 6, 2007 - The halfshafts are in.
These particular ones have me a little concerned - they're from a very high mileage car. I may have to change them later. They'll be well tested before the race.
Another problem has appeared with the parking brake - one caliper appears to be misbehaving. I'll have to pull it off and see if something is seized. The history of the calipers is also a bit of an unknown. At least it's not difficult to find a replacement.
entry 115 - tags: drivetrain, brakes | | | August 14, 2007 - Ready for the track day.
Three years ago, my Seven made its public debut at the Flyin' Miata Open House as well as its first serious track testing. This year, it's the Targa Miata's turn. There's a lot of interest in the car so it's going to be fun.
For final preparation, Brandon and I bolted on a new right rear caliper to solve a problem with the handbrake sticking on. Hopefully the rotor will be okay, a coworker drove the car about 1/2 a mile today with the old caliper siezed tight in place. Stinky!
The engine tuning was given a bit of a tweak today as well. The engine isn't putting out full power, that's fairly obvious even if we didn't put the car on the dyno. Still, it should be safe to run on track and the engine is very eager and flexible. At least it will idle happily now!
And voila. A bit of cleanup for the interior and I'm ready. Just in time, too!
entry 292 - tags: testing, brakes, tuning | | | 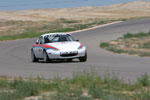 | August 19, 2007 - After that first session, everything dried up and I got faster.
My best lap on the first session had been a 1:12.049. I was concerned that the wheelspin on exiting hard right corners and a banging noise was due to a possibly bad shock, so I bumped up the damping a little to see what would happen.
The results? No real change in the behavior of the car, but then again the track conditions were quite a bit different. The tires were biting now on turn-in, and the combination of excellent initial grip and no sway bars made for a car that required a fairly light touch. I let Bill Cardell from Flyin' Miata take the car out as well and we agreed that the lack of traction on corner exit was probably a wheel lifting. The Torsen differential used in the car is nice when both wheels are on the ground, but once one lifts it acts like an open diff. The lack of sway bars and resulting body roll meant I was getting a lot of droop on the inside rear wheel, and the short Ohlins shocks didn't have a lot of droop to provide. This is something that could be solved by lowering the car - not good for the Targa - or by limiting the roll a bit more. I did test, and the car dealt very well with big bumps such as driving over the kerbs in the chicane.
My time dropped to 1:08.527, mostly due to the dry pavement. This picture was taken on the most difficult part of the track, as I'm accelerating hard downhill towards a braking zone that has the car up on its toes. On my first hard lap, I didn't have the car properly settled before nailing the brakes, and I was rewarded with a spin. Right, no sways and 2050 lbs instead of 1300. After reminding myself of that, I was able to take the late, gutsy option without drama. This corner is an excellent one for dialing in brake balance.
entry 295 - tags: testing, brakes, suspension | | | 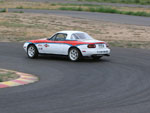 | August 19, 2007 - It wouldn't be a track day for me without an oversteer shot!
I was able to throw the car around a bit. By this point, I'd figured out that my banging noise was probably the exhaust hitting the differential. I knew that clearance was tight there, I'll have to get back underneath and take a peek.
The 1:07.977 was my fastest time of the day, and it was a pretty good one. By comparison, a turbo Miata with 225/45-15 Toyos (well scrubbed in) and the JIC shocks turned a 1:07.119. Another turbo Miata was close behind with a 1:07.337, both driven by coworkers of mine. And the Targa Miata was third, ahead of another 45or so Miatas. It was an excellent first day out. The fastest car on the track (1:03.733) was my little Seven, to my satisfaction.
So, what did I learn about the car? I'd like to try a nicely sized front sway bar to cut down the roll, and maybe a bit more front camber. That will make the car easier to throw around, something I'll need to be able to do on the Targa surfaces. Unlike the track, I'll be reacting a bit more instead of anticipating.
The braking is very light, almost to the point of being overassisted. It's the first time I've tried these brakes with the larger booster and master from the late Miatas, and that could be the reason. It could also be the street-only pads I was running (you could smell them at the end of the day) and the fact that I was jumping out of the Seven which has a very firm unassisted pedal. After the first lap, it wasn't really a problem so it may have been acclimatisation. Still, I'll get some proper pads in there and see.
The shocks are the big question. They do an excellent job of damping surface imperfections. But can I run the car high enough to get the ground clearance I need for the Targa? I'll have to drop the rear down a bit and see how it works. There's another set of shocks sitting at work that have 5" of travel and I want to try them next.
entry 297 - tags: testing, other cars, brakes, suspension | | |  | November 4, 2007 - The track day was with the Peak-to-Peak Miata club and took place at Pueblo Motorsports Park.
I was last there in March and it's a track that's fairly familiar to me. Not the greatest track in the world, but it does have a couple of interesting corners. More importantly, the club runs the track day as an open format. There are no run groups, so you can enter and exit the track whenever you want. This makes it excellent for both driver and car development and takes a lot of the tension out of a day. It wouldn't work with a group of unknown drivers, but these days tend to be invitation-only and everyone uses their heads.
For me, the goal was to sort the handling out and see how my new alignment worked as well as test the suspension at high speed. The first few laps felt good - the car was composed, but it was uninspired. There was a little bit of understeer. Very stable, but I didn't have the adjustability I wanted. So I installed a stock 11mm rear sway bar, as the car had been running without one. As you can see, the trailer makes an excellent sway bar adjustment rack.
That was better. The car was a bit more adjustable and turned in better, but it still wasn't quite there. I popped on a 14mm rear bar from a Mazdaspeed MX-5 and voila, we have a Miata. The car came alive with a great handling balance and excellent adjustability. It could dance.
Meanwhile, I also took a few sorties to work on the suspension tuning. A bit more rear compression damping, a touch more rebound and the car was able to handle just about anything on the track. I was driving over berms and trying to upset the car, but to no avail. One corner did give me the ability to bottom out the suspension, but I had to hit a berm at full cornering force to do it and it didn't upset the car at all. Once again, I found that I could move the rear end around if I wanted but it was still very easy to control. I believe this is due to the long travel available, keeping the wheels well planted on the ground. There are other suspensions out there with decent travel, but most will unweight the spring before reaching full extension. Not in this case!
There's one spot on the track where the exit berm on a corner has big bumps or teeth in it. On one lap, I brought the tail out on this one and went around with the rear wheels going over the teeth at full throttle. It was bumpy, but it didn't upset the car. That's the sort of composure I need.
The last turn on the track is a fast one that has widely varying surfaces as it travels across a drag strip. This means you go from patched asphalt to VHT-soaked asphalt to coarse concrete to VHT to asphalt again, with a couple of metal plates thrown in for good measure. Oh, and it's bumpy and you take it at wide open throttle in 4th gear. In a stiff car, it's painful and the car keeps skipping around. In the Targa car, I could feel the changes in lateral grip but the car didn't get upset at all. Very nice - I think we have a winner with this suspension setup. The Torsen differential was working as intended as well, putting down the power smoothly and cleanly.
So, all very promising then. I was able to run down and pass a Spec Miata which was gratifying, as he was running a much more track-biased suspension than I was. His front spring rates are more than double mine! There was a good battle with a Subaru STi that was promising as well, my handling and grip were able to make up for a 150 hp (or so) shortcoming.
Bill Cardell of Flyin' Miata tried the car and was impressed. The suspension he considered to be "suitable for a NYC taxi" because of the way it would absord anything. The engine feels good but it really needs more top end, that's something we'll work on. His only concern was the brake bias, as I have it a little strong in the tail for maximum braking. This means that the tail feels a bit loose in some situations. Not a problem on the track where you know exactly what the next corner looks like, but he pointed out that with the unexpected nature of the Targa course this could be a liability. Luckily, that's easy to adjust, even between corners.
So that's the good news.
entry 335 - tags: testing, suspension, brakes | | |  | March 30, 2008 - I need new brake pads.
Something more suited to the sort of use this car will see. I'm going to run the Performance Friction PFC97 on the front and Carbotech XP8s on the rear. This is a combination that has worked really well on some Flyin' Miata cars, giving very good braking when cold and exceptional braking when hot. The downside is that PFC97 destroys rotors when cold. No worries, they're easy to change out.
The fronts are on order. But for the rear, I had a set of XP8s in the 2001-05 brake size. I also had a set of Porterfield R4S pads in the 1994-02 size, which conforms to the calipers I have in the car. Brandon needed a set of R4S pads and had 2001-05 brackets in the rear of his car. Since my rear brackets are from a Flyin' Miata big brake kit and use the same size rotor, we decided to swap. Parts went flying everywhere, and when we were done we each had new rear brake pads in the size we wanted. It seems very complex in retrospect, but really it makes sense.
entry 441 - tags: brakes | | |  | March 30, 2008 - The Carbotech XP8 pads appear to have copper in them them.
Either that or gold. There are big flakes in the pad compound.
entry 442 - tags: brakes | | |  | April 5, 2008 - Another trackday test.
This was on our local kart track, the same track used for the car's first track day. I wanted to see how the suspension was doing, and see if the car could put power down.
Immediately it became apparent that the track was fast today. My existing lap record fell almost immediately to a turbo Westfield. That was set in the Seven, so I didn't have a chance to fight to get it back. My own times were quick as well though, as I ran times that were quicker than we've seen from Miatas here before. Recent rain has left the track much cleaner than usual, I suspect.
On track, the car felt great. The suspension is almost perfect, allowing me to take completely ridiculous lines through the chicane. I wasn't just putting the wheels on the berms, I was dropping off the other side and essentially straight-lining the course. I never bottomed out and the car wasn't upset at all. Only once did I scuff the bottom of the car, and to do that I had to put my outside wheels where most people ran their inside ones! We shot some video of the car from behind that shows my fairly ludicrous lines, I'll have that posted before too long. When I took my friend Mark (last seen welding the roll cage into the car a year ago) out for a ride, he was amazed. "It doesn't feel like a Miata, it feels like a rally car!". He was also impressed with the feeling of stability and adjustability in the car, as it just gripped and gripped and never seemed to get upset. The car and I are bonding, and it's become a very useful tool. Bill Cardell took a break from hammering on my lap record to take the car out for a run, and he was quite impressed with the setup as well. The new brakes with the Performance Friction front pads really worked nicely, hauling the car down remarkably fast with lots of stability. There are a couple of corners on this track that really test both braking and stability so it was a good venue.
Unfortunately, the car again showed an inability to lay down any power in a right turn. I started running with ballast (aka passengers) after the first session, and that seemed to help somewhat. But still, it's acting just as if there's an open diff back there. So either I got it wrong and installed an open (again!), there's something wrong with my Torsen (I can't think of how that would happen) or for some reason the suspension setup is unweighting that inside wheel. Given the amount of droop travel available, I doubt it's the latter. The car feels exactly like it did with the open diff back at the Open House testing, although I blamed a short-travel suspension for the behavior then. So step one is to confirm it's a Torsen for sure for sure. I'm also going to cornerweight the car and see if it's way off, but still. A turbo Miata running almost exactly the same tires (225/45-15 instead of 205/50-15) and an extra 130 hp was not having the same problem.
So how did I do? Well, I had the fastest Miata there at 1:04.989, running clockwise. That's 1.5 seconds faster than we've seen a Miata go around the track in that direction, I think. Running counterclockwise, I ran a 1:05.228. I even beat that turbo Miata on race tires. The only cars that went faster were the turbo Westfield and that STi from last weekend. No shame there! In the case of the turbo Miata, it was a matter of suspension versus horsepower again. That car's fitted with a JIC Magic suspension and is very competent on the track. It's just not quite as competent. That car was also being piloted by a very good driver who knows the track well, so it's fair to say that most of the difference was in the car.
entry 445 - tags: suspension, testing, brakes | | | 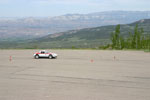 | June 1, 2008 - Autocross time!
This was an event put on by the Red Rock Racers, a group I started because we didn't have any autocrosses to go to! Problem solved, now there's one a month. And on the prettiest autocross course in the world.
We had a good bunch of cars out - a couple of modified STis (including one on Toyo R888s), a rotary-powered X1/9, some quick Miatas, an Evo and even a Isuzu I-Mark "Handling By Lotus". Everyone's a lot of fun to run with. However, they did have a little trouble keeping up with the Targa Miata. I took the fastest time of the day by a 0.8 second margin.
The car felt good, moving around nicely and easy to toss into corners and transitions. I was using the brake bias to adjust the handling of the car and it worked well. I didn't adjust anything on the suspension after my recent over-the-road testing otherwise.
The picture was taken on a fast right sweeper, and you can see there's a fair bit of body roll. It didn't seem like it from inside the car and it responds to transitions pretty well. But I was still having traction problems on rights, and looking at that roll makes me wonder if it is simply a matter of unloading the inner wheel completely despite all that droop. I'm going to play with some different sway bar and alignment settings, although having Janel in the car helped and I expect a cornerweighting session would also plant that right rear a bit more.
Another thing that concerned me a bit was my consistency - or lack thereof. I'm usually pretty good for putting down similar times, but today I was all over the place on the timing board. Still at the pointy end of the pack, of course, and I posted not only the fastest time but also the second-fastest and (I think) fourth and fifth-fastest. But there was a bigger range than usual. I'm not sure exactly why. I did manage to stay clear of cones all day though.
The car was burping coolant out of the overflow tank, but not showing signs of running hot. I think I might have a bad radiator cap that's venting early. Easy enough to check. Otherwise, the car ran flawlessly.
entry 462 - tags: testing, suspension, brakes | | | September 22, 2008 - The brakes were perfect all week.
Nice and powerful but easy to modulate. Of course, Miatas are easy on brakes. The Challenger was not, and this cost them dearly when the rotors taco'd at the beginning of the long and fast Leading Tickles stage. I didn't even have to bleed my brakes. That's the result of a light car that's fast in the corners and (relatively) slow in the straights, of course.
The adjustable proportioning valve did come into play over the week, as I'd adjust the bias to get a different behaviour under certain conditions.
entry 607 - tags: post-race, brakes | | | 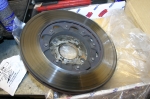 | July 16, 2010 - I've been working on other cars, and the Targa Miata has been sitting.
"Sure boss, I guess I'll drive the supercharged 2006 at the track day to see how it does" - that was actually a really good track day, as it poured rain. The combination of a powerful car on wide street tires and heavy rain made me work on some skills that could prove very useful at Targa.
But the car hasn't been forgotten. I've removed the 300 lb secondary springs to cut down on that initial body roll and sharpen up the car's reflexes. The radiator was removed as part of some cooling system testing and has ended up in Janel's street Miata. The differential is coming out so we can test a different unit. All of this should be on the track in a bit over a week.
But when I was working on the car, I discovered a problem. I know the Performance Friction PFC97 pads are hard on rotors, and I've been watching the slots on the rotor as a guide of wear. But when the wheels were off for something else, I took a closer look and was shocked. The rotor in the picture used to have slots! The outer face still has lots of meat and isn't showing dramatic wear, but the inner face is completely worn away. Both front wheels were like this. Yikes. I also discovered a cracked rear rotor.
So, what happened? Good question. The brackets on my brakes are from a source that often needs a bit of shimming to get them aligned well enough to clear the rotors, and even then my calipers are off-center on the rotor. I wouldn't think a 4-piston caliper would matter, but the brackets are being replaced with new ones that are perfectly designed and machined to keep the caliper centered. New rotor rings are on the way. Flyin' Miata is also testing a different brake kit that will be on the car for the next couple of track days, so there's no big hurry.
I have new rotor rings on the way to replace these.
entry 758 - tags: brakes, suspension, cooling | | | October 11, 2010 - The local Corvette club had an autocross yesterday.
I haven't run through the cones for a while, but it was just a few minutes from my house so I figured I'd go out and have some fun. Brandon brought out his bike-engined Seven so I had someone to play with.
The car is set up exactly the same way it was at High Plains Raceway. Heck, it hadn't even been out of the trailer yet. I did put a bit more pressure in the tires, as the cooler weather had dropped them down a few pounds. I also wanted higher pressure for the short autocross runs instead of 20-30 minute track sessions.
The car felt pretty good. The first run was a scrabble for traction, but this particular lot is always slippery at first due to a lot of dust. I softened up the shocks a bit (two clicks in front, one in the rear) to help it grip the rough surface and because it felt a bit too stiff to me anyhow, and that helped. The car would grip well at the front up to a certain point, but I still spent a fair bit of time trying to manage my front grip. A large part of that could have been my driving, as I suspect I was sawing away at the wheel too quickly and breaking traction. It's an easy bad habit to get into.
More interesting was the fact that I seemed to have too much front brake bias. Now, the lot was fairly slippery so that means less weight transfer and thus less (relative) front traction - but even with the rear brakes turned up all the way I couldn't get the back to rotate properly. I found the same thing the last time I was at our local track. I did recently replace the front pads, and I suspect the front brakes are simply working too well. I'll try swapping in some new rear pads and see if that solves things.
While I wasn't completely happy with my driving, the results were pretty good. Brandon walked away with the event because nothing can touch a Seven in the autocross, and we left before the final runs of the fastest drivers. But at that point, I was around 2.5 seconds ahead of the next car, giving me a solid second place. Can't complain there!
entry 768 - tags: autox, brakes | | | 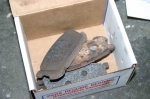 | July 29, 2011 - The car's been showing signs of weaker rear braking of late, so I figured it was time to try some new pads.
And just in time - Carbotech says these pads can be used down to 3.9mm, and I'm at about 5. We'll see how the new ones do. The car's a lot harder on brakes than it used to be for some reason.
entry 889 - tags: brakes | | | 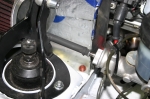 | August 19, 2011 - Here's what that little doodad does.
It's a brace for the brake master cylinder, tied into the shock tower brace. This should give a nice solid pedal - not something that's ever concerned me with this car, but it can't hurt. The brace is ridiculously simple, just a steel tube with a nut welded to the end. A threaded...I'm not sure what to call this thing, it's basically a bolt with a knurled knob at the end...presses up against the end of the master.
Did I have better things to do? Maybe.
entry 916 - tags: brakes | | |  | September 14, 2011 - Up on the stands in Clarenville for an inspection, I found a nick in one of my front brake lines.
I cut part of the plastic cover off and was able to determine that the stainless sheath was untouched - the only damage was to the plastic. That's not a structural part of the line, so I'll leave it alone. I wrapped the area in tape to give it another dose of initial protection. Based on the damage, I think it was a passing encounter with a rock.
entry 978 - tags: 2011 race, day 3, brakes | | | 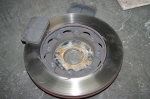 | February 15, 2012 - Maintenance time for the Targa car.
I'm changing it over to track spec, and pulled the rotors off for a peek. And what I saw looked very familiar. The pad wear is even on both sides, it's just that the inner face of both front rotors is heavily worn. Interesting. I'm guessing it's related to heat, as the inner face has a dust shield on it while the outer does not. I'm going to do a bit of research here. I do know that the Performance Friction PFC 97 pads can be rough on rotors when cold, but I would expect that to affect both sides.
A new set of rotors is going on, of course. The pads are about 40% worn by eyeball measuring, which isn't bad considering how much I used the brakes this time. Faster car with worse tires means more braking.
entry 1014 - tags: brakes | | | 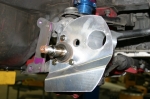 | June 6, 2012 - I forgot to mention these when I was preparing for the Laguna Seca event: a set of brake ducts.
After seeing the bad wear on the inside face of the rotors, overheated pads were the verdict from Performance Friction. An interesting note about PFC97 pads - it would seem that they don't lose braking performance as they overheat, they just start to destroy the rotors.
The solution was to keep the brakes cool. I was looking to build my own ducts, but these ones from Trackspeed Engineering pretty much covered all the bases. They're designed to take a 2" hose and bolt right in. They're now available through Flyin' Miata. Ideally, I'd like to see the hoses aimed closer to the center of the rotor so the internal rotor ducting would take care of air distribution, but that's not possible with the ABS sensor in the way. I use the ABS sensor to drive my rally computer!
entry 1042 - tags: brakes | | | 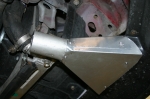 | June 6, 2012 - In order to provide a good supply of cold air for the brakes, I built a couple of ducts to mate up to the front air dam.
It was a fairly easy job using some thin sheet aluminum, a piece of 2" exhaust pipe and some rivets. A bit of foil tape took care of sealing inside. Aircraft SCAT hose took care of the air transfer duties.
How well does it all work? Difficult to say. Laguna Seca was too wet to put any real heat into the brakes, and the car was parked once the weather cleared up.
entry 1043 - tags: brakes | | |  | April 1, 2013 - Now that's a fun bunch of cars to see at a track day.
That Formula B car had a tendency to simply appear out of nowhere and then just vanish into the distance.
Along with the aero, I was testing some new rear brakes on the car. I'm going to have a look at the pads shortly, but they felt great with lots of bite.
entry 1078 - tags: trackday, brakes | | | 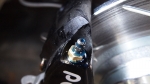 | August 30, 2013 - I've been using a different bleeding technique for the brakes for a while: gravity bleeding.
It's about as simple as it gets, but I've found it to be really effective. It's something I learned from the old Land Rover, as it's got a particularly recalcitrant hydraulic system.
Basically, you just open up the bleeders. In my case, I just let them drool but you can attach a hose. You could open them all up at the same time, but I like to do one at a time so I can watch what's going on. Big bubbles are obvious, but there are a surprising number of little teeny tiny ones that you'd never be able to see if you were using a hose.
It's the same basic idea as pressure bleeding, but without the extra hardware. Some pressure bleeders can actually aerate the fluid slightly which is counterproductive. I've found that I get a much firmer pedal with this technique, which might be the result of that aeration or the fact that I'm getting rid of those miniature invisible bubbles. The brake pedal is like a rock. Plus the only thing I need is a wrench and a few rags to clean up. It's also fairly quick, especially since you don't have to mess around with the pressure bleeder.
It wouldn't be a quick way to flush the system, as you actually end up using very little fluid. But if you're changing out calipers (as I have been doing regularly recently), it's perfect. Just like with any other technique, I finish by starting the car and trying to push the brake pedal through the firewall. You develop a lot more pressure in the system that way, and it's a good way to find leaks that would evade detection during bleeding.
entry 1093 - tags: brakes | | | 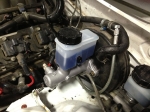 | October 2, 2013 - The master cylinder failed at the last track day.
It was an old salvage part that had been pushed hard - but I took it as an opportunity to upgrade. The previous setup used a 15/16" master cylinder from a Mazdaspeed. The Mazda 929 used a 1" master, and it bolts right on. Well, once you've reshaped the brake lines it does.
The result is a bit more braking effort and a firmer pedal. I figured I'd give it a try, so I installed a brand new 1" part. I took the opportunity to clean up the routing a little bit as well. The pedal is definitely firm, we'll see how it works at the track this weekend.
entry 1098 - tags: brakes, interchange | | | 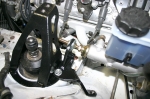 | November 27, 2013 - Paco Motorsports is a new sponsor of the Targa car, and here are a few goodies that are being installed.
The master cylinder brace (available from Flyin' Miata) is a simple bolt-in, and it makes a pretty dramatic difference to the amount of flex in the braking system.
You can also see the base for the new shock tower brace. It's no coincidence that this is compatible with the master cylinder brace. It's a step up from the one I've been using for the past few years, both in terms of strength and with improved access to the shock adjustment knob. I like it.
There are some new prototype parts from Paco on the way
entry 1116 - tags: brakes, bracing, paco motorsports | | | 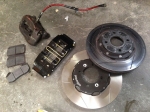 | April 17, 2014 - With the extra power, it's time to upgrade the braking.
Speed is a much bigger factor when it comes to braking than weight is.
The previous front setup was a typical one, with a Wilwood Dynalite caliper, two-piece 11" rotors and Performance Friction PFC97 pads. I loved the pads, they would always stop the car hard regardless of pad temperature. But they were hard on rotors when they got too hot or too cold, and the track work with the 5.3 was running them too hot so the pads were also starting to suffer.
So it's time for a new 6-piston Dynapro. Nice big pad area to go with the new rotors. I'm going to try some Wilwood compounds, starting with the E flavor. There's also a full set of H pads on my shelf if I need to be more aggressive. We'll see how it works. At the back of the car, I already have Wilwood Powerlite calipers with E pads. Basically, I'm now running the Flyin' Miata "Big Mama Jama Stage 2" kit.
Combined with the big master cylinder and the brace, I have one very solid brake pedal. Highly reassuring with this power/weight ratio!
entry 1122 - tags: brakes | | |  | April 20, 2014 - First track test!
Finally, a chance to let the big engine off the leash. And of course, it was raining in the morning. Yeah, that was a big slidy adventure with the slick RA1s.
But eventually, the track dried. And the car woke up. Let's get the fun stuff out of the way: it's a beast. No surprise. But holy cow, it's everything it should be. On the second gear corner exits, throttle modulation is the name of the game - or big black stripes on the pavement as an alternative. But hit third, and it'll hook up solidly and turn into a rocket. Third gear is awesome in the true sense of the word. The car just teleports forward.
This led to my biggest problem of the day - brakes. Thanks to the changes in traction levels, it took me a while to discover that I was set up with far too much front bias on the proportioning valve. That's a sign that my previous setup was definitely struggling. But even when I dialed it back, I was still having trouble getting the car slowed. Why? Because my braking point on the front straight had moved back by 40' or so, to the point where I was actually having to brake before the start/finish line. That's about the same place where Brandon was slotting third in his 1.6 Miata. I couldn't get past that, and kept trying to brake later followed by more big black stripes on the pavement.
I did manage to put down a 1:02.905, followed by a 1:02.908. Then I started overdriving and slowing down, eventually flat-spotting some tires as I tried too hard. So it didn't get any faster. I'm a bit disappointed I didn't manage to match my previous best, but that was a fast day when everyone was setting personal records. I'll spend some more time fine-tuning the brakes and go through the whole chassis setup, then we'll see what happens next time.
Mechanically, the car was solid. The engine never missed a beat and proved to be really easy to modulate. So that's a big success.
Video! This was one of the fastest laps.
entry 1123 - tags: testing, brakes, video | | |  | July 8, 2014 - High speed track testing.
The recent track test at the local track was fun, but the car felt a bit like a caged animal. So I trekked out to High Plains Raceway to run with the Z Car Club of Colorado. These guys always put on a smoothly run day, with the opportunity for lots and lots of track time. I had new H compound brake pads and was ready.
How was it? Spectacular. I had a ridiculous amount of fun. The first session was one a mismatched set of tires, RA1s on three corners and a Nitto NT01 on the other. The Nitto wasn't working as well as the Toyos so the car had uneven handling left and right.
I then swapped on a set of new Toyo RRs on 9" wheels. Wow, what a difference. The chassis now had the grip to match the power, and I was able to go into full rampage mode. The chassis setup was perfect and I was able to just drive. I spent the rest of the day chasing down a variety of cars, including another LS3-powered Miata. The one car I never got to play with was a Viper with race rubber - he started one session right behind me, but pulled off after a single lap. Top speed was about 135 mph into a headwind. At the end of that straight there was a fairly intense braking zone which had me hanging off the harnesses and giggling.
Video!
Unfortunately, the car wasn't perfect. The speed and the braking zones (five major braking events per lap) meant I was putting a lot of heat into the brakes, and the fluid started to boil. I was using ATE Super Blue which is pretty good stuff, so I'm going to take a look at improving the ducting further and run something that runs a bit hotter. I could manage the heat in the brakes by being a bit cautious on braking. The coolant temperature was good - even on the very hot day and running for 30 minutes, I never got into a problem zone.
At the end of the day, I bailed early. This group starts combining run groups near the end of the day and extends the length, which meant that I had the chance to run for a full hour with a bunch of poor B, C and D drivers getting blown into the weeds by the Targa Miata. With the brakes soft, I decided there was nothing to be gained so I packed up after the end of the regular sessions. Still, it was a good day. So much fun.
entry 1124 - tags: high plains, track, testing, brakes | | |
|

 THE DIARY