| MIATA BUILD |
|
|
 | | 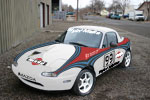 | January 18, 2007 - Here's an artistic rendering of the car.
Okay, it's a photoshop job. But it's what we're planning for a paint scheme. Both Eric and I are big fans of the classic Martini livery so we've decided to make a version of it for ourselves. There is no standard Martini paint job anyhow, they were always designed to suit the car.
Of course, we have a little way to go before we can actually do this, but it's our inspiration.
entry 2 - tags: Martini | | | June 13, 2007 - While flipping through a Classic and Sports Car magazine, Eric found an ad for a Lancia Delta S4.
Very sexy car mechanically, but it's also a Martini car. The shop's website has a number of excellent photo galleries of various classic rally cars under restoration, and it's fascinating stuff to see. Definitely worth a visit, especially the painting of an Integrale - step-by-step on a Martini paint job! That's useful.
Makela Auto Tuning
entry 206 - tags: Martini | | | 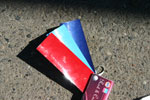 | June 24, 2007 - Martini colors!
Thanks to a member of the Grassroots Motorsports board, I have the right colors for the stripes. They're not perfect, the dark blue is metallic instead of...well, not metellic. I'm not sure if I can get that mixed up. Still, metallic isn't a big problem, it'll always be a small area (unlike red) and this will make it look blue instead of black.
For those who want to know, these are MS "Rod and Custom" colors Blue #59398, Blue #59392 and Red #59352.
entry 220 - tags: Martini | | |  | June 24, 2007 - Martini stripes!
Okay, not really. But I couldn't help myself. I grabbed a roll of tape and, well, this happened. It's both easier and harder to do this on the car than on the computer. I've spent a lot of time thinking about the layout over the last few days, and it turned out about as well as I'd hoped. I'm not convinced about the door area yet. I don't want the whole stripes to go in a big arch, I want the width to shrink and expand. Maybe I won't go all the way to the roof, but cut across the windshield pillar. Hmm...
The stripes are continuous around the car, narrowing down to a band that crosses the nose and the tail. I'll mock this up in the computer to see how much red will be on the car and then it's time to start laying it out.
Why all the excitement about stripes? Because I realized that it will be easiest to stripe the car when it's still basically clean, and before the windshield and rear glass goes on. Once the masking starts, it'll be a pretty quick process. But nerve-wracking! It's a crazy way to learn to mask well.
entry 221 - tags: Martini | | |  | June 24, 2007 - I'm very happy with how the stripes work from the front.
I think they'll flatter the car quite well. The design will also work with and without the hardtop. That's not an issue for Newfoundland, of course, but it's hot here in Grand Junction.
entry 222 - tags: Martini | | |  | June 26, 2007 - A side view of the proposed stripes.
It's not bad, although I'm not crazy about the curve over the top. There's too much of an arc to the stripes.
Let's call this shape "A".
entry 223 - tags: Martini | | |  | June 26, 2007 - Another side version.
Let's call it version B. I like this a bit better than shape A. You can't tell from the pictures, but it comes straight off the top instead of a big curve. There will be more red on the side of the car this way, including a large patch on the side of the hardtop.
entry 224 - tags: Martini | | |  | June 26, 2007 - Version A from the rear.
I'm not happy with how it transitions into the rear. I suspect once the full blue stripes are laid out (two light blue, three dark) there won't be much room for the red.
entry 225 - tags: Martini | | |  | June 26, 2007 - Version B from the rear.
The transition is much better. Other than the large panel of red on the hardtop side (the C pillar, to add to our alphabet soup), I'm pretty happy with this design.
As you can probably tell, I'm having fun with this. I'll wander into the garage and stare at the car for a while, then maybe play with some tape. Then I'll go dig through my library of Martini pictures and decide if what I'm doing is appropriate. I'm trying to come up with the design that Martini would have used on a factory Miata.
entry 226 - tags: Martini | | | 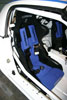 | June 27, 2007 - In anticipation of upcoming test drives with a computer jockey riding shotgun, I installed the passenger's seat.
It went in ridiculously easily. I'll pay for that later I'm sure. Due to the shape of the transmission tunnel, I was able to mount the codriver's seat about 1" further inboard than the driver's. It's also further back.
Eric's reaction to the proposed Martini schemes? "BBBBBBBBBBB!"
entry 227 - tags: seats, Martini | | | 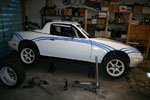 | July 1, 2007 - I spent the weekend working on another Miata.
Janel's little supercharged Miata is now turbocharged. The operation was a great success.
But that doesn't mean the Targa Miata was completely neglected. The new tires (Toyo RA-1 in a 205/50-15 size) came in so I had them mounted up. The wheels are some white SSR Competitions. Hang on, they never came in white! Ah, but they did in Japan. These date back from a previous race effort that was sponsored by SSR Japan. They're a custom 15x7 with a +20 offset, and are perfect for this application. The fact that they have a little tricolor stripe that happens to match the Martini colors is simply icing on the cake!
entry 228 - tags: tires, other cars, Martini | | |  | July 1, 2007 - Speaking of Martini colors, this book arrived in the mail today.
It's the "Martini Racing Story, 1983-1987". From the text, I think it's been translated from Italian. I bought it (half price!) for the pictures and it's even better than I'd hoped. There's a 6-page chapter on designing the stripes, and it confirms my thoughts about how it was done. The stripes were used to accentuate the curves of the car. Or boat.
entry 229 - tags: Martini | | |  | July 1, 2007 - See?
Martini stripes!
entry 232 - tags: Martini | | | July 2, 2007 - The official color codes!
The shop that did those beautiful Martini restorations (Makela Tuning) answered my email about paint codes. I'm blown away - I think they actually contacted their paint shop to get the codes on my behalf and that's why it took so long. It's great information.
Here you have the color codes, as I have got those from Carrozziere
Nitro Taurus (Official Italian Martini paintshop)
VERNICE SIKKENS / MAX MAYER # TIPO # TINTE COLORI
ROSSO OPEL 512
BLU INNOCENTI 5208
CELESTE FORD 537
LOGHI LAGANA' ADESIVI CHIVASSO (TO) #
(CHIEDERE ARKENTIS)
CARROZZIERE NITRO TAURUS
I have also used:
RED: Lamborghini 231240 (arancio diablo)
LIGHT BLUE: Mercedes DB5508 (cyan blau)
DARK BLUE: Volkswagen VAG.LA5B (marine blau)
I've managed to track down the PPG code for the Lamborghini red/orange and the VW color was used in the US on the Golf in the late 80's. The cyan is proving elusive though, both the Mercedes hue and the Innocenti. Are there any paint shop magicians who can help out with the Opel red or the cyan? Heck, can anyone translate some of those lines in all caps. My Italian is a little rusty.
The cyan I found in the MS Rod and Custom colors can be used, but since I'm so close I'd love to use the "real" colors straight from the legit Martini paint shop.
I'm blown away by the helpfulness of MAT.
entry 233 - tags: Martini | | | 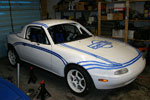 | July 3, 2007 - A variation in the side stripe.
I decided I didn't like the arc I had going before, so now there's more distinction between the flare over the fenders and the line across the door.
entry 234 - tags: Martini | | | 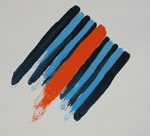 | July 7, 2007 - We have paint!
Okay, it's not on the car. But still, I do have the magic stuff to make my stripes happen.
I chose the Lamborghini "Arancio Diablo" because I wasn't having any luck finding Opel 512. But it's orange. Really orange as you can see in the picture. I expected an orange-red, but there's little or no red here.
This has me conflicted.
entry 238 - tags: paint, Martini | | | 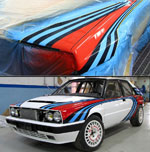 | July 7, 2007 - Looking at pictures of legitimate Martini cars on the MAT site, I can see that they do indeed use an orange.
But it shifts with the light - this is the same car under different light. I've tried photographing my brushed-on stripes in fluorescent, shade and sun light and it's always orange. I never get this shift into red.
entry 239 - tags: Martini | | | 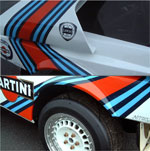 | July 7, 2007 - Another orange/red shift on a MAT car.
I can't make this happen. Hmm. The orange looks good beside the two blues, it's just not as red as I think it should be based on pictures.
entry 240 - tags: Martini | | | July 7, 2007 - While rooting around in one of the paint websites, I dug a little deeper and discovered my Opel red!
Most sites don't go back to 1968, and of course Lancia wasn't using 2000 model year colors back in the 80's. But this site did go back, and it turns out that Opel Flame Red has the color code L512 and was used on the GT. Knowing that, it's not difficult to find pictures of the cars in that color, and we may have a winner!
The Flame Red is mostly "Red Orange" in the mixture with just a touch of other colors. It's pretty pure though. Pictures seem to show an intense red or an orangish red as far as I can tell. I'll get a sample mixed up on Monday and compare it.
entry 241 - tags: Martini | | | 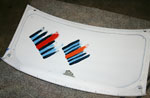 | July 9, 2007 - Success!
The Opel Rosso (aka "Flame Red") is the right color. It's a bit orange, just enough to make it really pop both in person and on film. This is what I was looking for. That's the Lamborghini Arancio Diablo on the right and Opel Rosso on the left.
There's a problem, though. I was planning on painting the stripes in a base/clear combination so I wouldn't have steps between the various colors. I'll lay down the dark blue first, then the cyan and red on top of that. The clear will flatten all the steps out. But the Opel paint isn't available in a basecoat formulation, only a single stage. You can't mix chemistries (I'm told) and you can't put clear over a single stage until it's cured for a month.
I could also try to add red to the Lamborghini color, but it'll be difficult to do and also end up with a mix I can duplicate if required.
Argh.
So what I'll have to do is get another two cans of blue and cyan mixed up in single stage. If I decide they need clear, I can shoot that a month down the road. The good news is that the single stage paint is about 40% cheaper, so it won't be as big an expense as the first purchase. I could return my clear coat materials as well.
And if you look carefully, you'll notice that the cyan and orange look a whole lot like another iconic vintage paint scheme. Hmm, I wonder when that will come in handy?
entry 242 - tags: Martini | | | 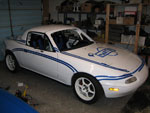 | July 15, 2007 - A big change in the stripe design.
I was grabbing a few parts before heading out to the shop to work on a car, and got distracted by the racer again. The shape of the stripes over the hardtop has been bothering me. They have too much of an arch shape. I've been trying to find the best way to bring them over the hardtop but to no avail. It always looked like a New Beetle.
So yesterday I decided to stick to the lower body. I tried to exaggerate the shapes of the car. I think this works much better, giving the car a longer, lower appearance and flowing better. I'm not sure how to deal with the hardtop yet. The Lancias would probably just leave it all white, but I want a bit of color on it. The current upper edge of the stripe on the bottom edge of the hardtop is awkward, and I'm thinking I should just leave it off the hardtop and A pillar completely. We'll see...
entry 243 - tags: Martini | | | 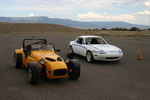 | July 15, 2007 - The Targa Miata visits the track for the first time.
I didn't take it out at all, it's not ready for that sort of use. I was the support vehicle for the FM Westfield. But I did put about 50 miles on the car today. There's a lot of tuning left to be done on the engine management and I did a bit of that today. It certainly has that very eager lightweight feel that I enjoy so much. The lack of a windshield or rear window helps exaggerate that of course! The car had very few problems and although the suspension leaves a lot to be desired, it will grip quite well already.
Getting the car out of the garage also let me walk around and look at the stripes from a few angles. The rear is great, I love it. It does the job of highlighting the rear arches. The way the front loops around is less successful, but I'm getting close. The recent change to the straighter, lower stripe was a good one. The car looks longer because of it.
A good day, but I'm a little windburned.
entry 244 - tags: testing, Martini | | | July 27, 2007 - I'm going backwards!
In order to paint the stripes, I need to strip off some parts of the car. A couple of pairs of hood pins, the door handles, mirrors, taillights, various trim pieces - I'm starting to pull it off now. Now I just have to finalise the shape of the stripes on the nose and I'm good to go.
entry 248 - tags: paint, Martini | | |  | July 29, 2007 - It's masking time.
This is an ambitious job for someone who's only just learned how to spray paint. But that's how you learn, right?
For masking the stripes, I'm using plastic "fine line" tape. It bends and curves much easier than masking tape and should leave a nice sharp edge. I sure hope so, I'd hate to have to do this again.
entry 249 - tags: paint, Martini | | | 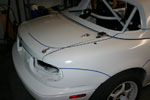 | July 29, 2007 - The fine line tape makes it very easy to lay down nice curves.
I've reworked almost every section of the car slightly, and pulled the tape up over and over to get a slightly better arc. I'm very happy with how the rear's turned out, but the front was still bugging me.
entry 250 - tags: paint, Martini | | | 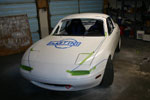 | July 29, 2007 - The lateral stripe across the nose had never worked to my satisfaction.
The original mockup had the stripes originating from the turn signal lens, so I tried going back to that. Think Lancia S4 instead of Porsche 911 for the source.
It took a whole lot of trial and error, but finally I stumbled across a look that I think is a big improvement. I was careful to have the stripe width constantly increasing, that was trickier than it sounds given the compound curves of the nose.
With both sides taped up like this, there was no question. I'd found the shape.
This picture shows the detail masking starting up. I spent a lot of time underhood and inside door jambs making sure I didn't get ugly overspray. I probably still will, but at least I tried.
entry 251 - tags: paint, Martini | | | 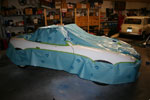 | July 29, 2007 - The big masking job begins.
It's tricky masking a convertible with a roll cage and no glass. The masking paper I bought from the paint store makes the job a lot easier than it could be. I thought about using plastic but I'm pretty sure this was the right decision.
One thing I did realize is that the hardtop complicates things. The top covers some of the rear fender when it's installed, so I have to paint the stripes on the topless car. But that's going to make it very difficult to align the stripes properly on the hardtop, and it's pretty obvious I can't pop it on and off when the car is masked. So I'll paint stripes on the car and the base color on the hardtop. Then I'll unmask the car, install the hardtop, mask off the remaining stripes (cyan and red) and spray it then. It means five painting sessions instead of three, but it'll also mean a much better look when I'm done.
I will mask off the wheels properly before spraying, and I might extend the "skirt" right to the floor. I sure hope this tape gives a clean edge. Not that I'm worried.
entry 252 - tags: paint, Martini | | | 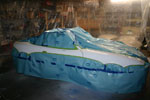 | July 30, 2007 - All bundled up and ready to go.
I sanded down the rear fenders a bit with some 600 and 1500 grit to smooth out the rough original paint - remember, that had a fair bit of bonus texture. The rest was scuffed up, then cleaned. I went over every bit of the tape to ensure it was well attached for a nice clean line.
One thing that isn't immediately obvious in this picture is that after doing the update last night, I noticed that the arc going into the front wheel was a touch more aggressive than it should be. So I eased it off a bit to match all the other arcs going into the wheel wells. Can you see the difference?
entry 254 - tags: paint, Martini | | | 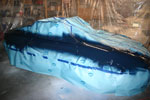 | July 30, 2007 - First, the dark blue.
This paint is "tape free" in 4 hours and deliverable in 24. I'm assuming "deliverable" means you can hand it over to the happy customer. I'll tape it up tomorrow night, then shoot the cyan.
The VW blue was fairly nice looking as I laid it down although I'm not sure I'd want a whole car this color. I did miss a couple of pinpoints of solvent (perhaps that last degrease was overkill) but I'll deal with that with touchup or by laying another stripe over top.
entry 255 - tags: paint, Martini | | | 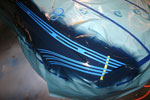 | July 31, 2007 - Time to start taping for the stripes.
This is taking up an inordinate amount of time and it's both fun and fairly new to me - so there are going to be a lot of pictures.
One of the most dynamic parts of the car, speaking from a stripe point of view, is the front corner. So that's where I started. The piece of green tape has the "ideal" proportions marked out - even size for the two blues, and the red is the size of three blue stripes. To make my life easier, I'm making the stripe width a combination of my tape widths. In this case, the stripes are 12mm wide, a good match to two widths of the 1/4" tape. You can see where I've used a couple of short pieces to ensure the gap is correct. The light blue tape is masking what will eventually be dark blue in the final scheme.
entry 256 - tags: paint, Martini | | |  | July 31, 2007 - So much for playing by the rules.
The stripes running along the hood didn't look right at 1/2" wide, so I narrowed them down to 1/4" plus 1/8". I also tapered them down slightly at the front. This small change altered the front from being a little stodgy to being very graceful. This is a game of millimeters.
entry 257 - tags: paint, Martini | | | 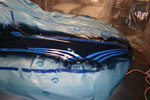 | July 31, 2007 - One fender done!
Okay, not quite done. The top stripe at the rear of the wheel opening has too much curve and doesn't quite work in the "graceful" stakes. I hadn't planned on having the dark blue stripes meeting in a point on the fender, but that's how it wants to go.
This is taking a while. I'm learning fast, though, and I think I'll be able to do the rest of the car pretty quickly. The door is almost done already, but it's easy because the stripes are a constant width. It's the flares at the wheelwells that take a while. Only three of those left, and I'm hoping the layout I'm doing now will help. I'm pretty excited, I think it's going to look really good.
Speaking of looking good, this picture almost makes it look like I can lay down paint!
entry 258 - tags: paint, Martini | | | 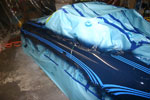 | August 1, 2007 - The next three corners did go faster as I learned what the "right" shape was for the fender flares.
I also got better at running a straight line of tape. The human eye is great at picking up slightly wavy lines - I could spot when my tape lines moved from 10mm to 11mm apart. Of course, so will anyone who's looking at the car, and I know there's going to be something odd that will show up.
A bit of asymmetry revealed itself. On the right side of the car, the red will dip down to touch the fender. On the left, not quite. I can live with that. Overall, the car was surprisingly consistent from side to side.
entry 259 - tags: paint, Martini | | |  | August 1, 2007 - How do you spend four or five hours masking a car without crippling your back?
Well, if you shop at the Snap-On truck, you have a cool little rolling stool that moves up and down and has a padded bench. If you shop at Home Depot, you have a little gardening seat with big wheels. Sure, it's not as cool as the Snap-On version, but it was $10 and it has a cupholder. Beat that!
entry 260 - tags: paint, Martini, tips | | |  | August 1, 2007 - The world's ugliest Martini livery.
The green tape (well, most of it) is masking off what will eventually be red, the blue tape is masking off dark blue and the exposed dark blue will be cyan. I ended up with a lot of red on the car although not quite as much as it appears here due to tape overlap. How will it look? We'll have to see.
entry 261 - tags: paint, Martini | | |  | August 1, 2007 - Cyan time!
Well, that went on pretty easily after all the work. The cyan coat, I realized afterwards, is the one where the masking is most important. It has about 4 times as much edge length as any of the others.
entry 262 - tags: paint, Martini | | |  | August 1, 2007 - The tape that covered the red sections has now been pulled off.
Unfortunately, I was wrong about the "tape free" time. It's 12 hours, not 4.
No, it didn't cause a problem with the paint - but it does cause problems with my scheduling. I was planning to shoot the red today so I could move the car out of the way and extract my Seven for a track day tomorrow. Now I'll have to mask off the cyan (a quick and easy job, as long as I don't run out of tape) tomorrow morning, shoot it before I go to work, then spend a bit of time just before the 4 pm track day shuffling the cars about. I won't unmask the whole Targa Miata then, just tear through the cockpit so I can steer it around. At least it means I'll be eager to get home after being at the track!
Oh, such problems to have.
entry 263 - tags: paint, Martini | | | 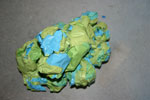 | August 1, 2007 - I think the most recent car to wear the Martini colors in world rally competition was the Ford Focus.
That was a couple of years back. Now they're sponsored by BP and their team colors look a whole lot like this tape ball.
entry 264 - tags: Martini | | | 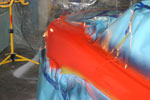 | August 2, 2007 - And now the red.
Officially, it is Flame Red, remember. But it sure looks orange. In person, it's an eye-popping color. I love it. I'll unwrap the car tonight.
entry 266 - tags: paint, Martini | | | 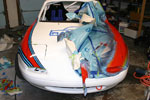 | August 3, 2007 - It's unwrapping time!
I've been both anticipating and dreading this moment. If there's a major slipup, it's going to be brutal to fix. Naturally, I didn't think of this until I started unwrapping. I suppose if I did this more often, I'd use a more professional word like "unmasking", but it seems too much like a present.
And the initial reaction is?
Sex on wheels.
I love the look, it's just what I'd hoped. The stripes are crisp and they just leap out at you. The shape works with the shape of the car and there are no major snafus. Oh, it's not perfect. There are a couple of tiny little lines of colors that got through my masking (next time I'll just buy 3/8" tape and save myself a lot of work), a few small rough edges and a couple of spots where the line width wavers slightly - but unless you're carefully peeling off tape inch by inch, it's unlikely you'll ever see them and they give the car some personality. No souless, computer-cut stripes here! The biggest problem is a shadow on the hood, as if a gust of dark blue got under the masking. It cleaned up easily with some solvent, leaving the fully cured white intact.
I always wondered why you never saw Martini "homage" cars, while the Gulf colors are so popular. It's pretty obvious after all this work!
entry 267 - tags: paint, Martini | | | 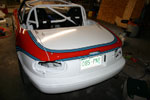 | August 3, 2007 - Eric pointed out I hadn't shown any shots of the tail.
Well, here you go. I actually got a little tricky here, using thinner stripes on the vertical section at the bottom than the horizontal upper stripes. I think it looks better. In fact, the upper stripes don't change width anywhere other than a slight taper right at the front as they enter the lights.
Miatas have nice little round butts. I think this stripe shape accentuates it. I haven't taken many pictures of the stripes back here because it came together really nicely early on.
entry 268 - tags: paint, Martini | | | 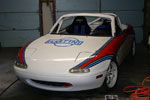 | August 3, 2007 - The final product.
I'll take it outside and get some better pictures later, but this stance just caught my eye as I was walking through the garage.
Compare it to the original rendering. I think it's better looking, mostly due to all the hours spent moving tape around.
entry 269 - tags: Martini | | | 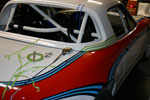 | August 5, 2007 - Almost done with the painting.
All I need to do is add the stripes to the hardtop. There isn't much of them and it's a challenge to make it all flow given the curves in the stripes and the hardtop. You can see one of the attempts to reach the same grace as I found on the side stripes. If I was going to run with the hardtop 100% of the time, this would have been easier. But I'll have the top off occasionally, so it has to work both ways.
The top is in the "paint booth" and the two blues have been laid down. I'll spray the red tomorrow morning.
entry 270 - tags: paint, Martini | | | 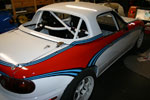 | August 7, 2007 - The hardtop is painted and installed.
It's not the best part of the car, but it still looks pretty good. Now it's time for some final assembly. Brandon came over last night and helped to install the top, clean up wiring and install the dash. Now the windshield can go in. I'm on schedule to have the car ready for the Open House, and it's all coming together nicely.
entry 272 - tags: paint, Martini | | | 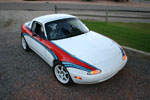 | August 9, 2007 - Out of the garage!
The Targa Miata visited Flyin' Miata today for the first time. Well, it's been there before, one piece at a time. But this is the first self-propelled visit. The car behaved itself and all of my coworkers were suitably impressed with the paint job.
I spent enough time looking at the car from a distance to start spotting sections of the stripes that I could have done better. It's time to get the decals on the car and distract myself from all that, I think.
One good note - the silicone on the rear window is slowly drying and going clear. In another couple of days, it should be all done.
entry 280 - tags: testing, Martini, lexan window | | | 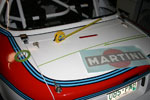 | August 11, 2007 - Sticker time!
I picked up all the various Martini logos and sponsor names yesterday. It's not quite a complete set, but it'll do to get the primary look of the car done. First step is to figure the exact location of the stickers and make sure they're straight!
entry 282 - tags: Martini, decals | | | 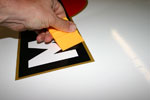 | August 11, 2007 - After the car's cleaned off, I wetted the surface down with slightly soapy water.
This gives me the ability to reposition the decals if necessary, although it can make it difficult to position strips of letters if you have things too wet. A small squeegee was used to chase out the bubbles and make sure everything conforms to the complex shape of the car.
entry 283 - tags: Martini, decals | | | 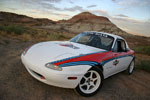 | August 11, 2007 - And here it is.
The Targa Miata, in (almost) full livery and ready for the track. As you can tell from the background, I live in an area that is about as different from Newfoundland as it is possible to be!
If anyone wants a larger version of this picture (or more shots of the car, I have piles of them), just let me know.
entry 284 - tags: Martini | | | 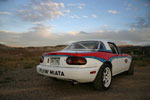 | August 11, 2007 - From the rear.
The chunky black lettering on the rear bumper is taken off the Martini cars as well. I'm considering something for the nose, but it'll have to be smaller to work. Maybe a MAZDA logotype. You can't tell from this photo, but the silicone around the rear window is finally going clear.
entry 285 - tags: Martini, lexan window | | | 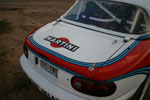 | August 11, 2007 - The trunk logo is placed near the trailing edge of the trunk.
I'm not 100% sure this is the best place for it, or if it should be centered.
entry 286 - tags: Martini, decals | | | 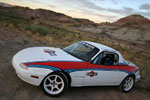 | August 11, 2007 - I've put the driver/codriver names above the window.
They're pretty visible!
I'm pretty sure I asked for a larger version of the logo for the hood, but it's pretty well balanced. There needs to be room for race numbers, race sponsors and more of our own sponsors on the sides of the cars.
entry 287 - tags: Martini, decals | | | 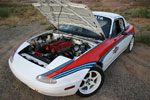 | August 11, 2007 - Open wide!
The powdercoated valve cover isn't a perfect match to the stripes, but that's fine by me.
It's interesting to see just how red the stripes do photograph despite the orange hue of the paint. That's why I spent so long searching for the perfect red, it had to have that ability to pop. I'll get some photos in direct sunlight later and see how it looks.
entry 288 - tags: Martini | | | 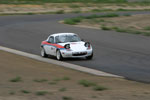 | August 19, 2007 - The first session took place in a light rain.
Great, just the way I like to test out a car for the first time. Other than about 200 road miles, the car was completely fresh.
On this first session, the car was a handful. It would understeer on corner entry then light up the rear wheels and oversteer on the exit. It didn't help that I had brand new RA-1s on the car that hadn't been heat-cycled yet and I never got around to installing sway bars! It was a bit of a challenge.
The one thing that did stand out, however, was the engine. It's a hero. Sharp throttle response, lots of torque from deep down and a killer top end. I thought there was something wrong with the tach - I use that to judge my speeds on this track because I know it so well. And in a couple of places, I was pulling almost as many rpm as I do in the Seven - a car that weighs 1300 lbs!
It's cool seeing the action shots of the car, partly to see how the stripes work. This picture was taken in light rain, but the blinding white and the orange-red colors jump out just the way they're supposed to. Excellent. The headlights are up because I forgot to put them down, no other reason.
entry 294 - tags: testing, Martini | | | 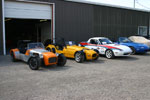 | August 19, 2007 - All the kids were available for rides at the Open House.
Orange is my Seven, yellow is the FM Westfield I helped to build and set up, white you know and blue is my wife Janel's little turbo Miata. The Targa car was pretty popular, both amongst people who had never heard of it and a bunch of regular readers who were exited to see it in the metal. Turns out I'm not the only person who thinks the stripes look good. It's obvious from the pictures at the track that the black FLYIN' MIATA on the nose and tail really stands out as well.
One thing I discovered on the test drives - I was leading my coworker Brandon in his turbo Miata that makes approximately 230 hp at the wheels and weighs around 2350 lb or so. When I put the throttle down, he could keep up. But he didn't seem to be gaining ground. Wow, maybe the engine is working better than I thought. It sure feels great, and it has just the flexible nature I'll need.
entry 298 - tags: other cars, Martini | | | September 14, 2007 - Martini paint codes.
Someone asked me via email for the paint codes for the Martini paint job, and I realized I'd never really spelled out the final mix. So here it is. I used NAPA Martin-Senour paint in the "Gold 5.0 urethane" single stage mix for the stripes and was very happy with how it laid down. The white was PPG Omni.
Dark blue. VW Marine Blue from a 1988 Golf. VW LA5B, M-S code 23427
Cyan. Mercedes DB5508, apparently. I used M-S 59392
Red. Opel Flame Red from a 1968 GT. Opel L512, M-S 20934
White. Mazda Crystal White from a 1990-93 Miata. Mazda UC, M-S 39783
entry 311 - tags: paint, Martini | | | May 7, 2008 - I spent the weekend at the Walter Mitty historic races.
It was gratifying to meet so many people who were aware of the car!
One of the cars there was a 911 with Martini livery. I was glad to see that the stripe width varies slightly, just like it does on my car. It's part of the hand-painted character! Of course, this car had also been carefully sanded and clearcoated unlike mine, but I'm willing to accept that. However, it became obvious to me that I need larger Martini logos on the doors.
I've been considering how to get the car to Newfoundland for the race. The plan was to ship the car out and I'd fly to meet it. But this causes problems with spare parts, tools and tires. So now I'm thinking of driving out, towing the car on a trailer. It'll be a long, long drive (about 5 days) but it'll save a bit of money as well as let me carry more things with me. My friend Trevor is willing to ride along as a copilot. Ah, all the complexities of taking part in a big race...
entry 454 - tags: martini, logistics | | | 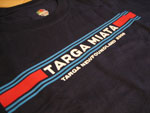 | July 8, 2008 - Targa Miata clothes have arrived!
If you want to get a high-quality t-shirt or sweatshirt and show that you're a fan of the coolest rally Miata around, now's your chance. I had to wait until I saw the quality of the sample shirt, but it's good stuff. It's not only a heavy, high-quality shirt but the printing is perfect. Can't say the same about the out-of-focus picture, of course...
The store is at targamiata.spreadshirt.com and about 10% of the proceeds will go towards the race effort. Yes, I know, they're not the cheapest shirts in town. But they're high quality and this way we don't have to do a big print run and hope we got the quantities and sizes right! You can choose whatever size and style you want.
Currently, all of the clothes are navy blue with the Martini stripes, but white is coming at Janel's request. I'm going to order some team sweatshirts to keep us feeling warm and looking cool during the race.
entry 489 - tags: announcements, Martini | | | July 11, 2008 - White shirts are now available.
T-shirts, long-sleeved shirts and even a vintage-style "ringer" tee are in the Targa Miata store. Show that you're part of the team!
If there's a particular product you'd like to see, just contact me.
entry 493 - tags: announcements, Martini | | | 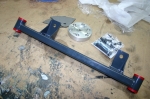 | January 20, 2011 - The first of the V8 conversion parts is here.
This is the mounting system for the rear differential. Two tabs need to be welded to the rear subframe to locate the nose of the diff and that grey cross-bar bolts into the factory mounting spots. The big aluminum disc is an adapter that goes on the pinion flange of the differential.
entry 775 - tags: parts, differential | | | 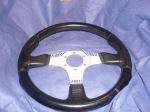 | February 18, 2011 - A gift from Eric: a real Martini Racing MOMO steering wheel.
It's from a Lancia Integrale and was shipped to him from Italy. He's going to send it my way.
Totally unnecessary, but very cool.
entry 794 - tags: Martini | | | 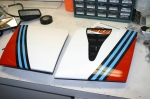 | July 31, 2011 - The headlight covers looked really good in bare carbon.
Well, on their own they did. On the car, they didn't look good because of what they did to the stripes. Besides, I don't like accentuating the pop-up lights. So out came the paint guns.
I originally was going to leave the white sections as bare cf, but that was still a bit too low-rent for my taste. So I went with something more subtle. Check out the stripe that's supposed to be dark blue. I'm pretty happy with how it turned out. The NACA duct, of course, was left bare.
entry 895 - tags: carbon fiber, Martini, weight loss, air intake | | | 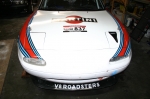 | July 31, 2011 - The headlight covers installed.
I did a pretty good job on the stripes on the passenger's side, but the ones on the driver's side don't have the right curve. I laid them out too quickly, only taking a half hour instead of the weeks it took the first time. Oh well, there are other mistakes I'd like to fix in the livery elsewhere, and I doubt anyone will really notice. Or wouldn't have, until I pointed things out. I guess I shouldn't mention how the stripes arc into the front wheel arch from the door on the driver's side, should I...
Other work on the car included an alignment. Turns out I can now get up to 3.0 degrees of negative camber on my problem corner thanks to the V8Roadsters control arms, and it can be adjusted independently of the caster. I'm currently running about 2.3 degrees, partly because that's where the driver's side came in. The rears have the potential for a lot more camber than they have, and they're really easy to adjust. So I'm going to play a bit and see what the car likes. I might have to drop that rear spring rate down a bit, but we'll see with the tires inflated properly.
Lots of little jobs on the car. After a week of concentrated work, it's time to get it back out of the garage and see how they've all added up.
entry 896 - tags: air intake, Martini, NACA, suspension | | |  | August 24, 2011 - Janice Alster is an artist and friend of Flyin' Miata.
She was inspired by the team (and apparently my "we will teleport off the corners" comment in the recent video) to do this tribute for us. She's also done one featuring Nancy.

entry 927 - tags: art | | | 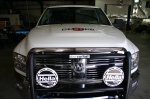 | August 30, 2011 - Of course, the tow vehicle had to be properly attired.
Only semi drivers can actually see the Martini on the hood when we're driving, but I know it's there.
entry 932 - tags: truck, Martini | | | 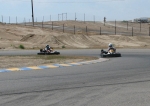 | May 18, 2012 - Last weekend, we went racing in a different way.
The track days that usually run every six weeks or so were replaced with a two-hour kart enduro. Not the fastest karts out there, but we were racing wheel-to-wheel in equal vehicles so it added quite a different flavor to the day. There's a lot to be learned by doing this - not just the usual of how to set up a pass or figure out why someone is just a little bit faster through a corner, but usually passing someone involved an unusual line which could be helpful in rally. Huge fun, especially after the field had spread out a bit and there were slow karts and fast karts all mixed up. I did get called "merciless" by one of the other drivers!
Janel and I shared a kart and came third overall out of 10 teams. She's fun on the track - if someone's in front of her, she'll push hard to catch up. She needs a rabbit to chase. In the picture, that's me in the white helmet and Brandon's in the black one. We got a chance to have a bit of fun chasing each other around. We're usually a very close match on speed, but I had a bit of an edge with the karts for some reason. I don't expect that to remain the case if we do much more of this...
entry 1038 - tags: karting, racing, track | | | 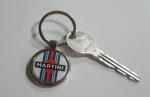 | February 5, 2014 - Drive time!
Between snow storms, I took the car out for a quick spin down the road to see how the new engine feels and to make sure everything was healthy. The result? It feels very healthy indeed. The engine is a gem, it's got a wickedly sharp throttle response that just begs to be played with. It's reminiscent of the old high compression 2.0, but it's got some serious power and torque behind it. The car has the potential to be very hard on your neck. I didn't drive far, but it was a real promise of what to expect on future drives. The new 6.2 is a lot more potent than the old 5.3 was.
As for the keychain, it was a present from my friend Adam at Revlimiter.net. He does custom gauges and just started doing keychains, so he sent me a Martini one for the racer. I like it a lot. Thanks!
entry 1119 - tags: engine, 6.2, test, martini | | |
|

 THE DIARY