| MIATA BUILD |
|
|
 | |  | February 13, 2010 - We made the cover of Forever MX-5 magazine!
Along with the cover is an 8-page article about the race. They've kindly given me permission to post it here.
Read the article
You may remember the magazine published an article about the car nearly two years ago, before we ran the race. Well, they'd asked me for a followup article about the race itself, so I sent something in to them. And of course, magazines started failing left and right right about then. Instead of just shutting their doors like many titles did, the publisher kept trying to bring the issue to press. They were ultimately unsuccessful, and eventually decided to go digital instead. So the long-lost issue has surfaced!
I really enjoyed reading it. Of course, I wrote it. But it's been so long since I've seen it that I forgot how it went. It's not a perfect article but I think it's pretty well done - and it brought the memories flooding back. You can tell it was all pretty fresh in my mind.
The issue isn't just about our Targa adventure. There's also a report on the Miatas at Mazda Raceway Laguna Seca event from last year that Janel and I attended - and will be attending again in April. Add in some Miata club event reports, a road trip article and various other stuff and it's well worth the $1.99 purchase price.
Buy the issue
I've been lucky enough to rate a fair bit of magazine coverage for my various cars over the years, but this is the first time I've taken over the cover.
entry 725 - tags: announcements | | | 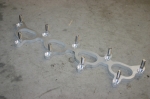 | February 26, 2010 - Time for a new intake test!
This particular one is designed for a 1994-97 head. Well, I have a 1999-05 head. The ports are the same shape, but they're higher in the head on my setup. Usually this involves cutting and welding the manifold to move stud holes.
This very cool adapter comes to the rescue! Bolt it to the head with counter-sunk screws, then slip the manifold on. It needs just a little bit of porting to be a perfect match, but I'll do that if the intake shows promise.
entry 726 - tags: intake, testing | | |  | February 26, 2010 - The new intake moves the injectors into the cylinder runners.
The factory ones are in the head. So the holes need to be plugged. When I discovered this, I spent some time looking at various options to solve the problem. I'd honed in on the creative misuse of a specific oil pump plug. I just needed to drill a hole in the top so I could screw something in to yank them out in case I needed to relocate the injectors to their rightful home.
But when I was looking for something else in the various bags that came with the intake, I found four of these little guys. They're specially made pieces for just this purpose, and are an absolutely perfect fit. Nice!
Too bad I didn't go looking further, it would have saved me some work.
entry 727 - tags: intake | | |  | February 26, 2010 - That's starting to look like a race engine.
It took a fair bit of work to get to this point - I spent all day Wednesday as well as a couple of hours on Thursday and Friday - but I've added at least 50 visual horsepower.
The biggest problem was a fuel rail that had holes 10.50mm in diameter. The stock Miata rail is 11.00mm. I couldn't get the injectors to seat without tearing an o-ring. I tried various o-rings from the shelves at Flyin' Miata, but all they had were stock or oversize. A trip to NAPA yielded the perfect thing - injector seals from a Geo Metro! Kudos to the NAPA counter guy who nailed them on the first try.
The red lines are running to a mount for the idle speed control valve. This gives the throttle bodies a bit more civility than you often find with this sort of setup. The ones on the Seven don't have this, and I have to keep that car alive with the throttle until the engine warms up. Not here!
I haven't had it on the dyno yet, I'm hoping to do that this weekend. On a short test drive, the car ran very rich on partial throttle, but felt very good wide open. I'll sort that out in the Hydra programming. It makes a very characteristic noise, with a distinct growl for each cylinder. The return springs on the throttles are pretty stiff so that will take some practice when matching revs - but overall, considering the amount of work to install, it behaved pretty well.
I'm looking forward to see what this has (or hasn't) done to the power output.
entry 728 - tags: intake, testing | | | February 27, 2010 - That was worthwhile.
Overall the throttle body setup shows gains over most of the range with no real losses anywhere. The peak gain is probably around 15 hp at 6000 rpm. Based on some post-dyno tuning, I know I'll be able to pick up a bit more in the 3500-4000 range as well.
Dyno chart
The dip is persisting, though. I've seen it with both headers, two sets of cams, three intake variations and some cam timing changes. I've looked at a number of other cars with similar engines, and while they don't have as big a dip, they also have less torque on each side so the change in output is downplayed. They never actually make more torque than my setup.
The two exceptions were a well-tuned 1.8 CSP engine and another high-compression 2.0. What did they have in common? Variable valve timing. In the case of the 2.0, there's a massive difference. I'm trying to get my hands on a 2001-05 head, preferably one that has some work done to it so it's equivalent to my current one.
Before I go that far, however, I'm going to try some different cams. Why? Because it's easy and I have them!
When I compare this dyno chart to the first time this car hit the dyno, it's come a long way.
entry 729 - tags: dyno, intake | | | 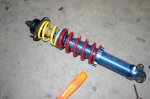 | March 1, 2010 - I'm not done with the intake yet, but first I need to play with some springs.
Why? Because the 750 lb springs on the car are borrowed, and they have to go on to a V8 Miata instead. And just today, I got a package from AFCO with my dual spring setup!
With the stiff springs I've been running, I don't get much spring compression with the car's light weight. This means that the spring will unload before the shock is fully extended. Most people think this is bad because the spring can rattle around and they imagine it means it can land crooked. That's not the problem. The problem is that I lose suspension travel. Once the spring unloads, there's nothing to open up the shock except the weight of the wheel fighting against the fairly stiff rebound damping.
The solution, then, is a helper spring. A short, relatively soft spring that is usually fully compressed but helps supply that extra push when the main spring is fully extended. I've run into two problems with this setup. First, most helper springs are just a little bit undersize in their inner diameter. AFCOs are set up for 2.625" springs but can run 2.5". I haven't found a helper spring from another setup that will fit. More importantly, most helper springs are wussy little things that just keep the main spring from rattling around. Rates like 5 or 10 lbs/in. That's nowhere near enough to extend my shocks when they're valved for the big springs.
AFCO sells 4" springs with a 300 lb rate. It's about double what I'd prefer, but it's the best I can find. The potential problem with this is that it won't fully compress at rest, so the light spring is still active until the car hits a bump or rolls. The weird thing is that the spring rate of the two springs combined is less than either of them. So I'll have a fairly soft rate until all of a sudden it spikes up. How will this work? I have no idea. But I'm willing to give it a try in my science experiment of a car.
My other problem is that because the helpers are 4" long, I need a fairly short main spring. That's a front shock with a 7" 600 lb main spring. I'd prefer a 6" (like the 750 I just removed) but it is not to be. At the lowest ride height I can manage, I'm running relatively high - the front wheel-fender measurement is 12.75". That's about where I was when I got back from the Targa, and I suspect this setup might actually work well.
It's not so pretty in the rear. I have a 7" 450 lb spring back there, but even at a perch height that's a bit lower than I can really use, the car's an inch too high. I'll need a shorter main spring. I have my eyes on a 5" that's 425 lbs. These spring rates (once the helpers are compressed) should give me a similar handling balance to the Targa spec. We'll see.
Fun stuff!
entry 730 - tags: suspension | | |  | March 16, 2010 - I started the day planning to do some dyno testing on some intake variations.
But first, I had a couple of parts to install. First was a couple of springs for the rear, so I could get the ride height into a reasonable range. That was quick and easy.
After that, I decided to put on an ATi damper. Since the car's seeing a lot of constant high rpm use on track, I figured I'd like a bit of extra margin of safety for the oil pump. Besides, it makes the engine feel smoother and the guys at Flyin' Miata suspect there might be a bit of power in it. We'll see.
Unfortunately, the install of the damper and a few other jobs ate up my spare time so the dyno didn't happen. Soon, though.
I did take the car out on the road for a bit of a test drive with the new intake setup. The Hydra was able to autotune itself into a happier place - I suspect I never set up the part-throttle tuning after the fuel pressure change, and so it's running really rich at anything but wide open. Before the changes to the fuel system, the fuel pressure was tied to manifold pressure so I'd see a drop in pressure under vacuum. Anyhow, a half hour drive later and the car's much happier. And pretty fun, once you get used to the heavier throttle pedal. The dual spring suspension is working pretty well - it's quite comfortable on the highway and on smaller bumps as the softer spring takes the hit, but you can tell there's some real stiffness behind it. I think, on track, it's going to have an initial bit of lean and then the car will take a very solid set. Would it be a good Targa setup? I don't know. I need some more seat time.
I did think of one potential problem, however. The Laguna Seca weekend that's coming up in a month or so has a very high 102 dB sound limit - almost unheard of at Laguna. Janel's also going to be driving on Friday with another group to get some private instruction from our friend Rick Weldon. Well, that group probably has a 92 dB limit, and with the current intake setup I suspect the car isn't going to meet that limit.
entry 731 - tags: suspension, intake, damper, engine, sound, laguna | | | March 18, 2010 - More thoughts on the dual spring suspension - this is interesting.
Just for fun, I pitched the car into a couple of the right angle bends on the way in to work. I figured I'd dance with the tail a bit. Now, I haven't been behind the wheel of this car for a while but I've been driving a number of other Miatas. And the car seemed to grip much harder than it should. We have another car at Flyin' Miata right now running a completely different dual-spring setup, and it's showing similar characteristics. Mechanical grip seems to be way up there.
It's going to take more investigation, but I am quietly optimistic. We'll see what happens on the track in a few weeks. Will I go back to the stiff single springs, or keep this dual setup?
entry 732 - tags: suspension | | | March 26, 2010 - I drove the car home from the shop tonight and took the interstate to see how the car felt at higher speeds.
The answer: sketchy. This may have had something to do with some fairly extreme winds, of course. I pulled off at the first exit and tweaked the shocks a bit, and that might have solved it although I wasn't able to test at over 40 mph after that. I want to do more testing - the car feels a bit darty. I'm not there on the shocks yet, I know that. I'll take the car up the Targa Simulation Road tomorrow if the weather is good and see how it behaves.
Ah, the weather. I drove home in spitting, then light rain. Then the rain drops got a little viscous and started building up on the wipers. Just the sort of weather I'd feared during the race. The good news is that the defogger system works and the car felt pretty sure-footed.
Speaking of the race, the airing of the 2009 TV show is on Speed tomorrow at 6 pm Eastern. It'll be shown again once or twice. Plan your day accordingly!
entry 733 - tags: TV, shocks, springs | | |  | March 28, 2010 - One of the first things we wrote on our "things to do differently" list after the Targa was "get a better video camera".
The little Canon DV camcorder we used actually took some very good video, but after a couple of years of track use it was starting to malfunction. The biggest problem was that it would decide to start zooming in, and combined with the wide angle adapter this meant we lost focus. I wish I could watch the entire Leading Tickles stage, but alas all I have is the audio.
I'd been thinking about a pro-level unit like a ChaseCam, but they're expensive. When we do go back to the Targa, I might bring one along. But for the time being (and for the big event at Laguna Seca in a couple of weeks), I decided to try one of the cheaper options. Meet our new Flip Ultra HD. Because it's 100% solid state, I'm hoping it won't fall apart like the Canon did. It takes some decent footage as well, and is very affordable.
The biggest problem is that it's got a fairly narrow field of view. But with an inexpensive wide angle lens and a bit of superglue, that can be changed. The lens screws into a threaded ring, so I can go back to the normal Flip lens easily.
entry 734 - tags: video | | |  | March 28, 2010 - Here's a before-after peek at the wide angle lens, taken up on the Targa Simulation Road.
I think I need to move the camera up a bit in the car, but the wider field of view helps a lot with the sensation of speed. My other concern with the camera had been the lack of image stabilization, but that's not a problem. In fact, the video was rock steady even on this very bumpy road. So that's a big winner then. I'll post the video soon - that's another advantage to the Flip. Very easy to post video to various hosting sites.
I was up on the Simulation Road to see how the new dual-spring suspension worked. Pretty well, I have to say. After a couple of stops to set the shocks (it never ceases to amaze me at how one click makes the difference between "hmm, it's okay but not great" and "wow!") the car seemed pretty happy. This is a tough stretch of pavement and the car was certainly pitching, but it was stable and well-connected to the road. I doubt it would have worked as well if I'd been running the main spring rates alone - 650 and 425 lbs, I think. That's a lot of spring! I'll take it out on the highway later today to see how stable it feels at speed without the massive headwind and with the shocks set up.
entry 735 - tags: video, suspension, testing | | | 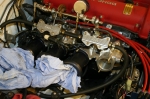 | March 28, 2010 - Time for some more dyno testing!
One nice thing about the individual throttle body setups is that I can change out the air horns and alter the intake runner length. In theory, a short runner should trade off low rpm torque to gain high rpm power - and a long one should do the opposite. But if they're way off, then you just plain lose. Since I have a collection of horns, I'll simply do some back-to-back testing and see what happens. It's always interesting to simply install a pipe that's 1" longer and see a power bump.
I had the chance a while back to talk with Bill Schenker, a national-level CSP autocross competitor about his engine. It makes very good horsepower - similar peak power to my engine, but with less torque - and it's all come from hundreds of dyno runs, testing one slight change against another. One thing he told me was that the length of the intake tube running from the stock intake manifold to the filter had a big effect. Again, a 1" change made a notable difference. Of course, he was talking about naturally aspirated power so it wasn't a 15 hp difference, but if you can find 10 places to gain 1.5 hp, there's your 15 hp gain.
So, bring on the air horns!
entry 736 - tags: testing, intake, air horns, IRTB | | | 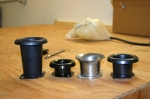 | March 28, 2010 - Here are the air horns I have to work with.
The silver one is what came with the throttle bodies, the others are some Titan units that I found in the shop. At least, I think that's where they're from. I have some TWM units around as well.
The first dyno runs were with the silver, "stock" horns. I followed that up with the longest of the black ones, just to see if they'd actually fit. The answer is yes, but the filters I was using won't fit over the end of them.
Dyno chart - the red trace is the medium-length silver horn, the black is the long one.
Overall, it looks like a big win for the long tube, with a solid gain from 4200 to redline and no real loss anywhere else. Unfortunately, it's not an apples-to-apples result. The biggest change is that the long tubes had no filters. Now, these are some pretty open filters with a large surface area, so I don't expect they have much effect. But I do need to test them back-to-back to confirm.
There's also a difference in the design of the bell mouth on the air horns. Note how the silver one has a simple horn shape, while the black ones have a more complete radius. This entry is fairly important, and it could be that the black ones have a better design.
The internal diameter of the horns is also a bit different. The black ones actually match the diameter of the throttles, while the silver one is a bit oversize. Interesting, given that it's the one supplied with the kit. The lip of the throttle bodies has a small chamfer in it that steps the diameter down, but basically there's a step change in the size.
Luckily, I have a black air horn that's almost exactly the same length as the silver one, so I can do comparative unfiltered tests between them to see which is the better design.
I only had the chance to do two different runner lengths today. I'll spend more time on the dyno this week and test all four options in the same session. Hopefully.
entry 737 - tags: dyno, IRTB, intake, engine, air horn | | | 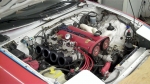 | March 28, 2010 - Dyno run video.
It's not exciting, I know. Really, this was just an excuse to practice uploading video off the new camera and make the changes in the website code to use YouTube instead of the no-longer-accepting-uploads Google Video. But if you want to hear how the engine sounds with the new intake, well, it might be worth your time. Video
entry 738 - tags: video, dyno, IRTB, noise | | | March 29, 2010 - Another new video.
This is a run up the Targa Simulation Road to test both the springs and the video camera. I'm pretty happy with both. We'll see how the springs do on-track this weekend.
Video
entry 739 - tags: video, testing, suspension, video | | | March 30, 2010 - Results for the intake runner length testing.
This was interesting. Not because of what happened, but because of what didn't.
Each engine setup was dynoed three times in quick succession, because I found the first one tended to be erratic. The second and third would be almost exact copies of each other. When I was done, I went back to the beginning to test both the silver runners and the filtered option.
Here's the biggest difference: Short (blue) vs long (red). The shorties did indeed suffer in the midrange, with the biggest difference right around 4500. They didn't gain much up top though, which is a bit odd. Cam limitations? The medium and short runners were basically identical. The silver runners and the black ones of the same length were identical despite the difference in lip design.
But here's the really telling test: Filtered (blue) vs unfiltered (red). That's where my high-end gain came from last time. I'm a bit surprised by this, because the ITG filter I use on the Seven makes no difference at all. It's a big boy and apparently very free-flowing. Something will have to be done - read on for more.
So, the long runners were the winners. Everything else was the same. The short runners make the same power as the ones that came with the throttle bodies.
I need to quieten this car down for a 92 dB day at Laguna Seca in a bit less than two weeks. Ideally, I'd build a plenum to enclose those long runners and see what happens. But there's a way to cheat. A friend who runs a business selling parts for Titan race cars has a nice Pipercross 600 plenum I can use. I'll have to stick with the short runners to fit it, but it's a quick and easy way to quieten the car and bring in cold air. It should be here on Thursday and I'll fit it then.
entry 740 - tags: dyno, intake, IRTB, plenum | | | April 1, 2010 - Spent a long day working on the intake.
And of course, I didn't take any pictures. The Pipercross plenum showed up. These are made in either left-hand or right-hand configurations, with my application being the right-hand version. Naturally, I was only able to obtain the opposite.
No worries, all I had to do was to fit the base plate on upside down. But that interfered with my fuel rail. After some poking and prodding, I figured out that the plenum was made in a couple of pieces. I separated the two, flipped one over and voila, my left-hand plenum was now the right-hand version! I had to epoxy everything back together, so that meant I wasn't going to be finishing today.
In the meantime, I cut the base plate to match my runners and installed the short air horns. Due to the shape of the plenum, I also had to relocate the idle speed control valve and reroute some wiring. The latter needed to be done anyhow, it was kind of rough looking. Since I knew I wouldn't have time to test the car any more before the track day on Saturday, I unshackled the car from the dyno.
Over to a lift, I swapped out the current exhaust midpipe (with an empty cat) for anther one that we'd been using for testing. I also needed to find a place to fit an air filter. One of the problems I'd found with the IRTBs on the road was that my intake air temperatures were quite high. The new plenum will not only hush the car (important for Laguna Seca on Friday!) but will give me the opportunity to pipe in fresh, cool air. I decided to try a filter mounted behind the front bumper. It's not the best place if I decide to ford a river, of course, but for normal use it should do just fine. After a bit of thinking, I decided to bolt the top of the filter to a handy flange. Three bolts with big backing washers going through a top that's about 3/4" thick (really, I was amazed at it!) and it's solidly mounted. I'll run the air hose in it tomorrow and the car will be ready. I'll also take some photos.
Is it going to be quieter? Oh man, I hope so.
entry 741 - tags: ITRB, plenum | | | April 4, 2010 - No pictures of the new intake yet, but I have track videos!
Fastest lap
Smoother fast lap
The track day went pretty well. It was a fairly cold one and I only got about three sessions in the Targa car (along with the chance to drive a 350Z, a BMW M Coupe and a couple of FM Miatas), but my best time was a 1:04.959. That's about 0.2 seconds off my best in the car, nothing to be ashamed of. There was a time when simply dropping below 1:06 in any car was unusual!
The dual spring setup does allow for some body roll, but the lap times would indicate the car isn't suffering too badly. It absorbed the berms well and was very stable under braking. I'm trying to decide if I want to keep this setup for Laguna Seca or if I want to pull the secondary springs so the car corners flatter and has quicker reflexes. Tough call. If it can still hustle around our little autocross track here this quickly, I'm thinking the dual setup is working.
The engine felt good. For the first time, I noticed a lack of pick-up coming out of one of the hairpins at 4000 rpm - that's the dip in the torque curve. The heavier throttle pedal (due to a stiffer spring) took a little getting used to in order to be smooth, but I adapted pretty quickly. Nobody noticed that the car was particularly loud, so I'm hoping that's good for Laguna Seca sound levels. Hoping hoping hoping. I did have one person ask me if it was a V8 because it didn't sound like a four-cylinder!
Pictures of the intake are at work, I'll put them up tomorrow.
entry 742 - tags: video, GJMS, testing, track, IRTB | | | 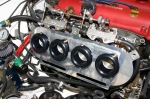 | April 5, 2010 - Time for some pictures of the new plenum!
First, I had to drill a backing plate for my intake setup. In order to clear the fuel rail mounts, it has to sit a bit low.
entry 743 - tags: intake, plenum, IRTB | | | 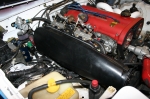 | April 5, 2010 - The plenum clips on over the base plate.
I had to notch the edge of the plenum slightly to get clearance for the fuel rail, but here it is in place.
You can see the relocated IAC back by the fuel pressure regulator. It's a tight fit wiggling this on!
entry 744 - tags: intake, plenum, IRTB | | |
|

 THE DIARY