| MIATA BUILD |
|
|
 | | January 13, 2008 - Excellent news.
The team has a new codriver - my wife Janel. This is not as obvious a choice as it seems, and it took some careful consideration on her part. Personally, I'm very happy with her decision.
She's a bit of a gearhead, with a turbo Miata that sees track and autocross use whenever possible. She can also explain why she prefers her existing turbo system over the supercharger she had before. She's spent lots of time at the track both riding shotgun and helping me set up cars. She's a WRC fan who was mistakenly rooting for Grunholm in 2007. Her organizational skills are far better than mine and she's good under pressure. In short, she has the potential to be an excellent codriver. It doesn't hurt that it'll be easy for us to practice together - much easier than for Eric and I living in different countries.
There are some problems we'll have to overcome. A complete lack of codriving experience of course. Motion sickness is liable to be the biggest concern. There's also the matter of available vacation time to actually participate in the Targa - it looks as if the honeymoon might get pushed off yet another year. I'm going to end up paying dearly for that one! But both of us are excited about the prospect.
entry 370 - tags: announcements | | |  | January 13, 2008 - Back to the header.
Now that the #4 tube is stuck together, it's time to try it in the car. I started with a die grinder to cut the remaining stub of the original header out of the flange, and discovered that this was going to be both long and noisy. Especially with my poor bits. So I grabbed the plasma cutter and cut it out that way. Much more satisfying.
The hole was cut with a taper to make it easier to force the pipe in to place. This picture was taken before a bit of cleanup with the die grinder.
entry 371 - tags: header | | | 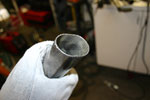 | January 13, 2008 - The pipe itself was carefully formed.
I put the end of a stub of tube in a vice and cranked it down. Voila.
entry 372 - tags: header | | |  | January 13, 2008 - With the shape of the hole just right and a bit of hammer action, here's the fit of the pipe in the hole.
Not bad at all.
entry 373 - tags: header | | | 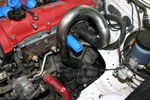 | January 13, 2008 - With the #4 runner tack-welded to the new stub, I was able to see how well the metal pipe coincided with the plastic prototype.
Almost perfectly. The only problem came when I slid the collector on the end and discovered that it was too close to the motor mount. Changing the last 2" long bend in the pipe from a 4" radius to a 3" radius did the trick.
The #3 runner was then checked again with the prototyping pieces and tweaked slightly to take the change into account. It ended up fitting better overall of course. So now it's time to cut that one up and stick it together. It's only going to get more difficult from here on in of course!
I have had one person ask me why I'm making my own header when there are commercially available ones. Well, it has to do with engine output. Mass-produced headers like the Racing Beat are designed for almost-stock engines. That means stock cams, 1.8 litres of displacement and about 110 hp at the wheels with a redline of 7000 rpm. My engine is a 2.0 with more aggressive cams, a redline that could go as high as 9000 rpm if required and a hopeful output of close to 200 hp at the wheels. So the dimensions will be different. There are some very expensive race headers that might be pretty close, but I don't have the budget for one of those. Besides, this is a fun learning experience.
entry 374 - tags: header | | | January 14, 2008 - 2007 Targa on television.
The 2007 Targa Newfoundland will be aired at 9 pm (local time) on Sunday, January 26th by Global. Check your local listings, as they say. Those who live in the US will have to wait until there's a lull in Nascar coverage on Speed TV, time and date to be announced. Of course, with a bit of creativity, I expect you could find it on the internet...
entry 375 | | | 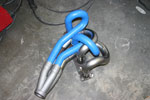 | January 16, 2008 - The #3 runner is together after a bit of a fight.
This freed up enough of the "lego" to let me prototype the last two tubes. Now, how easy will it be to turn this into metal?
entry 376 - tags: header | | | 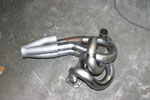 | January 16, 2008 - The #2 runner took me most of the day to build.
I brought a belt sander home which helped a whole lot in making all the of tube ends square and flat - or it did, after I adjusted the platform to be at a right angle to the belt! A belt sander should really be considered a required tool for this sort of work. My boss did give me an odd look when I told him I wanted to borrow it, though. I should bring it back to work tomorrow, so I've been killing myself to get this done.
entry 377 - tags: header | | |  | January 16, 2008 - After a long day, the header's almost complete.
I just have to finish one part of the #1 runner, and that's just a matter of getting the motivation back up again after dinner. I stuck it on the engine just to make myself feel better about the amount of work I've done today.
The metal versions of the tubes weren't as cooperative as the plastic. Why? I think the biggest problem was that I didn't have any way to ensure that I was really cutting the tubes off perpendicularly. The belt sander helped on the straight sections, but in the middle of a curve it was mostly eyeball action. Icengineworks does sell a nice tool for this, but it's not cheap. The fact that I was using their 1.675 tool to work on 1.75" tubes might not have helped, I'm still trying to figure out if that's true or not. The biggest change I had to make was that little short straight section in the #2 runner.
A real challenge still awaits, though. I'm going to TIG weld this together. Not that I know how, of course! I'll be working with Bill at Flyin' Miata for that. I can MIG it, but it will look much better with the TIG. That's not the challenge though. It's going to have to be assembled and welded in a very particular order so I don't end up with inaccessible seams. It's going to have to come apart, that much is fairly obvious. A bit of thinking should prevent me from getting painted into a corner, so to speak. Hopefully.
entry 378 - tags: header | | | January 16, 2008 - The date for the California Rally School has been released.
It's on February 9th. Yikes. Now I have to figure out just what schools Janel and I need to take to become reasonably competent and eligible to run. The requirements aren't clear cut.
I may have mentioned this before, but I do have the course book from the California school here thanks to my coworker Jeremy. It's the navigation part that's important. How to drive on dirt will not be a required skill at the Targa.
entry 379 - tags: skills | | | January 16, 2008 - A new toy on the site.
You'll notice that some of the entries now have tags associated with them. For example, any that involve building the header have a "header" tag. Click on that and you'll get a listing of all the header posts. It should be useful if you want to follow the evolution of a particular aspect of the build.
At the moment, only the header posts have tags on them. I'll go back through the rest of the site and add in more. Just like the Targa Miata itself, this website is completely homebuilt. It's part of the fun, right?
entry 380 - tags: announcements | | | 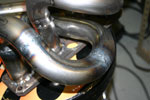 | January 19, 2008 - Time to weld the header together.
And learn how to TIG weld. Might as well pick something simple as a first project, right?
As I've mentioned before, the order of welding on this critter is going to be crucial. Luckily, the entire #4 runner can be welded together without causing problems for any others, which means I can use it to locate the collector. But since it was also the first runner I put together (without the help of a belt sander), the fitment of the tubes wasn't perfect. So I used the #3 runner to locate the collector, then reworked #4 to have a perfect fit. Naturally, this took a little time.
Then it was time to start working on my welding. It took surprisingly little time to come up to speed, although nobody's going to mistake my work for that of a professional. No matter, as long as it's airtight and strong I'll be happy.
Once the #4 runner was all welded up, I did a test fit of the header on the car. Whoops. The collector shifted, and my 1/4" of clearance to the block turned into about 1/4" of interference. That's not going to work. So the next step will be figuring out how to fix that. It'll involve at least one cut through the #4 runner along with a rotation, but the trick will be finding the magic place to do that without messing up the other three tubes. More fun to come, I'm sure.
In other news, Janel and I have signed up for the California Rally Series school in three weeks. We'll learn how to deal with the really tough part of rallying - the driver/codriver teamwork - and it'll help us get the necessary licenses for the race. Plus we get to spend a day in Las Vegas on the way!
entry 381 - tags: skills, header | | | January 21, 2008 - A single cut and twist on one of the tubes solved the interference problem with the collector.
Now, time to build the next runner. After some more grinding and massaging to make it fit with the final collector location, I welded it together. And almost screwed up in a big way!
After building the #3 runner, I tack-welded it to the flange - and was smart enough to test-fit the #2. Whoops! While welding the #3 runner, I removed a short spacer that I'd inserted. You can see it in the background of the last picture. I thought it had been put there to make the tube fit a bit better and my slightly reworked setup just improved the fit. But I'd forgotten it was also there to give enough room for the #2 tube to pass underneath! Also, if I kept going in the current order, I'd never be able to weld one of the #2 seams all the way around. So off came the tack weld and now I can assemble #2 without causing problems. That was close.
entry 382 - tags: header | | | January 21, 2008 - Welding welding welding.
Wow, there are a lot of seams in these pipes. And I'm going to have to add one more. It turns out there's no way I can attach #2 to the flange at the normal joint. So I'm going to have to cut it at a more convenient location so I can weld it back together again. The header's looking a little piecemeal up close, but from a distance it looks awesome. Lets hope it doesn't crack!
entry 383 - tags: header | | |  | January 22, 2008 - More welding.
And it's at the tricky stage now. In the picture I'm in the middle of welding the #3 runner to the flange, while the #2 runner is wrapped around it and held out of the way.
I have now finished all of the welds except one. But it's causing a problem. Not in terms of access, but a problem I didn't see coming. One of the tubes is stuck in the collector. Okay, that's not terribly serious. But I need to move it out about 1/8" so everything lines up perfectly. Without that I'm going to have to do some really ugly sectioning to make this work. I don't want to.
My TIG welding is definitely better, but conditions are getting more and more difficult as I go on so it's difficult to say just how well I'm doing. When I have nice access and a good joint, I can lay down a pretty bead. Most of them, however, are not.
entry 384 - tags: header | | | 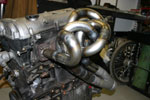 | January 24, 2008 - And voila!
The finished item. Well, not really finished. I still have to put the tubing on between the collector and the rest of the exhaust and the flange needs to be sanded flat. But the hard part is done.
The stuck tube was freed by the application of lots of heat, a prybar, a hammer, a pair of pliers and two people. Thanks to Bill at Flyin' Miata for helping me out there. Once I could move it, I lined up the last seam and prepared to do the prettiest weld of them all. After all, this is the seam right on the top of the front tube, the most visible place. I carefully set everything up, went to weld...and BLAM! Blew a 1/4" hole in the tube. I'd forgotten to turn on the gas. So I called myself a few names, turned the gas on and filled the hole. So there's a big ugly goober weld there, nicely visible in this shot. Sigh.
entry 385 - tags: header | | | 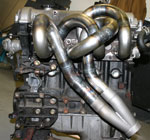 | January 24, 2008 - A side view of the finished setup.
This is going to be a little more difficult to see once it's all installed, of course. You can see on the lower welds on the #1 runner that I can actually lay down a decent bead sometimes. Most of the big goobers come from trying to hide the MIG tack welds. In hindsight, I should have ground them down once there was a bit of TIG bead. Why didn't I tack weld with the TIG? Because I can MIG with one hand and hold the pipes in place with the other.
entry 386 - tags: header | | | 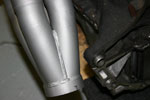 | January 24, 2008 - The clearance between the engine block and the collector.
It's nicely placed in there.
I've been trying to figure out how to finish the header. A coworker suggested ceramic coating and that would be ideal, but I'm not sure it's in the budget. I'll probably end up with high-temperature paint instead - at least until I know that 1) the header works and 2) it's not full of leaks.
entry 387 - tags: header | | | January 26, 2008 - There's a discussion of the header on the German MX-5 forum.
It's quite a long one and they bring up some good points - although I suspect it would be easier to read in German than through online translation engines! Some of the comments are ones I expected, particularly those about the welding quality. There were also questions about my choice to build such a convoluted design instead of a more traditional one with the collector down by the bellhousing, and how to prevent cracking. Since it's possible that others will be thinking along the same lines, here's what I replied to them. It provides a bit of a summation to the project so far:
I know some of the welding is ugly. I'm learning how to TIG weld on
this project. It was not easy. In some cases, I tried to hide my tack
welds (the little ones you make to hold everything in place) by
melting them down and spreading the material around. This makes the
weld look ugly, but it will look nicer when it's painted.
The tube length is chosen on musical principles. Basically, the high
pressure pulses from each cylinder will travel down the tube and
reflect back. At the right engine speed, this means you can get a low
pressure right on the exhaust valve which increases the suction and
makes more power. The tube length is determined by the cam profile and
desired engine speed. Tube diameter is a different question, although
you can cheat a bit and use a larger diameter and a slightly shorter
length for the same effect.
The Racing Beat header is surprising in a couple of ways. The tube
lengths are not all the same, which is a trick sometimes used to
spread the power band around a bit. But the short length is what's
odd. The header shouldn't work until it's up near 9000 rpm, and it
doesn't seem to improve as the engine spins faster. There may be some
secondary resonances that they're using. I did use larger diameter
tubing than the Racing Beat, but I didn't go to an extreme size. The
long tubes should give me more power in the medium to high engine
range, which is where I want it. They are almost all exactly the same
length.
The Boig headers don't fit well inside the car. They hit things, they
leak, they rattle and they bang around. I used one on my 1990 for a
short period of time. Even the Racing Beat has a dent in one of the
tubes to clear the steering column. So I decided to move my collector
high up to avoid the clearance problems. This is something that has
been used on other E Production race cars.
The english term for "glow in" is probably "heat treat" or "heat
cycle". I'll see how I can do that. I am concerned about longevity as
well.
But the biggest thing to remember is that I did this to learn. It was
ambitious, but now I'll know if it's better than the Racing Beat. I
have some room to adjust the length of the header (another advantage
of my collector location) so I can do some tuning if that helps. I've
learned a lot of about TIG welding. I don't present this as a lesson
on how to make a header, I'm giving people the chance to look over my
shoulder as I learn. I'll make mistakes. And I'll learn from them.
entry 388 - tags: header | | | 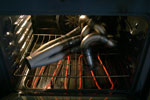 | January 26, 2008 - There was some concern on the German forum about the potential for cracking in the header - and rightfully so.
In an effort to avoid this, I'm heating the header up to 500F for a couple of hours, then I'll let it slowly cool down to room temperature. This should relieve any stresses in the tubing. Will it work? We'll see.
Yes, that's the kitchen stove. Now that Janel's the codriver for the car, she has less cause to complain. She was not overjoyed when I wanted to put car parts in the oven though. I did degrease it first!
entry 389 - tags: header | | |
|

 THE DIARY