| MIATA BUILD |
|
|
 | |
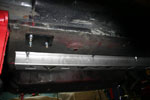
 | February 4, 2007 - About 3 minutes worth of work was required to bolt in the bar once all the welding was done.
It's a lot easier to install a cage in a completely stripped car than a street Miata, that's for sure! The quality of the welding by Hard Dog Fabrication had us all in awe.
entry 37 - tags: safety |
| |
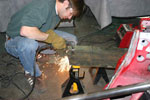 | February 4, 2007 - Brandon Fitch of Flyin' Miata was also on hand to help out with the cage construction.
He's cutting out some gussets to allow us to tie the cage to the windshield frame for maximum stiffness. Plasma cutters are fun!
entry 38 - tags: safety, stiffness |
| |
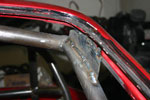 | February 4, 2007 - One of the gussets in place.
Before these were welded in, the windshield frame could be moved slightly independently of the cage. Now, there's no chance.
entry 39 - tags: safety, stiffness |
| |
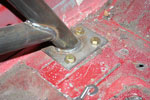
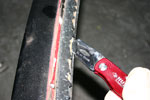
 | February 4, 2007 - The frame rail reinforcements were bolted in.
You can also see the backing plate for the cage. Between the gusseted cage, the seam welding and these braces the Miata is solid as a rock. The chassis of the car is now ready for paint.
entry 40 - tags: stiffness |
| |
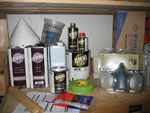 | February 6, 2007 - Mmmm, painting toys.
Now that the chassis is prepared (and most of the body panels are close), it's time to turn my attention to making the car look like the cool pictures. And this means it's time to learn how to paint.
Luckily, the panels already have decent factory paint with no bodywork so the preparation is easy - just some sanding to scuff the surface. And the fact that there's nothing to mask makes it even easier. That's good, I'll likely need all the help we can get.
In other news, we've found out that while we have to run inner door panels, we don't have to run factory panels. We might still do that as the factory parts are pretty light - but the ones from our donor cars are pretty badly damaged.
entry 41 - tags: paint |
| |
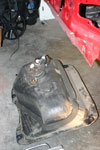 | February 10, 2007 - The fuel tank was the only thing left in the car that could be removed.
I was going to leave it in for the painting, but at this point it's very simple to remove and I don't have to worry about spraying the rubber hoses in the trunk anymore!
entry 42 |
| |
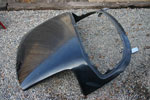 | February 10, 2007 - We've planned on running a hardtop right from the beginning.
While it would be fun to run as a convertible, we know what the weather in Newfoundland can be like in September! We'd want a top of some sort, and a hardtop with a Lexan rear window is lighter than a soft top. It's also more aerodynamic.
So here it is, our hardtop. It's a little hammered, with chunks missing from the paint and a shattered rear window. As part of a hardtop shuffle, I'm going to end up painting a white hardtop blue and a black hardtop white. It doesn't make sense until you see the pristine, perfect white hardtop beside our damaged black one! The white hardtop is going on a street car instead.
entry 43 |
| |
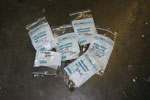 | February 10, 2007 - When you're in a major project like this, do yourself a favour.
Put little parts in bags and label them. Even if you know the car extremely well - I'd like to think I fall into that category - it makes life much easier.
entry 44 - tags: tips |
| |
 | February 10, 2007 - It's time to start working on the paint job.
First step, make sure the car is clean. It's amazing how many little crevices there are in a modern car. After all, it's essentially fabricated out of sheet steel that's been folded and welded together in a very complex shape. Just how complex becomes clear as you try to get every little corner clean...
entry 45 - tags: paint |
| |
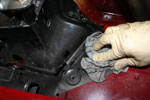
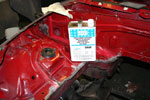 | February 10, 2007 - Now that the body is clean, it's time to go over it again with wax and grease remover.
Despite the careful cleaning, an extraordinary amount of grime comes off the car.
By the way, I'm learning as I go with this painting gig. If there are any experienced painters out there who see me doing something wrong, don't hesitate to offer advice!
entry 46 - tags: paint |
| |
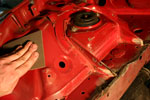 | February 10, 2007 - The new paint won't stick to nice shiny baked-on factory paint - which is what we have here - so it's time to scuff it up.
On the interior paint, we're using scotchbrite pads. For the exterior, it's 600 grit sandpaper.
entry 47 - tags: paint |
| |
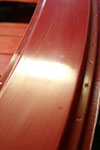 | February 10, 2007 - The paint's been scuffed.
Now all I have to do is the final cleaning (again!).
entry 48 - tags: paint |
| |
February 10, 2007 - I've added a guestbook to the site.
It's always good to hear from other people who are watching the race effort. So if you have a question, a comment, a warning or just want to say hi, have a look.
entry 49 - tags: announcements |
| |
 | February 11, 2007 - Before the hardtop can be used, it needs to be prepped.
Step one is to remove the remains of the rear window. It's possible to do this without breaking the window if you're careful. If you're dealing with a broken window like I did, eye and hand protection is a must!
entry 50 |
| |
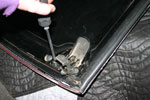 | February 11, 2007 - We'll bolt the hardtop on.
This means the very heavy latches need to be removed. These are held in with some industrial threadlocker. You have to be very careful not to let the screwdriver slip or you can easily round out the screw heads. A previous owner did just that on the screw closest to the camera. Some careful screwdriver work and I got it out - I've learned some good lessons about recalcitrant and damaged fasteners from my old Land Rover.
entry 51 - tags: weight loss |
| |
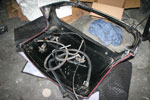 | February 11, 2007 - Who would have thought there were so many parts in a hardtop?
By the time all the latches, weatherstripping, gaskets and brackets are removed, the hardtop is significantly lighter.
entry 52 |
| |
February 12, 2007 - The guestbook actually works now.
Whoops. Sorry to anyone who tried to sign it and wasn't able to - it's working now. Sign or read it.
entry 53 - tags: announcements |
| |
February 13, 2007 - Those with sharp eyes will notice some navigation changes to the site.
You can now read the updates in reverse chronological order - in other words, with the newest updates at the top. Click on the link at the top or bottom of the page that reads "Show newest first". The site will remember your preference. Feedback is appreciated!
entry 54 - tags: announcements |
| |
February 13, 2007 - We would like to welcome Corbeau as a sponsor of the Targa Miata team.
Corbeau will be supplying the seats and harnesses for the car. We approached them because we found their seats were the most comfortable of all the ones we've tried - and we've tried quite a few.
The FX1 Pro seat is also a very compact one that will fit well in our small car while providing us the comfort and support we'll need for a full week of racing.
entry 55 - tags: announcements, seats |
| |
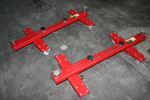 | February 16, 2007 - It's time to paint, so how do you move a chassis with no wheels or suspension to another part of the garage?
With these handy dollies, loaned to us by Flyin' Miata. It's kinda fun driving the car around on these, one person can easily maneuver it around the shop with one hand.
entry 56 |
| |

 THE DIARY